1. Objects
1.1. Learning Outcomes
Students will be able to:
-
Create and use objects
-
Access objects using reference variables
-
Create reference variables using reference types
-
Differentiate between reference variables and primitive variables
-
Differentiate between stack and heap memory
-
Pass objects as arguments to methods and use as return types from methods
1.2. Resources
1.2.1. Text
-
Think Java : How to Think Like a Computer Scientist by Allen Downey and Chris Mayfield
-
Think Java Chapter 10: Objects
-
Programming Fundamentals Chapter 7: Object-Oriented Programming
-
Introduction to Programming Using Java: Chapter 5
1.3. Introduction
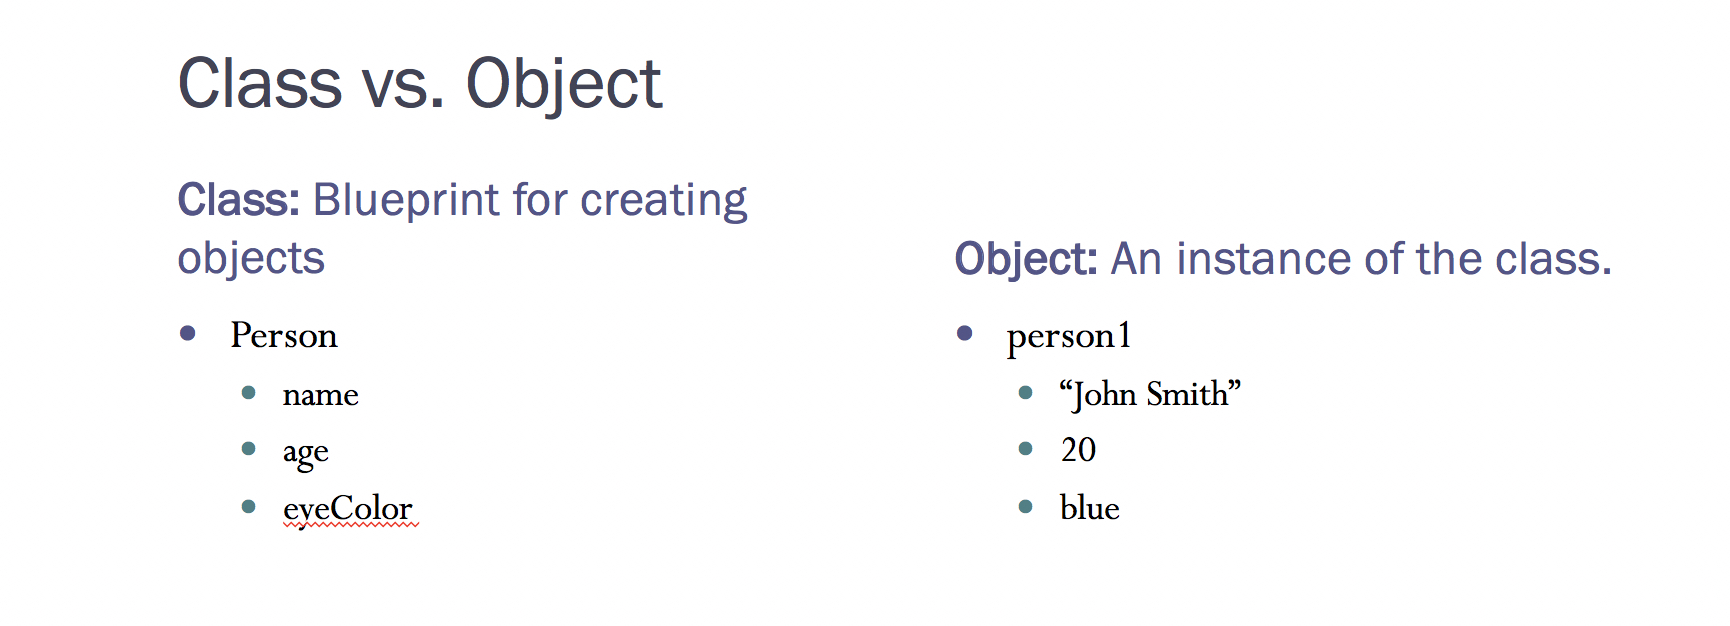
Object-oriented programming languages, such as Java are organized around objects, instead of actions. An object represents an entity in the real world, such as a car, a home, a person, etc. Each object has state, represented by its data fields or attributes and behavior represented by methods. Objects of the same type are defined using a class. A class is considered to be a blueprint for the objects that it represents. Each class can have many objects, also referred to as instances.
For example, consider a Person class. Each person can have data: name, age, eyeColor. Each person can also perform the following actions or behaviors: walk, talk. Class Person defines the state and behavior that is common to all objects that belong to it. Examples of objects or instances of class Person include, specific persons, such as person1, person2, person3, etc. Each of these persons will have a value for name, height and eyeColor. The values can be different for each object. Each of these persons also have the ability to perform actions walk and talk. See the figure.
More details about classes are available here.
Below you can see sample code for creating a class to model a square:
public class Square{
  private double length;

  public Square(){
    length = 0.0;
  }

  public Square(double inLength){
    length = inLength;
  }

  public void setLength(double inLength){
    length = inLength;
  }

  public double getLength(){
    return length;
  }

  public double computeArea(){
    return length*length;
  }

  public double computePerimeter(){
    return 4*length;
  }

  public String toString(){
    String result = "square length: " + length + "\nperimeter: " + computePerimeter() + "\narea: " + computeArea();
    return result;
  }

}
The above code creates a blueprint for all Squares. All objects of class Square will have attribute length. And they all have the ability to perform actions defined by each of the methods. Below is an example of a tester class, used to test the Square class. The tester class will have a main() method and can be used to create objects of class Square. These objects can then perform actions by invoking the methods defined in the business class, Square.
1.4. Creating Objects
public class SquareTester{
  public static void main(String[] args){
    Square square1 = new Square();
    square1.setLength(10.5);
    System.out.println(square1);
  }
}
In the statement: Square square1 = new Square(); an object of class Square is being created. A class is basically a data type defined by a programmer. Instead of a primitive data type (e.g. int, double, boolean, and char), a class is a reference type. It is going to hold a reference to an object. We can think of a reference to an object as the “address” of the object. Through the reference, the Java runtime system - Java Virtual Machine (JVM) – can locate where the object is located in memory.
In the example, square1 is a variable of this reference type and is referred to as a reference variable. The new operator creates a Square object. The address of the object is assigned to the reference variable square1.
1.5. Difference between primitive type and reference type variables
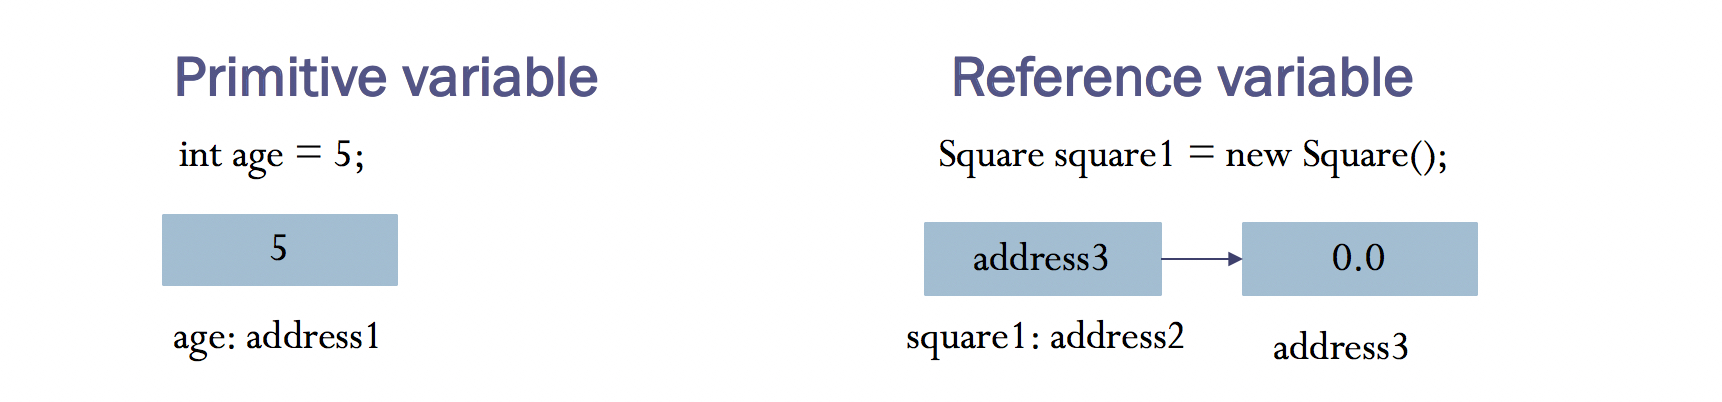
A variable represents a named memory location that stores a value. When we declare a variable, we specify what type of variable it is. Whether a variable is primitive or reference type decides how that variable is stored in the memory. For example, if we write the following statement: int age = 5; then 4 bytes of memory is allocated for age and the value of 5 is stored in it. This memory is referred to as age. Whereas, if we write the following statement:
Square square1 = new Square();
square1 does not directly store the value of a square, as age does. Instead, memory is allocated for object of reference type Square and square1 (reference variable) then references that object. Instead of holding the object itself, square1 holds the information necessary (reference or memory location) to find the object in memory. See image below.
This difference in how memory is allocated for primitive and reference variables impacts assignment statements. For example, if we consider the following statements:
int age1 = 40;
int age2 = 18;
age1 = age2;
then we know that after those three statements execute, age1 loses the original value of 40 and gets the value of 18. The memory allocation before and after looks as shown below.

In this scenario, both variables are at the same memory location as before. Value of age1 has changed. Now consider a similar scenario with objects.
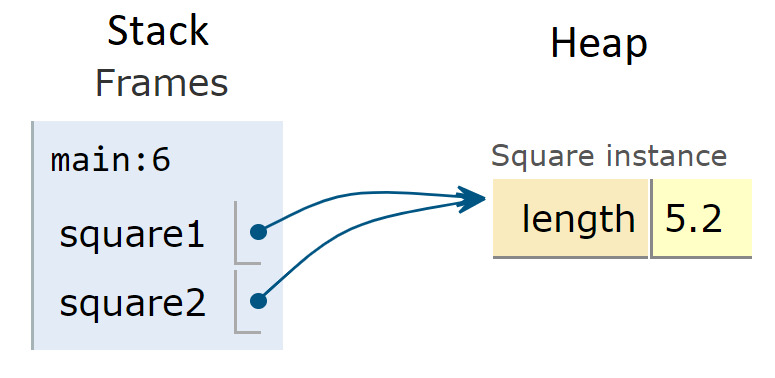
Square square1 = new Square(10.5);
Square square2 = new Square(5.2);
square1 = square2;
Here, square1 and square2 are reference variables that hold a reference to the actual Square objects. So, when we assign one reference variable to another, the references get assigned, not the values. See the image below.
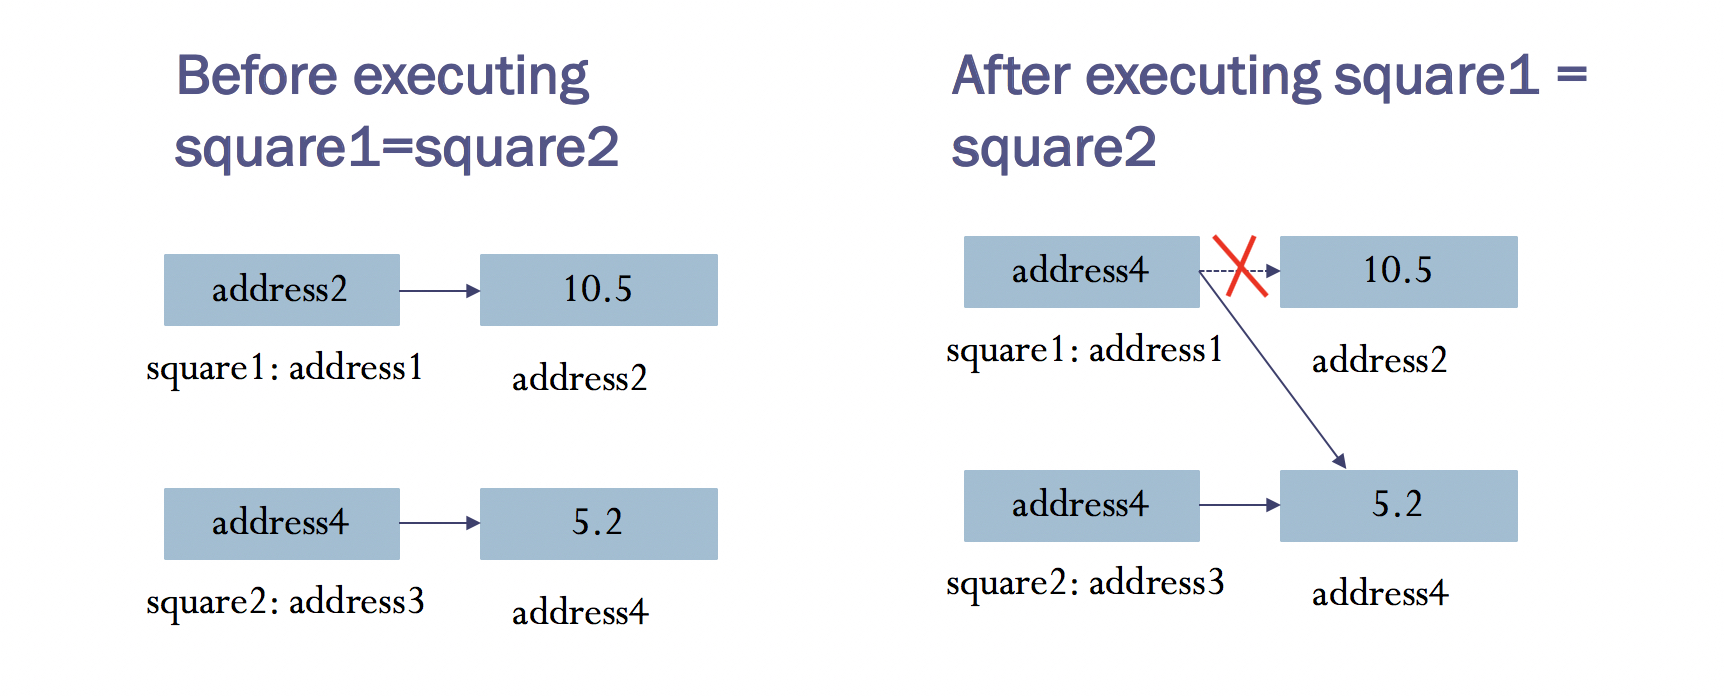
Notice that the length values for each square object remain at their original memory locations. They do not get copied over. The reference of square2 however, gets assigned to reference varaible square1. This means square1 no longer references the object with length 10.5. It now references the object of length 5.2.
1.6. Difference between Stack and Heap Memory
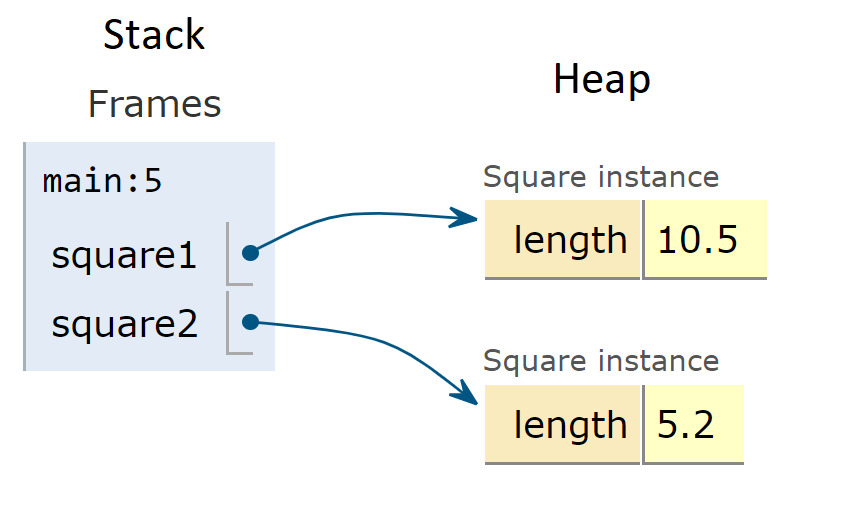
Java Virtual Machine (JVM) divides the memory into two types, the stack and the heap. The stack memory is used to store local variables of primitive type and reference variables. On the other hand, heap stores the actual objects. Stack memory is used for static memory allocation and is accessed in a First In Last Out manner. Every time a method is called, stack memory is allocated to store the primitive and reference variables. When the method finishes execution, its memory is released, control goes back to the calling method and stack memory is now available for other methods. This video demonstrates this idea. Heap memory on the other hand is dynamically allocated at runtime. It stores the objects themselves. So, in the above example, reference variables square1 and square2 would be stored in the stack, whereas the objects that they refer to would be stored on the heap. This video demonstrates how heap memory works.
The memory illustration that includes the stack and heap for the previous example are as follows before and after the assignment statement is executed.
1.7. Passing Objects to Methods and Returning Objects from Methods
Objects can be passed as arguments to methods, similar to primitive type variables. When objects are passed to methods, the references of the objects are passed as shown in this video. Because of the difference between primitive and reference type variables, passing objects/primitive types to methods results in different behavior. Compare the example in the above linked video to the example shown in this video. Notice how when a primitive type variable is passed to a method, the value of variable x in the main() method does not change. Whereas, when an object is passed as an argument to a method, the value of both attributes of object person1 are changed.
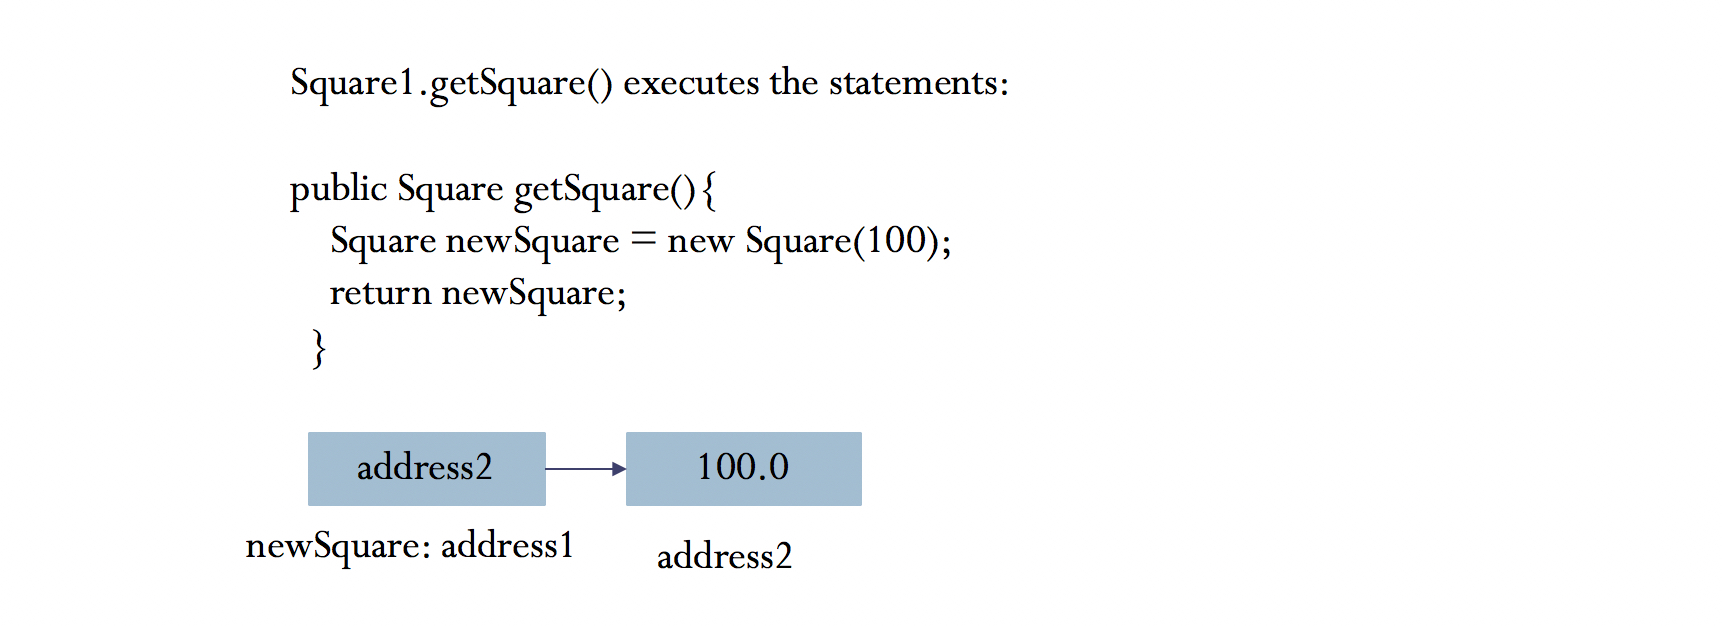
Returning objects from methods, also involves returning the reference of the object. To see an example of this, let’s add a new method to our Square class created above. This method looks as shown below:
public Square getSquare(){
    Square newSquare = new Square(100);
    return newSquare;
  }
This method creates a new object of class Square with length value of 100 and returns this newly created object. Here, it does not actually return a copy of the newly created object, rather it returns the reference of the newly created object. To test this new method, in the tester method, we will invoke the getSquare() method as shown below:
public class SquareTester{
  public static void main(String[] args){
    Square square1 = new Square();
    square1.setLength(10.5);
    System.out.println(square1);

    Square square2 = square1.getSquare();
    System.out.println(square2);
  }
}
The statement Square square2 = square1.getSquare();
invokes method getSquare() on reference variable square1. This creates a new object with length 100, as defined in the getSquare() method and a reference to that new object is returned. This is depicted in the image below:
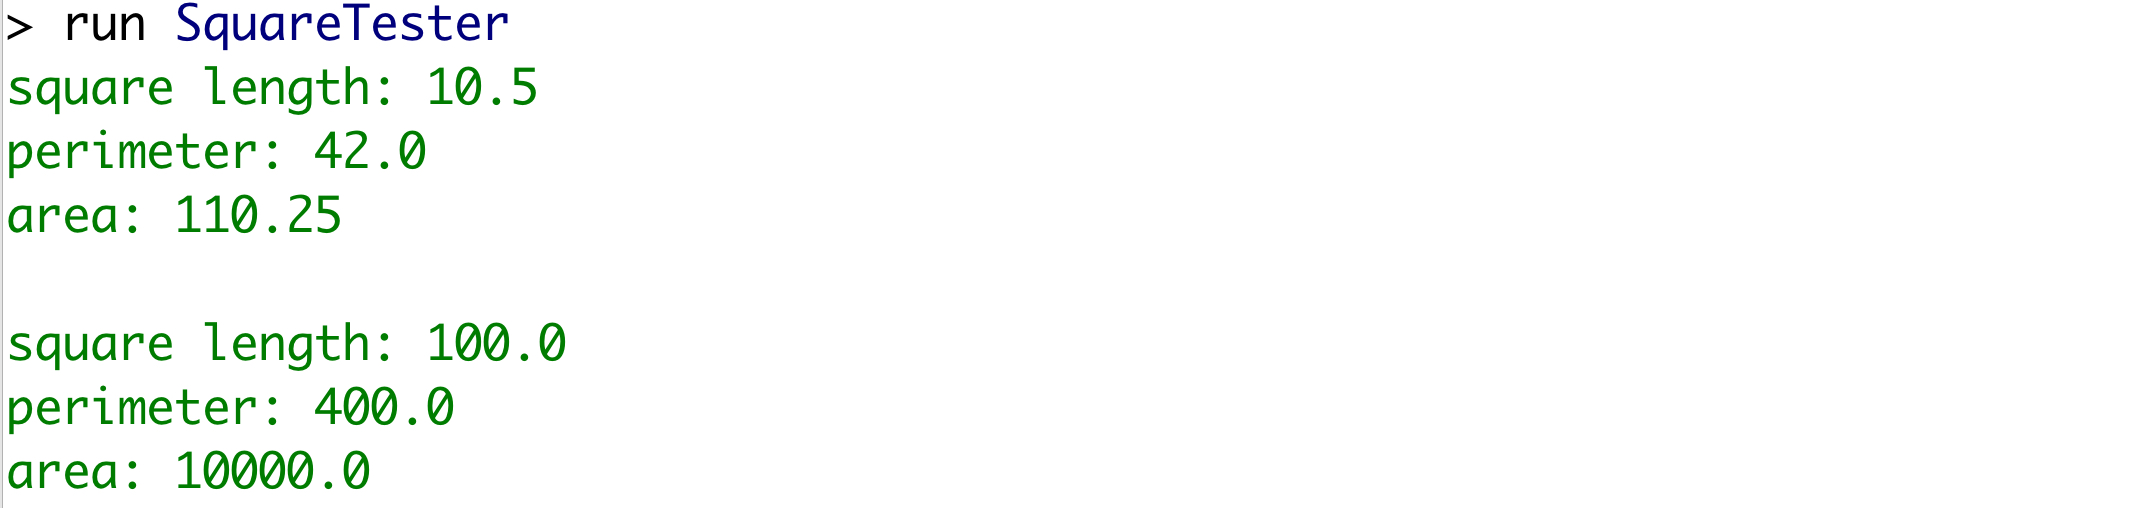
This returned object, or rather reference is then assigned to square2. The result of that is shown below.

So, when square2 is printed, the results should be calculated accoridng to 100 as the length of the square. These results of both square1 and square2 are shown below.
1.8. Key Terms
Behavior: actions of an object; represented by the methods of an object.
Class: a blueprint that defines an object.
Heap memory: dynamically allocated memory used to store objects.
Object/Instance: represents an entity in the real world and has state and behavior.
Object-oriented programming: a way of organizing code around objects, instead of actions.
Reference: memory address of where the object is located.
Reference type: a class; variable of this type can reference an object of a class.
Reference variable: variable of a class type, which contains a reference to the object of that class.
Stack memory: stores local variables of primitive type and reference variables; memory is accessed in First In Last Out order.
State: represented by data fields or attributes of the object.
1.9. Exercises
1.9.1. Exercise 1
Create Person and PersonTester classes to model a person. Details are as follows:
Tasks: Create business class Person
-
Person should have the following properties (attributes, instance variables, member variables). Pick appropriate data types:
-
name – stores the full name of a person
-
age – stores age of a person in whole years
-
eyeColor – stores the color of a person’s eyes
-
-
Create a no-argument constructor for this class
-
In the constructor for the Person class, use your information to initialize the instance variables
-
-
Create a 3-arg constructor that initializes the instance variables to passed parameters
-
Create getters/accessors for each instance variable
-
Create setters/mutators for each instance variable
-
Override the toString() method to return a clear message providing details of each person.
-
Create instance method talk() that prints a message “Welcome, coders! I am ”, underline should be replaced by the person’s name. It does not need any parameters and does not return any values.
Tasks: Create tester class PersonTester
-
In the main() method, create an object of class Person called person1 using the no-argument constructor.
-
SOP person1 details using toString().
-
Invoke the appropriate setter method to set/change the name of person1 to “Howard Roark”.
-
Invoke the talk() method on person1.
-
Ensure that all of your code is thoroughly commented.
1.9.2. Exercise 2
Create a business class to model a bike. Then create a tester class to test the bike class and create list of bikes. Details are as follows:
Bike Class
-
Create a business class called Bike
-
Bikes should at least have number of wheels, manufacturer and year data. Additional data can be created at the programmer’s discretion.
-
A no-arg constructor with values of 2 for number of wheels to 2, “Schwinn” for manufacturer, and 2014 for year should eb created.
-
Other constructors, getters, setters and toString() method should be created.
BikeTester Class
-
Use the BikeTester class to create object bike1 using no-arg constructor. Print its details after creation.
-
Create object bike2 in the same manner, and use the setter methods to change the instance variable values to those of your choice.
-
Print details of bike2.
-
Create an arraylist of bikes called bikeList.
-
Add bike1 and bike2 to this list
-
SOP bikeList
-
Count the total number of wheels on all bikes in the bikeList and print them
-
Find the year of the oldest bike in the list and print that year.
-
Ensure that all of your code is thoroughly commented.
1.9.3. Exercise 3
Create classes to model and test textbooks. Follow the instructions shown below:
-
Create a business class to model a textbook. Decide what data should be stored for a textbook and create at least three instance variables, two constructors, and appropriate getters, setters and toString() method. Create at least one instance method of your choice.
-
Create a tester class which creates at least two objects of the business class. Invoke various getters, setters and instance method(s) to test the business class.
-
Comment your code thoroughly.
1.10. Issue Tracker/Comments
2. Object-Oriented Programming Design, Class Relationship, and Inheritance
2.1. Learning Outcomes
Students will be able to:
-
Define the relationships among association, aggregation, composition, and inheritance.
-
Define a subclass from a superclass through inheritance.
-
Invoke the superclass' constructors and methods using the super keyword.
-
Override instance methods in the subclass.
-
Distinguish between overriding and overloading.
-
Explore the differences between the procedural paradigm and object-oriented paradigm.
-
Design program using the object-oriented paradigm.
2.2. Resources
2.2.1. Text
-
Think Java : Inheritance by Allen Downey and Chris Mayfield
-
Think Java : Class Relationship by Allen Downey and Chris Mayfield
-
Think Java: Objects of Objects by Allen Downey and Chris Mayfield
2.3. Introduction
From previous chapters and open source textbook, you learned how to define classes for objects. First, the body of a class declares members (fields and methods), instance and static initializers, and constructors. Regarding the scope of a member, it is the entire body of the declaration of the class to which the member belongs. Field, method, member class, member interface (you will learn soon) and constructor declarations may include the access modifiers such as public, protected, private or default.
In this chapter, we will explore object-oriented program design, class relationship and inheritance. You will learn how member of a class includes both declared and inherited members in terms of encapsulation and inheritance. It means that you will learn how the newly declared fields can hide fields declared in a superclass, newly declared class member can hide class or interface members declared in a superclass, and newly declared methods can hide, implement, or override methods declared in a superclass. (source: The Java Language Specification by James Gosling, Bill Joy, Guy Steele, Gilad Brach, Alex Bucklely)
-
Object Oriented Program Design
-
Class Relationship
-
Inheritance
2.4. Object Oriented Program Design
Object oriented programming is associated with the concepts of class, object, inheritance, encapsulation, abstraction, polymorphism. In previous chapter, you learned about classes, and objects. The focus of this chapter is to explore object-oriented programming.
2.4.1. Class Abstraction and Encapsulation
You will learn about Abstraction in next chapter but following description explains about Abstraction in brief to help you understand the Encapsulation in terms of data hiding which is one of principles of object-oriented programming.
-
Abstraction - Abstraction is about the quality of dealing with ideas rather than events. It means that abstraction is about hiding the details and showing the essential components to the user. For example, without knowing about all the mechanics about the car, you can drive a car. Of course, if you are an automotive engineer, then your job is to create the most powerful and high quality vehicle that many people can enjoy driving. You must also know all the details to design software systems, assembly, tooling, evaluate problems, etc. But if you just drive a car, you do not need to know how each component works interactively inside of a car you drive everyday. This concept is about which data or information should be visible and which data or information should be hidden.
Abstraction can be achieved with either abstract classes or interfaces and you will learn more about abstraction in next chapter.
-
Encapsulation - "Class encapsulation and abstraction are two sides of the same coin" (Liang, 2018, Introduction to Java: Programming and Data Structure) It is a process of wrapping code and data together in a single unit. By using the concept of accesser and modifier(e.g getter and setter methods), you can read data or only access data. If you read the Person class, it has two private data: name and countryOfOrigin. By using the getName() and setName() methods, in the Main tester class, you can change the name by calling setName(String name) and access the name by calling getName(). However, there is no setter to modify the county of origin. Only getCountryOfOrigin() method is provided. Therefore, you cannot modify or set the value in the countryOfOrigin data member. Encapsulation is to hide the data, implementation, the class (abstract class or interface you will learn after this chapter), design and instantiation.
public class Person
{
    private String name;
    private String countryOfOrigin = "Germany";

    public String getName()
    {
        return name;
    }
    public void setName(String name)
    {
        this.name = name;
    }

    public String getCountryOfOrigin()
    {
        return countryOfOrigin;
    }
}


public class Main
{
    public static void main(String[] args)
    {
        Person person = new Person();
        person.setName("Ludwig van Beethoven");
        System.out.println(person.getName() + " was a " + person.getCountryOfOrigin() + " composer." );
    }
}
2.5. Class Relationship
To design classes, Association, Aggregation, Composition, and Inheritance are four points we use to discuss the relationships among classes.
2.5.1. Association
"Association is a general binary relationship that describes an activity between two classes. For example, a student taking a course is an association between the Student class and the Course class. And a faculty member teaching a course is an association between Faculty class and the Course class." (Liang. 2018 - Introduction to Java)
Example: * Course, Teacher and Student: One or More students can associate with a single teacher OR One single student can associate with one or more teachers. And both of them can be created and deleted independently. So when a teacher leaves the school, then teacher will be removed from the list and we do not need to delete any students. And when a student leaves the school, any teachers are not leaving. Following example source code is showing how to implement association using the classes of Student, Course, and Teacher. For example, addstudent() method in the Course class and addCourse() method in the Student class shows how the association relationship is implemented.

 class Course
 {
        private String courseName;
        private ArrayList<Student> enrollmentList = new ArrayList<Student>();
        private Teacher teacher;

        public void addStudent(Student student)
        {
                enrollmentList.add(student);
        }

    }

class Student {
        private ArrayList<Course> registeredCourse;
        private String studentName;

        public void addCourse(Course course)
        {
            //
        }

    }

class Teacher
{
        private ArrayList<Course> teachingCourse;
        public void addCourse(Course c)
        {
           //
        }
}
Some of the association relationship can be categorized as either Aggregation or Composition. See This example
2.5.2. Aggregation
This relationship is "has-a" relationship between two objects. It is more specialized relationship of the association relationship. The owner object is called an aggregating object and its class is called aggregating class. Child object or subject object is called aggregated object and its class is called aggregated class.
Examples: Student class and Address class. Student class can have reference of Address class but Address class does not have the reference of Student class. It does not involve owning so address does not need to be tied to a student. An address can exist by itself.
Employee class may have fields id, name, email, phone, etc. And also contains an object named address. Let’s suppose this address has fields city, state, zipcode, etc. In this case, Employee has an address so the relationship is "Employee Has-A address." (See below)
class Employee
{
   int id;
   String name;
   Address address;//Address is a class
}
2.5.3. Composition
This relationship is also has-a relationship when a class has the ownership of another subject class but the subject depends on the owner class. If the existence of the aggregated object is dependent on the aggregating object, then the relationship is composition. Composition is the strongest form of association and aggregation is weaker relationship while Aggregation and Composition are very similar. For example, please take a look at the following programs, Person and Job. The Person has a job instance variable so we can create a Job class. It has "a person has a job" relationship.
public class Person
{
    //composition has-a relationship
    private Job job;

    public Person()
    {
        this.job=new Job();
        job.setSalary(1000L);
    }
    public long getSalary()
    {
        return job.getSalary();
    }
}


public class Job
{
    private String position;
    private long salary;
    private int id;
    public String getRole()
    {
        return position;
    }

    public void setRole(String position)
    {
        this.position = position;
    }

    public long getSalary()
    {
        return salary;
    }

    public void setSalary(long salary)
    {
        this.salary = salary;
    }

    public int getId()
    {
        return id;
    }

    public void setId(int id)
    {
        this.id = id;
    }
}


public class Main
{
    public static void main(String[] args)
    {
        Person john = new Person();
        long salary = john.getSalary();
        System.out.println("John's Salary is " + salary);
    }
}
Thormben Janssen explains about the composition connecting to the real world including benefits with more examples.
2.6. Inheritance
Inheritance is a powerful mechanism that allows you to define new classes from an existing class. The existing class is a more general class, called a superclass. A superclass is also referred to as a parent class or a base class. The Java inheritance allows a Java class to inherit from a single superclass. Only singular inheritance is allowed.
The new classes are specialized cases of the superclass. They are called subclasses of that super class. A subclass automatically inherits all the instance variables methods from its superclass. It may define its own new variables and methods. It may also override any inherited methods. It means that the method has the same method signature in both the superclass and subclass. It means to provide a new implementation for that method in the subclass.
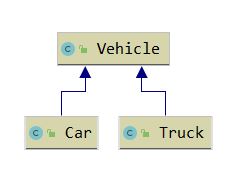
The subclass and its superclass form a is-a relationship. See the diagram of a superclass called Vehicle and two subclasses called Car and Truck, Car is a Vehicle and Truck is a Vehicle. In other words, Car class inherits all accessible data fields and methods from the Vehicle class and the Truck class inherits all accessible data fields and methods from the Vehicle class. In UML, an arrow points from a subclass to its superclass.
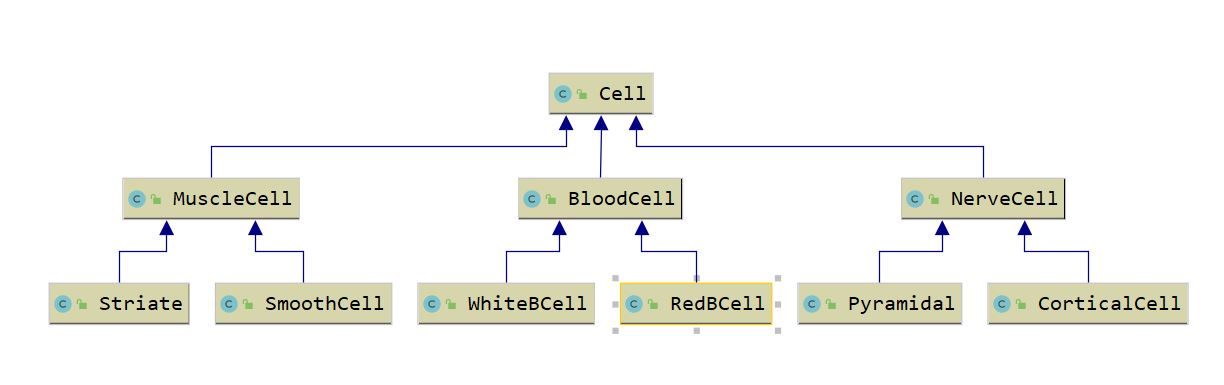
According to David A. Taylor in his book Object-Oriented Technology, he mentioned that the object-oriented approach is more natual. For example,"the basic building block out of which all living things are composed is the cell. Cells are organic package that, like objects, combine related information and behavior. Most of the information is contained in protein molecules within the nucleus of the cell. The behavior, which may range from energy conversion to movement, is carried out by structure outside the nucleus.” He also explained about the hierarchy of cell types as you see the inheriting cell diagram. "The cell is truly universal building block. All cells share a common structure and operate according to the same basic principles. Within this basic structure, plant cells have a hard outer wall to make them ridgid, blood cells are mobile and specialized to transport gases, muscle cells are able to distort their shape to perform mechanical work."
2.6.1. Overloading vs. Overriding
-
Overloading a method is to define multiple methods with the same name but different signatures.
public class Addition
{

    public int add(int a, int b)
    {
        return a + b;
    }

    public int add(int a, int b, int c)
    {
        return a + b + c;
    }

}-
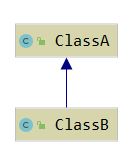
Overriding methods is to provide a new implementation for a method in the subclass (See example methods from ClassB and NamePoint).
In following diagram, the ClassA is the superclass and ClassB is the subclass.
/**
* Class: ClassA
*/
public class ClassA {
protected int m;
public String toString()
{
return new String("(" + m + ")");
}
}
/**
* Class: ClassB
*/
public class ClassB extends ClassA
{
private int n;
public String toString()
{
return new String ("(" + m + "," + n + ")");
}
}
/**
* Class: Main
*/
public class Main
{
public static void main(String[] args)
{
ClassA a = new ClassA();
System.out.println("a = " + a);
ClassB b = new ClassB();
System.out.println("b = " + b);
}
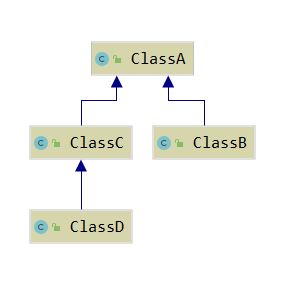
}In following diagram, the ClassA is the superclass for ClassC and ClassB and ClassC is the superclass for ClassD.
Let’s take a look at The Point class and NamedPoint class. The Point class has two private instance variables x and y and it is the superclass of a subclass NamedPoint class. As a result of inheritance, the NamedPoint class instance/object will have three fields: x and y inherited from the superclass Point and the String instance variable name which is defined in the NamedPoint class.
The NamedPoint class has a total five regular methods. It inherits the equals(), getX(), and getY() methods from the superclass Point. It creates a new method getName() and overrides an existing method toString(). Besides the five regular methods, the NamedPoint class also contains a constructor with three parameters: x, y, and name. The constructor of the NamedPoint invokes the constructor of the Point superclass using the keyword super by passing x and y. Inheritance applies to class field x and y and methods getX(), getY(), equals(), but not constructors. It is because the constructor must always have the same name as its class. Thus, subclasses usually explicitly define their own constructors.
public class Point
{
    //objects represent lattice points in the cartesian plane
    //object are immutable

    protected double x, y; // the point's coordinates. In this program, we used protected.

    public Point(double x, double y){
        this.x = x;
        this.y = y;
    }

    public boolean equals(Point p)
    {
        return (x == p.x && y == p.y);
    }

    public double getX()
    {
        return x;
    }

    public double getY()
    {
        return y;

    }

    public String toString()
    {
        return new String("(" + getX() + ", " + getY() + ")"); //why getX() and getY()?
    }
}


/**
 * this class to hold named location's information for data point (coordinates of x and y).
 */
public class NamedPoint extends Point
{
    final private String name;

    public NamedPoint(double x, double y, String name)
    {
        super(x, y);
        //super keyword is to invoke superclass' constructor. This statement super(x,y) invokes the Point class constructor
        //that matches the arguments and it must be the first statement of the subclass' constructor as you see here.
        //this is the way to explicitly invoke a superclass construtor.
        this.name = name;
    }

    public String getName()
    {
        return name;
    }

    @Override
    public String toString()
    {
        return name + "(" + x + ", " + y + ")"; //why x and y?
    }
}

public class Main
{
    public static void main(String[] args)
    {
        NamedPoint p = new NamedPoint(0,0, "Origin (O)");
        System.out.println("p: " + p);

        System.out.println("P.getName(): " + p.getName());
        System.out.println("p.getX(): " + p.getX()); //getX() method is inherited from the Point superclass.

        NamedPoint q = new NamedPoint(1,10,"A");
        System.out.println("q: " + q);

        System.out.println("q.equals(p): " + q.equals(p));
        //q is able to invoke the equals() method that it inherited from the superclass.
    }
}
2.6.2. Accessibility Issue
| Modifier | Class | Package | Subclass | World |
|---|---|---|---|---|
public |
Y |
Y |
Y |
Y |
protected |
Y |
Y |
Y |
N |
no modifier or default |
Y |
Y |
N |
N |
private |
Y |
N |
N |
N |
If the instance variables in the super class are private, the subclass cannot directly access these variables, even though they are inherited. To retrieve/update the values of these variables, the getter/setter method of the super class will need to be used. The following is an example.
 // Testing if a subclass can access the private members of a superclass

class Vehicle
{
    private String licensePlate;

    public String getLicensePlate()
    {
        return licensePlate;
    }

    public void setLicensePlate(String licensePlate)
    {
        this.licensePlate = licensePlate;
    }
}

class Car extends Vehicle
{

   private int numberOfSeat;
   private int manufacturedYear;

    public int getNumberOfSeat()
    {
        return numberOfSeat;
    }

    public void setNumberOfSeat(int numberOfSeat)
    {
        this.numberOfSeat = numberOfSeat;
    }

    public int getManufacturedYear()
    {
        return manufacturedYear;
    }

    public void setManufacturedYear(int manufacturedYear)
    {
        this.manufacturedYear = manufacturedYear;
    }

    @Override
    public String toString()
    {
        return "Car\n" +
                "Number of Seats: " + numberOfSeat + '\n' +
                "Manufactured Year: " + manufacturedYear;
    }
}

public class Main
{
    public static void main(String[] args)
    {

        Vehicle vehicle = new Vehicle();
        Car car = new Car();

        //no error to set value because setLicensePlate() is public method of the Vehicle superclass
        //but you cannot modify the value of licensePlate directly from the superclass - Vehicle
        vehicle.setLicensePlate("UIO678");

        car.setNumberOfSeat(7);  //no error to setNumberOfSeat because setNumberOfSeat() is a public method of the Car class
        car.setManufacturedYear(2020);//no error to setManufacturedYear because setManufacturedYear() is a public method of the Car class

        System.out.println(car.toString());
    }
}
2.7. Key Terms
Access specifiers: private, default, protected, and public.
Association: a general binary relation between two separate classes. For example, a student taking a course is an association between the Student class and the Course class.
Aggregation: an association when one object uses another object.
Composition: an association when one object owns other class and other class cannot meaningfully exist. Composition is stronger than aggregation.
Default access specifier (no modifier): accessible within the same package.
Inheritance: a mechanism to define new classes from existing classes. In java, classes can inherit the properties and methods of superclass.
private access specifier: acceessible within the class where defined.
protected access specifier: accessible to class
public access specifier: accessible from subclasses and members of the same package.
Overriding method:When a method in a subclass has the same name, same parameters or signature, and same return types(or sub-type) as a method in its superclass.
Overloading method: a class is allowed to have more than one method having the same name as long as their parameter lists are different.
Superclass (a parent class or a base class): a general class which a method(s) to a subclass. Or the class being inherited from.
Subclass (child): The derived class that is derived from superclass.
2.8. Exercises
2.8.1. Exercise 1
File allocation: Write a program named Storage and a Tester Program to allocate files based on the file size and maximum capacity of the storage. A storage has multiple blocks to store files. Each block has maximum capacity to store files and maximum capacity will be given by the user. Please use the first fit algorithm that places each file into the first block where it would fit. Your program should prompt the user to enter the maximum size of the directory A (e.g. What is the maximum size of the directory A?"), also prompt the user to enter the number of files to store, and then prompt the user to enter each file size in KB. The program will display the total number of blocks needed to store files and file size. Use the starter code provided as follows and here is the sample run:
What is the maximum size of the directory A?
50
How many files do you have to store in directory A
10
Enter each file size in KB
4 5 10 2 7 9 5 23 11 8
Block 1 can store following size file(s)4 5 10 2 7 9 5 8  (in KB)
Block 2 can store following size file(s)23 11  (in KB)
Starter Code:

import java.util.ArrayList;
import java.util.Scanner;
public class Main
{
    public static void main(String[] args)
    {
        Scanner input = new Scanner(System.in);
        //complete here
        }
    }


    public static ArrayList<Storage> firstFit(int[] fileSizeList, int maxFileSize)
    {

        //Complete here
    }

}


import java.util.ArrayList;

public class Storage
{
    private ArrayList<Integer> file = new ArrayList<>();
    private int maxFileSize = 0;
    private int totalSize = 0;

    public Storage(int maxFileSize)
    {
      //complete here
    }

    /**
     * method addFile
     * @param fileSize
     * @return boolean
     * description: this method will add file as long as total size
     * includng a new file size you want to add
     * is not larger than the maximum file size
     */
    public boolean addFile(int fileSize)
    {
         //complete here
    }

    public int getNumberOfFiles()
    {
        return file.size();
    }

    @Override
    public String toString()
    {
         //complete here
    }
}
2.8.2. Exercise 2
Your task is to develop a program to display recipes of different types of bread(e.g. sourdough bread, muffins, pastries, etc)
Directions are as follows.
▪Create Bread superclass that has default constructor with general ingredients and recipe.
It also has a constructor with all the parameters. Bread also comes with getter, setter, and toString methods.
Besides those methods, the Bread superclass has the bake method to change the state of bread from "not baked" to "baked",
unless it is already "baked."
And also has getIngredients method.
This method returns a String of all the ingredients of the instance. And you can add other methods as you want.
There are five subclasses of Bread class. Each of them will have unique properties with unique ingredients.

–Instance variables: flour, water, salt, sugar, baking powder, yeast, breadName, state, recipe.
–Default constructor
–Constructor with all parameters.
–Getters, setters, toString method.
–bake, getIngredients, and other methods you want to include.
▪Create SourdoughBread subclass
–Instance variables: you will need to create unique instance variables for sourdough bread.
–Constructors, getters, setters, recipe method  to describe how to, and toString or you can add other methods you want to include.

▪Create Pastry subclass
–Instance variables: you will need to create unique instance variables for pastry.
–Constructors, getters, setters, recipe method  to describe how to, and toString or you can add other methods you want to include
▪Create three more different type of bread subclasses (e.g. SourdoughBread- see follow sample)
–Constructors, getters, setters, recipe method  to describe how to, and toString or you can add other methods you want to include
▪Main class.  This class has an instance of Bread and its subclasses. This program will display recipes of all classes and methods.
▪ReadMe.txt – this file will explain about your program in details.
A part of the sample run is as follows:

SourdoughBread class testing

Ingredients of Sourdough Bread are:
5.00 cups of flour
1.50 cups of water
2.50 tsps of salt
1.00 tsp of yeast
1.00 cup of ripe sourdough starter

A recipe of Sourdough Bread:
1. Mix flour, water, salt, baking powder, yeast, and ripe sourdough starter.
2. Make the dough
3. Bulk Rise
4. Stretch and fold the dough
5. Cut and shape the dough
6. Second rise
6. Preheat the oven to 450°F towards the tail end of the second rise.
7. Spray the laof with luke warm water.
8. Bake the bread at 400°F for 20 minutes, until deep golden brown.
9. Remove the bread from the oven.
10.Let the bread cool until good to eat.
Can't bake, Sourdough Bread is already baked.
The Sourdough Bread is baked now.
2.9. References
Liang, D. (2018). Introduction to Java: Programming and Data Structures (11th ed.). Pearson Taylor, D.A. (1981). Object-Oriented Technology: A Manager’s Guide.Servio
2.10. Issue Tracker/Comments
3. Polymorphism / Abstract Classes / Interfaces
3.1. Learning Outcomes
Students will be able to:
-
Describe what is polymorphism
-
Use polymorphism to store objects of different classes in one data structure (e.g. an array) and process them in a loop
-
Describe what is abstract method and abstract class
-
Describe the advantages of including an abstract method in a super class even if it cannot be implemented
-
Identify what method in a super class is a good candidate to be an abstract method
-
Create an abstract class and its subclasses
-
Describe what is an interface
-
Create an interface
-
Implement an interface
-
Implement an interface at the same time extending a super class
-
Compare and contract an interface and an abstract class
-
Describe and utilize interface inheritance
3.2. Resources
3.2.1. Text
-
Think Java by Allen Downey and Chris Mayfield: Chapter 16 (Section 3) - Abstract Class
-
Introduction to Programming Using Java - Eighth Edition by David J. Eck: Chapter 5 (Section 5 and 7) - Polymorphism
-
Java, Java, Java: Object-Oriented Problem Solving by Ralph Morelli and Ralph Walde: Chapter 8 - Inheritance and Polymorphism
-
Oracle Java Tutorial Lessons:
-
W3School Java Tutorials:
3.3. Introduction
From the previous chapter, you have learned that inheritance is a very powerful tool that a programmer can use to create a child class from a parent class. Instead of defining a class from scratch, the child class will inherit all the attributes and methods from the parent class. The child class can declare its own additional attributes and methods and override the definition for an inherited method. Through inheritance, we can build a hierarchy of related classes.
In this chapter, we will learn several concepts, mainly through examples. Before we start our journey in this chapter, here is a brief overview of these concepts.
Because of inheritance, a reference variable could refer to objects that belong to any of its subclasses. This is called polymorphism. Polymorphism can be utilized to make programming more convenient. For example, you are programming a computer game that contains various characters. The characters belong to several different classes and these classes have a common super class. Instead of using different arrays, each for characters belonging to a specific class, polymorphism will allow you to store all the characters in one array. You can also use a loop to process all these characters (such as moving each character to its next location) instead of using separate loops for each type of characters. In addition, one method can be used to process characters belonging to different classes. This helps avoid defining multiple methods that do the same things with the only difference being the data type of one or more parameters (method overloading).
Abstract class is a way to define a super class that leaves some methods undefined. These methods are called abstract methods. These methods contain just method headers and have no method bodies. They will need to be overridden in a concrete (non-abstract) subclass. For example, if we write a game program which contains a super class Character and subclasses Dog, Cat, and Bird, we may decide that Dog, Cat and Bird objects should be able to execute a walk method, which calculates how to animate a character when it walks. It is possible to implement the method in all the subclasses using the knowledge we have regarding how dogs, cats and birds walk. However, for the super class Character, there is really no meaningful implementation for the walk method. We could make Character an abstract class and mark the walk method abstract. This eliminates unnecessary code in the super class and at the same time guarantee that all the non-abstract subclasses implement the method.
Interface is another mechanism to enable polymorphism. It is parallel to the class inheritance mechanism. Instead of containing attributes and methods, an interface contains only abstract methods. A class can implement an interface by providing definitions for the abstract methods contained in the interface. A variable of an interface type can be used to hold references to objects of any classes that implement the interface. This allows even more flexible polymorphism than that is enabled by the inheritance relationships.
3.4. Polymorphism through Inheritance
In this section, we will first learn what is dynamic binding and polymorphism and then understand why polymorphism is a powerful tool to make it easy to manage objects belonging to different classes.
3.4.1. Dynamic Binding and Polymorphism
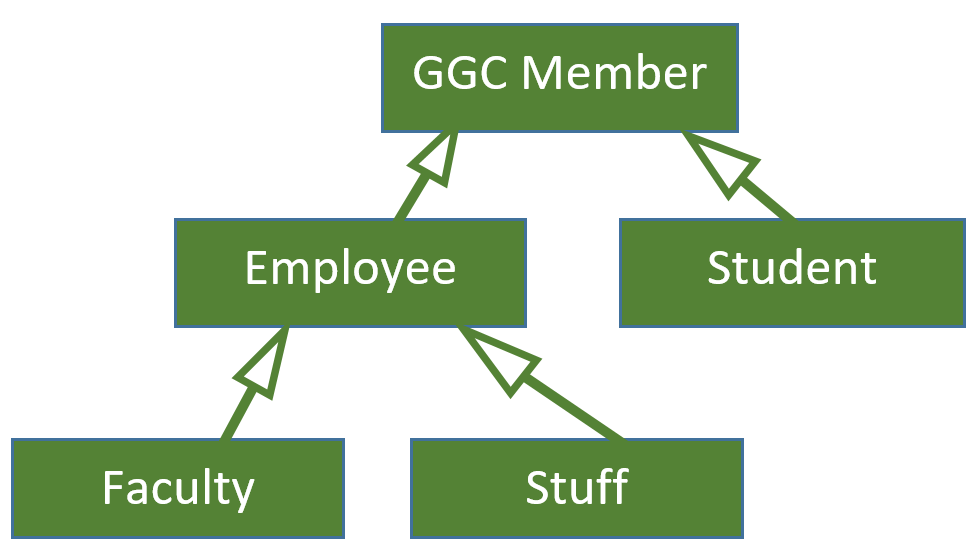
Each of us can assume different identities. For example, we are all members of the GGC community, while some of us belong to the employee category and the others belong to the student category. Employees are further divided into the staff category and the faculty category. If we use a Java class to capture each category, the following UML captures the relationship among these classes.
The following are definitions for these classes.
public class GGCMember
{
	private long id;
	private String firstName;
	private String lastName;

	public GGCMember(long id, String firstName, String lastName)
	{
		this.id = id;
		this.firstName = firstName;
		this.lastName = lastName;
	}

	//getters and setters for ID, firstName and lastName (not shown)

	@Override
	public String toString()
	{
		return "GGCMember [ID=" + id + ", " + firstName + " " + lastName + "]";
	}
}public class Employee extends GGCMember
{
private String division;
public Employee(long id, String firstName, String lastName, String division)
{
super(id, firstName, lastName);
this.division = division;
}
//getter and setter for division (not shown)
@Override
public String toString()
{
return "Employee [ID=" + super.getID() + ", division=" + division +
", " + super.getFirstName() + " " + super.getLastName() + "]";
}
}public class Faculty extends Employee
{
private String dept;
public Faculty(long id, String firstName, String lastName, String division, String dept)
{
super(id, firstName, lastName, division);
this.dept = dept;
}
//getter and setter for dept (not shown)
@Override
public String toString()
{
return "Faculty [division=" + super.getDivision() + ", dept=" + dept + ", " + super.getFirstName() + " " + super.getLastName() + "]";
}
}public class Staff extends Employee
{
private String office;
public Staff(long id, String firstName, String lastName, String division, String office)
{
super(id, firstName, lastName, division);
this.office = office;
}
//getter and setter for office (not shown)
@Override
public String toString()
{
return "Staff [division=" + super.getDivision() + ", office=" + office + ", " + super.getFirstName() + " " + super.getLastName() + "]";
}
}public class Student extends GGCMember
{
private String major;
public Student(long id, String firstName, String lastName, String major) {
super(id, firstName, lastName);
this.major = major;
}
//getter and setter for major (not shown)
@Override
public String toString()
{
return "Student [ID=" + super.getID() + ", major=" + major +
", " + super.getFirstName() + " " + super.getLastName() + "]";
}
}Just like a student is also a GGC member, a Student object can also be "called" GGCMember and its reference can be stored in a GGCMember variable. Similarly, a Faculty or Staff object can be "called" Employee or GGCMember and its reference can be stored in either an Employee variable or a GGCMember variable. That is, an object can be accessed via reference variable of its type or a reference variable of any of its superclass type(s). This gives us the freedom to use one variable to hold references to any object of its subclasses. The following is an example. Variable m is of the GGCMember type, it can hold references for Student objects, Staff objects and Faculty objects.
 1| public class GGCRoster
 2| {
 3|	  public static void main(String[] args)
 4|   {
 5|		GGCMember m;
 6|
 7|		m = new Student(90011022L, "John", "Smith", "MATH"); //m is bound to a Student object
 8|		System.out.println(m); //toString method for the Student object will be invoked
 9|
10|		m = new Staff(90003088L, "Rachel", "Morgan", "Academic Affairs", "SST"); //m is bound to a Staff object
11|		System.out.println(m); //toString method for the Staff object will be invoked
12|
13|		m = new Faculty(90021028L, "Linda", "Davis", "Academic Affairs", "CHEM"); //m is bound to a Faculty object
14|		System.out.println(m); //toString method for the Faculty object will be invoked
15|	  }
16| }
Variable m is a GGCMember variable. When line 5 is executed, the reference for a Student object is assigned to m. At this point, m holds a reference to a Student object. The compiler allows the assignment of a Student object to a GGCMember variable, because Student is a subclass of GGCMember. On line 8, m.toString() is implicitly invoked. The decision on which toString method to invoke is determined when line 8 is executed (run time). Since m holds a reference to a Student object, the toString method defined in the Student class is invoked. This is called dynamic binding. It means that the method call is bonded to the method body at runtime instead of compile time. This is also known as late binding.
On line 11, m gets the reference to a Staff object, so when line 11 is executed and m.toString() is implicitly invoked, the toString method defined in the Staff class is invoked.
On line 14, m gets the reference to a Faculty object, so when line 14 is executed and m.toString() is implicitly invoked, the toString method defined in the Faculty class is invoked.
We can think of variable m as taking on different forms, sometimes referring to a Student object, sometimes Faculty, and sometimes Staff. We call it polymorphism, which means that a reference variable can hold references to different types of objects. For example, a reference variable could refer to objects that belong to any of its sub-classes. We will learn later in this chapter, that a reference variable can also hold references to objects belonging to different classes that implement the same interface.
The following is the output of the program.
Student [ID=90011022, major=MATH, John Smith]
Staff [division=Academic Affairs, office=SST, Rachel Morgan]
Faculty [division=Academic Affairs, dept=CHEM, Linda Davis]
3.4.2. Why Polymorphism is Useful?
You might be wondering why we need polymorphism. You might say that you could write a program (like the one below) that does the same thing as the example above without using polymorphism.
public class GGCRosterNoPolymorphism
{
	public static void main(String[] args)
	{
		Student m1 = new Student(90011022L, "John", "Smith", "MATH");
		System.out.println(m1);

		Staff m2 = new Staff(90003088L, "Rachel", "Morgan", "Academic Affairs", "SST");
		System.out.println(m2);

		Faculty m3 = new Faculty(90021028L, "Linda", "Davis", "Academic Affairs", "CHEM");
		System.out.println(m3);
	}
}
Polymorphism will make programming convenient if your program needs to process a set of different but related objects systematically, often in loops. The following is such an example.
 1| public class GGCRosterLoop
 2| {
 3|   public static void main(String[] args)
 4|   {
 5|		GGCMember[] members = new GGCMember[3];
 6|
 7|		//Each indexed variable could be bound to any of the three types: Student, Staff, and Faculty
 8|		members[0] = new Student(90011022L, "John", "Smith", "MATH");
 9|		members[1] = new Staff(90003088L, "Rachel", "Morgan", "Academic Affairs", "SST");
10|		members[2] = new Faculty(90021028L, "Linda", "Davis", "Academic Affairs", "CHEM");
11|
12|		for (GGCMember m: members)
13|     {
14|			System.out.println(m);
15|		}
16|	  }
17|}
If your program needs to process a mixture of Student, Staff and Faculty objects, you can use an array of GGCMember (their common superclass) to store them (as on line 3). Each array element (an indexed variable) is of GGCMember type, so it can be bound to a Student object, a Staff object, or a Faculty object (line 8-10). In addition, you can use a loop to process them (line 10-12). In the loop, variable m can be bound to any of the three types of objects. Without Java’s polymorphism, you would not be able to store these different objects in one data structure (e.g. an array) or process them conveniently in one loop.
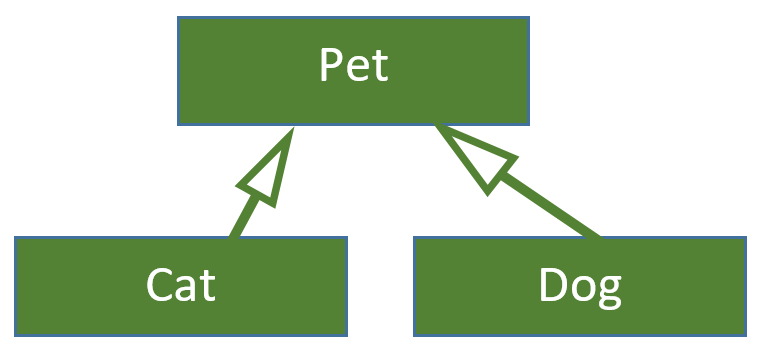
Now let us look at another example. Suppose a pet clinic needs to maintain a list of their pet clients (cats and dogs). It is necessary for them to put both types of pets in the same pool to manage scheduling. Instead of making two unrelated classes Cat and Dog, we can make Cat and Dog both subclasses of a Pet class. This way, we can use a Pet array to store both Cat and Dog objects. The following are the UML and code for this example.
public class Pet
{
    private String name;
    private String ownerName;
    private int age;
    private String hairColor;

    public Pet(String name, String ownerName, int age, String hairColor)
    {
        this.name = name;
        this.ownerName = ownerName;
        this.age = age;
        this.hairColor = hairColor;
    }

    //getters and setters for name, ownerName, age, and hairColor (not shown)
    @Override
    public String toString()
    {
        return "Pet[name=" + name + ", ownerName=" + ownerName +
        		", age=" + age + ", hairColor=" + hairColor + "]";
    }
}public class Cat extends Pet
{
private boolean longHair;
private boolean clawed;
public Cat(String name, String ownerName, int age, String hairColor,
boolean longHair, boolean clawed)
{
super(name, ownerName, age, hairColor);
this.longHair = longHair;
this.clawed = clawed;
}
//getters and setters for longHair and clawed (not shown)
@Override
public String toString()
{
return super.toString() +
" Cat[longHair=" + longHair + ", clawed=" + clawed + "]";
}
}public class Dog extends Pet
{
private String breed;
public Dog(String name, String ownerName, int age, String hairColor,
String breed)
{
super(name, ownerName, age, hairColor);
this.breed = breed;
}
//getter and setter for breed (not shown)
@Override
public String toString()
{
return super.toString() + " " + "Dog[breed=" + breed + "]";
}
}public class PetCareClients
{
public static void main(String[] args)
{
Pet[] pets = new Pet[5];
pets[0] = new Cat("Fluffy", "Jane", 2, "orange", true, false);
pets[1] = new Dog("Coco", "Linda", 3, "brown", "Poodle");
pets[2] = new Dog("Mongo", "William", 1, "white", "Bichon");
pets[3] = new Dog("Patch", "Marta", 12, "spotty", "Dalmatian");
pets[4] = new Cat("Petey", "Nicholas", 5, "brown", false, false);
for (Pet p: pets)
{
System.out.println(p);
}
}
}From these two examples, we have learned that we can make objects of different types related to each other through a common superclass. Through this common superclass, we can take advantage of polymorphism and store and process these objects systematically.
Another advantage of polymorphism is that it enables a method to be used for different types of data. The example program below simulates that the pet clinic sends appointment reminders for the next day.
import java.util.Date;

public class PetCareClientsMethod
{
    public static void main(String[] args)
    {
    	Pet[] pets = new Pet[5];

    	pets[0] = new Cat("Fluffy", "Jane", 2, "orange", true, false);
    	pets[1] = new Dog("Coco", "Linda", 3, "brown", "Poodle");
    	pets[2] = new Dog("Mongo", "William", 1, "white", "Bichon");
    	pets[3] = new Dog("Patch", "Marta", 12, "spotty", "Dalmatian");
    	pets[4] = new Cat("Petey", "Nicholas", 5, "brown", false, false);

    	Date date = new Date(); //The date (time as well) when this line is executed.
    	long time = date.getTime(); //Total milliseconds from midnight 1/1/1970
    	time += 24*60*60*1000;  //24 hours from now

    	for (Pet p: pets)
    	{
    		appointmentReminder(p, time);
    		time += 30*60*1000;  // add 30 mins to the time (30*60*1000 milliseconds)
    	}
    }

    public static void appointmentReminder(Pet pet, long time)
    {
    	Date date = new Date(time);
    	System.out.println("Dear " + pet.getOwnerName() + ",");
    	System.out.println("  A kind reminder that " + pet.getName() + "'s appointment is at " + date);
    	System.out.println("See you soon!");
    }
}
The method appointmentReminder uses polymorphism to adapt to different pet types. The data type of the first parameter is Pet. When the method is invoked, the first argument for the method could be either Cat or Dog. Without polymorphism, we would need two separate but almost the same methods (method overloading), one for Dog and one for Cat (see below). If a pet hospital takes care of ten different types of pets, without polymorphism, ten such methods would be needed and the only difference among them is the data type of the first parameter. It would be very cumbersome. With polymorphism, one method is adequate, and it could "adapt" to different pet types through dynamic binding.
    public static void appointmentReminder(Dog pet, long time)
    {
    	Date date = new Date(time);
    	System.out.println("Dear " + pet.getOwnerName() + ",");
    	System.out.println("  A kind reminder that " + pet.getName() + "'s appointment is at " + date);
    	System.out.println("See you soon!");
    }

    public static void appointmentReminder(Cat pet, long time)
    {
    	Date date = new Date(time);
    	System.out.println("Dear " + pet.getOwnerName() + ",");
    	System.out.println("  A kind reminder that " + pet.getName() + "'s appointment is at " + date);
    	System.out.println("See you soon!");
    }
3.5. Abstract Class
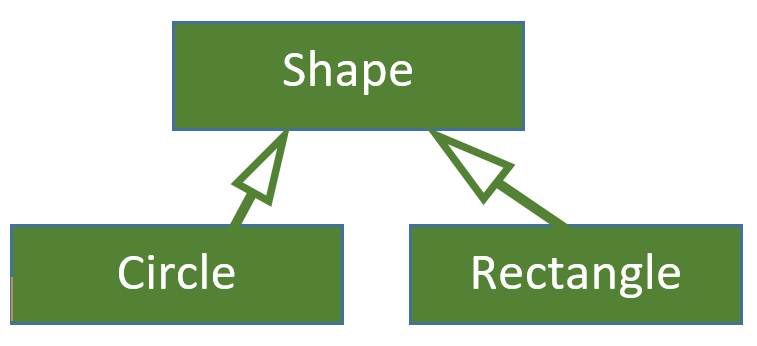
We will introduce abstract class with a concrete example. We will write a computer game and the game includes different shapes, such as circles, rectangles, etc. In order to prevent the game space from getting too crowded, the program needs to know the total area occupied by the shapes. As just stated from the previous section, in order to manage all these different shapes in a systematic manner, it is good to connect all these shapes with a common superclass. The following is the UML for this application.
The following is the superclass Shape. The class might contain other attributes, such as x and y coordinates and speeds along x and y directions, but we will skip them to make the example just adequate to introduce the new concept.
public abstract class Shape
{
    private String color;
    private boolean filled;

    public Shape(String color, boolean filled)
    {
		super();
		this.color = color;
		this.filled = filled;
	}

	//getters and setters for color and filled (not shown)

	@Override
	public String toString()
	{
		return "[color=" + color + ", filled=" + filled + "]";
	}

	public abstract double area();
}
You will notice a couple of new things in the above class definition. On the class header, there is a new key word abstract. This key word also shows up in the method area, which has no method body. Remember that Shape is the super class for different concrete shapes. Since the class Shape does not represent a concrete shape, there is really no way to calculate the area. We use the key word abstract to represent that the method is not implemented on purpose. As long as there is one abstract method, the class header must include the keyword abstract to mark the class as abstract. If a class is abstract, you cannot instantiate the class, that is, you cannot create an object (an instance) of this class.
You might be wondering that if the method area cannot be implemented in the Shape class, why do we include the method at all? Without it, the Shape class could be just normal non-abstract class. To understand the purpose of an abstract class, let us look at the following definition for the subclass Circle. Note that we do not want Circle to be an abstract class, since we will need to create Circle objects in the game. That is why we do not include the keyword abstract on the class header.
public class Circle extends Shape
{
    private int x, y;
    private int radius;

	public Circle(String color, boolean filled, int x, int y, int radius)
	{
		super(color, filled);
		this.x = x; 		this.y = y;		this.radius = radius;
	}

	//getters and setters for x, y, and radius (not shown)

	@Override
	public String toString()
	{
		return "Circle [@(" + x + ", " + y + "), r: " + radius + "] " + super.toString();
	}
}
You will notice that there is no method definition for area in the Circle class. In an IDE such as Eclipse or IntelliJ, you will see a compile error at the class header. See the following image:
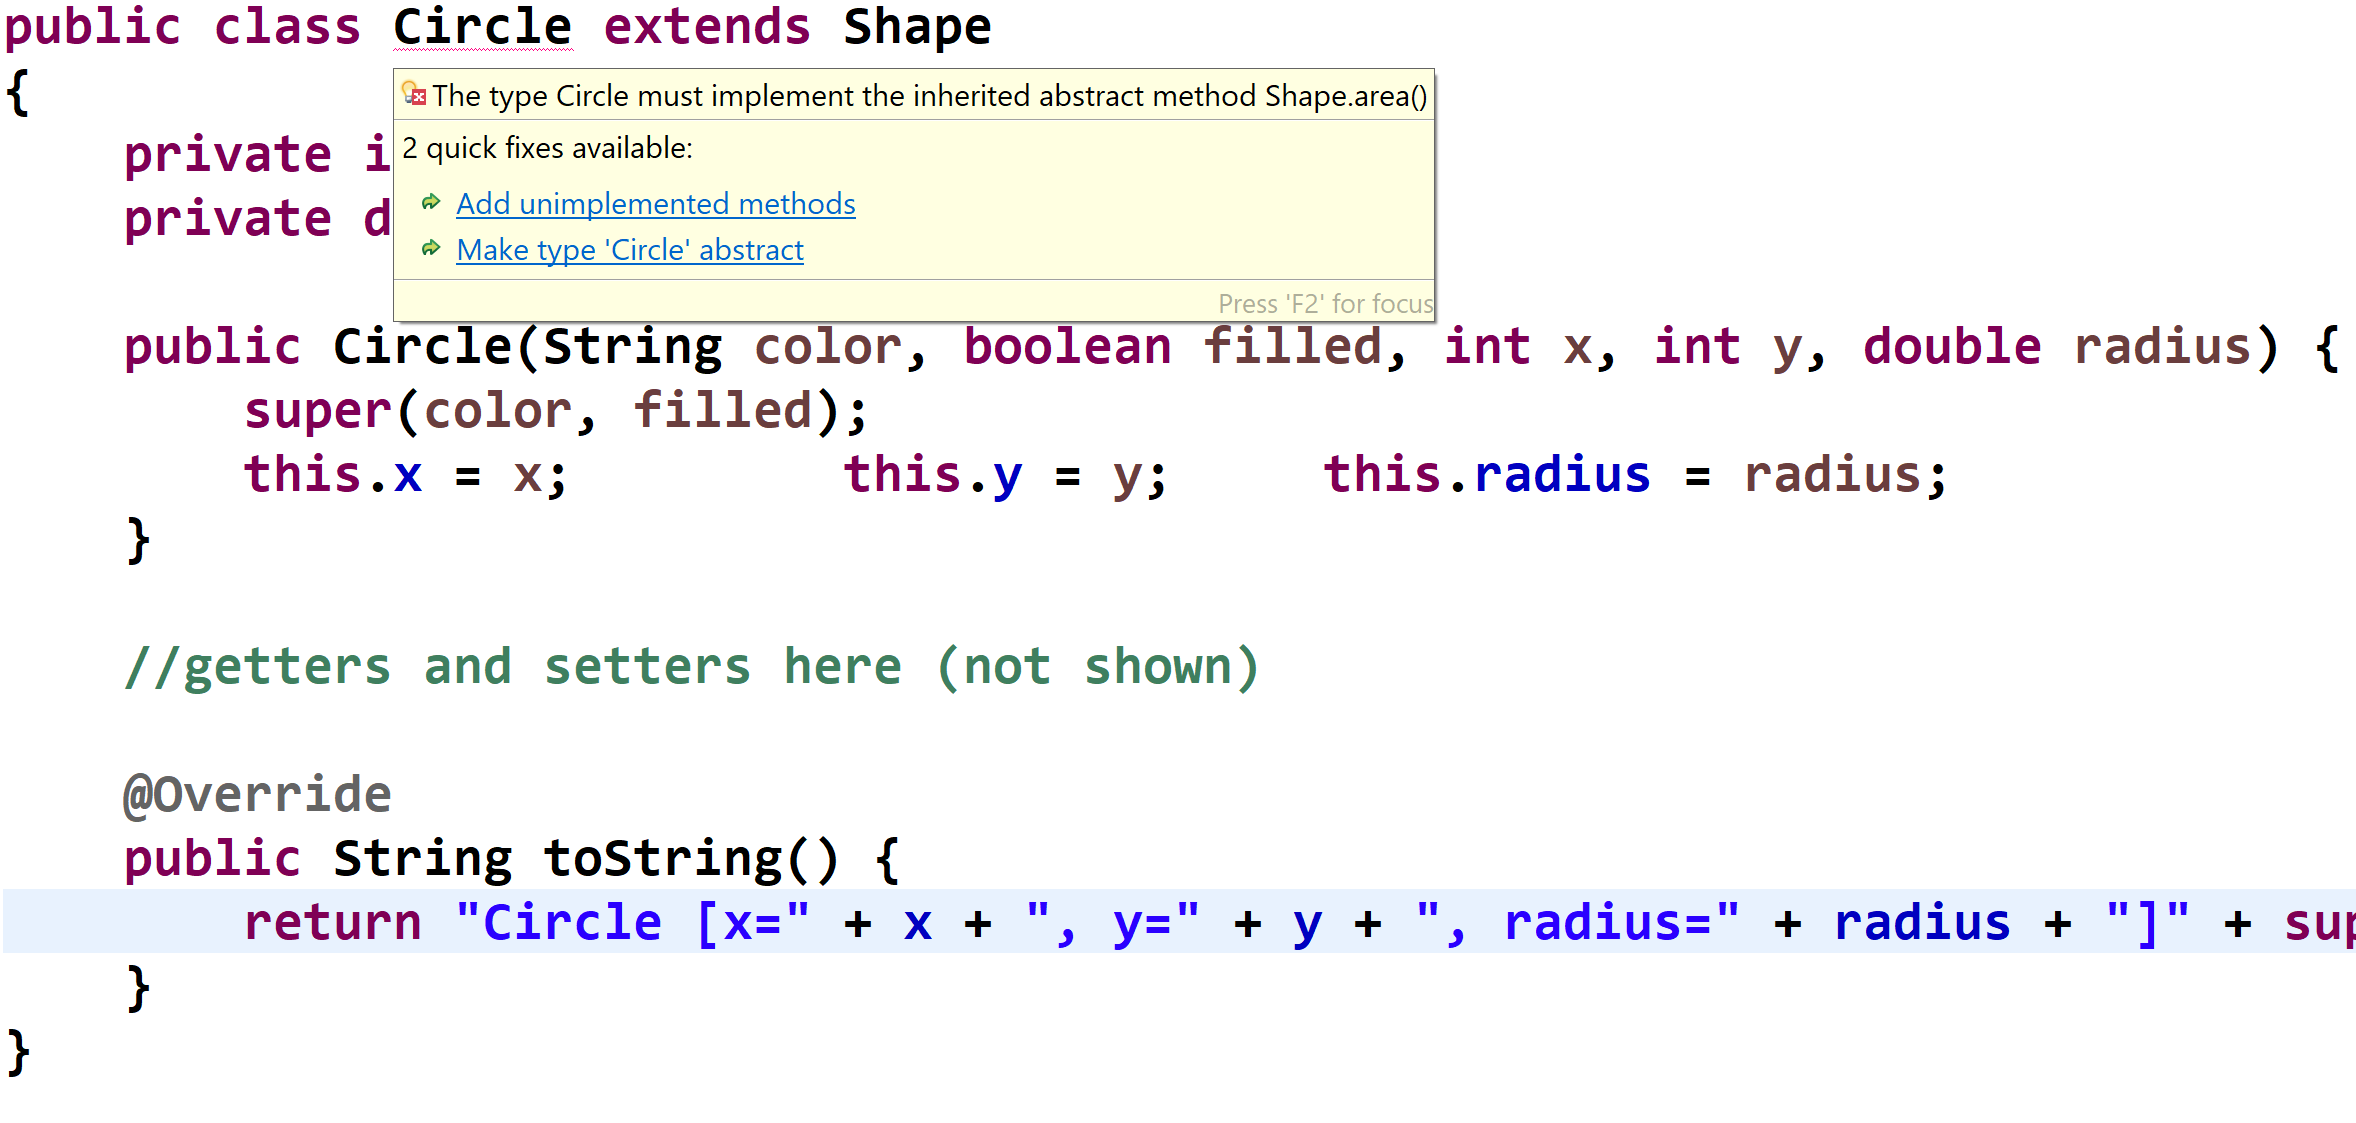
As shown above, the compiler reports an error if an abstract method is not overridden with an actual implementation by a non-abstract class. This is the reason for including the abstract method area in the super class Shape. It "forces" all non-abstract subclasses to provide an actual definition for the method.
If you click on the first quick fix, you will get a method stub for overriding the method area as shown by the last method in the following code:
public class Circle extends Shape
{
    private int x, y;
    private int radius;

	public Circle(String color, boolean filled, int x, int y, int radius)
	{
		super(color, filled);
		this.x = x; 		this.y = y;		this.radius = radius;
	}

	//getters and setters for x, y, and radius (not shown)

	@Override
	public String toString()
	{
		return "Circle [@(" + x + ", " + y + "), r: " + radius + "] " + super.toString();
	}

	@Override
	public double area()
	{
		// TODO Auto-generated method stub
		return 0;
	}
}
We will replace the auto-generated stub for method area with the following actual implementation.
	@Override
	public double area()
	{
		return Math.PI * radius * radius;
	}
The following is the class definition for another subclass Rectangle. We will skip other shapes (e.g. triangle) to prevent the example taking up too much space but still adequate for introducing the concept.
public class Rectangle extends Shape
{
    private int x, y;
    private int width, height;

	public Rectangle(String color, boolean filled, int x, int y, int width, int height)
	{
		super(color, filled);
		this.x = x;
		this.y = y;
		this.width = width;
		this.height = height;
	}

	//getters and setters for x, y, width, and height (not shown)

	@Override
	public double area()
	{
		return width*height;
	}

	@Override
	public String toString()
	{
		return "Rectangle [@ (" + x + ", " + y + "), w: " + width + ", h: " + height + "] " + super.toString();
	}
}
3.5.1. Polymorphism through Abstract Class
Except that you cannot instantiate an abstract class (cannot create an object of the class), you use an abstract class the same way as a regular super class. The following code shows that we can store objects of different types (Circle and Rectangle, both Shape’s subclasses) in a Shape array and process them in a systematic manner because of polymorphism.
 1| public class AreasOfAllShapes
 2| {
 3| 	public static void main(String[] args)
 4| 	{
 5| 		Shape[] shapes = new Shape[3];
 6|
 7| 		shapes[0] = new Circle("blue", true, 30, 30, 5);  // center at (30, 30), radius 5
 8| 		shapes[1] = new Rectangle("orange", false, 50, 100, 30, 15); // upper-left corner (50, 100), width 30, height 15
 9| 		shapes[2] = new Circle("red", false, 250, 250, 20); // center at (250, 250), radius 20
10|
11| 		int area = 0;
12| 		for (Shape s: shapes)
13|         {
14| 			area += s.area();
15| 		}
16| 		System.out.println("Total area of the shapes: " + area);
17| 	}
18| }
Output of the program:
Total area of the shapes: 1784
3.5.2. An Experiment: Removing the Abstract Methods from the Super Class
The previous example shows that abstract methods, even though not implemented in the super class, will force all the non-abstract subclasses to implement them. Here we will do an experiment to help you understand the abstract method from another angle.
You might be wondering what could happen if we just make the super class Shape non-abstract by removing the abstract method area altogether. We can simply implement the area method in the subclasses Circle and Rectangle. If we remove the abstract method area from Shape and make it a regular class while keeping the method area in Circle and that in Rectangle intact, we will get the following compile error.
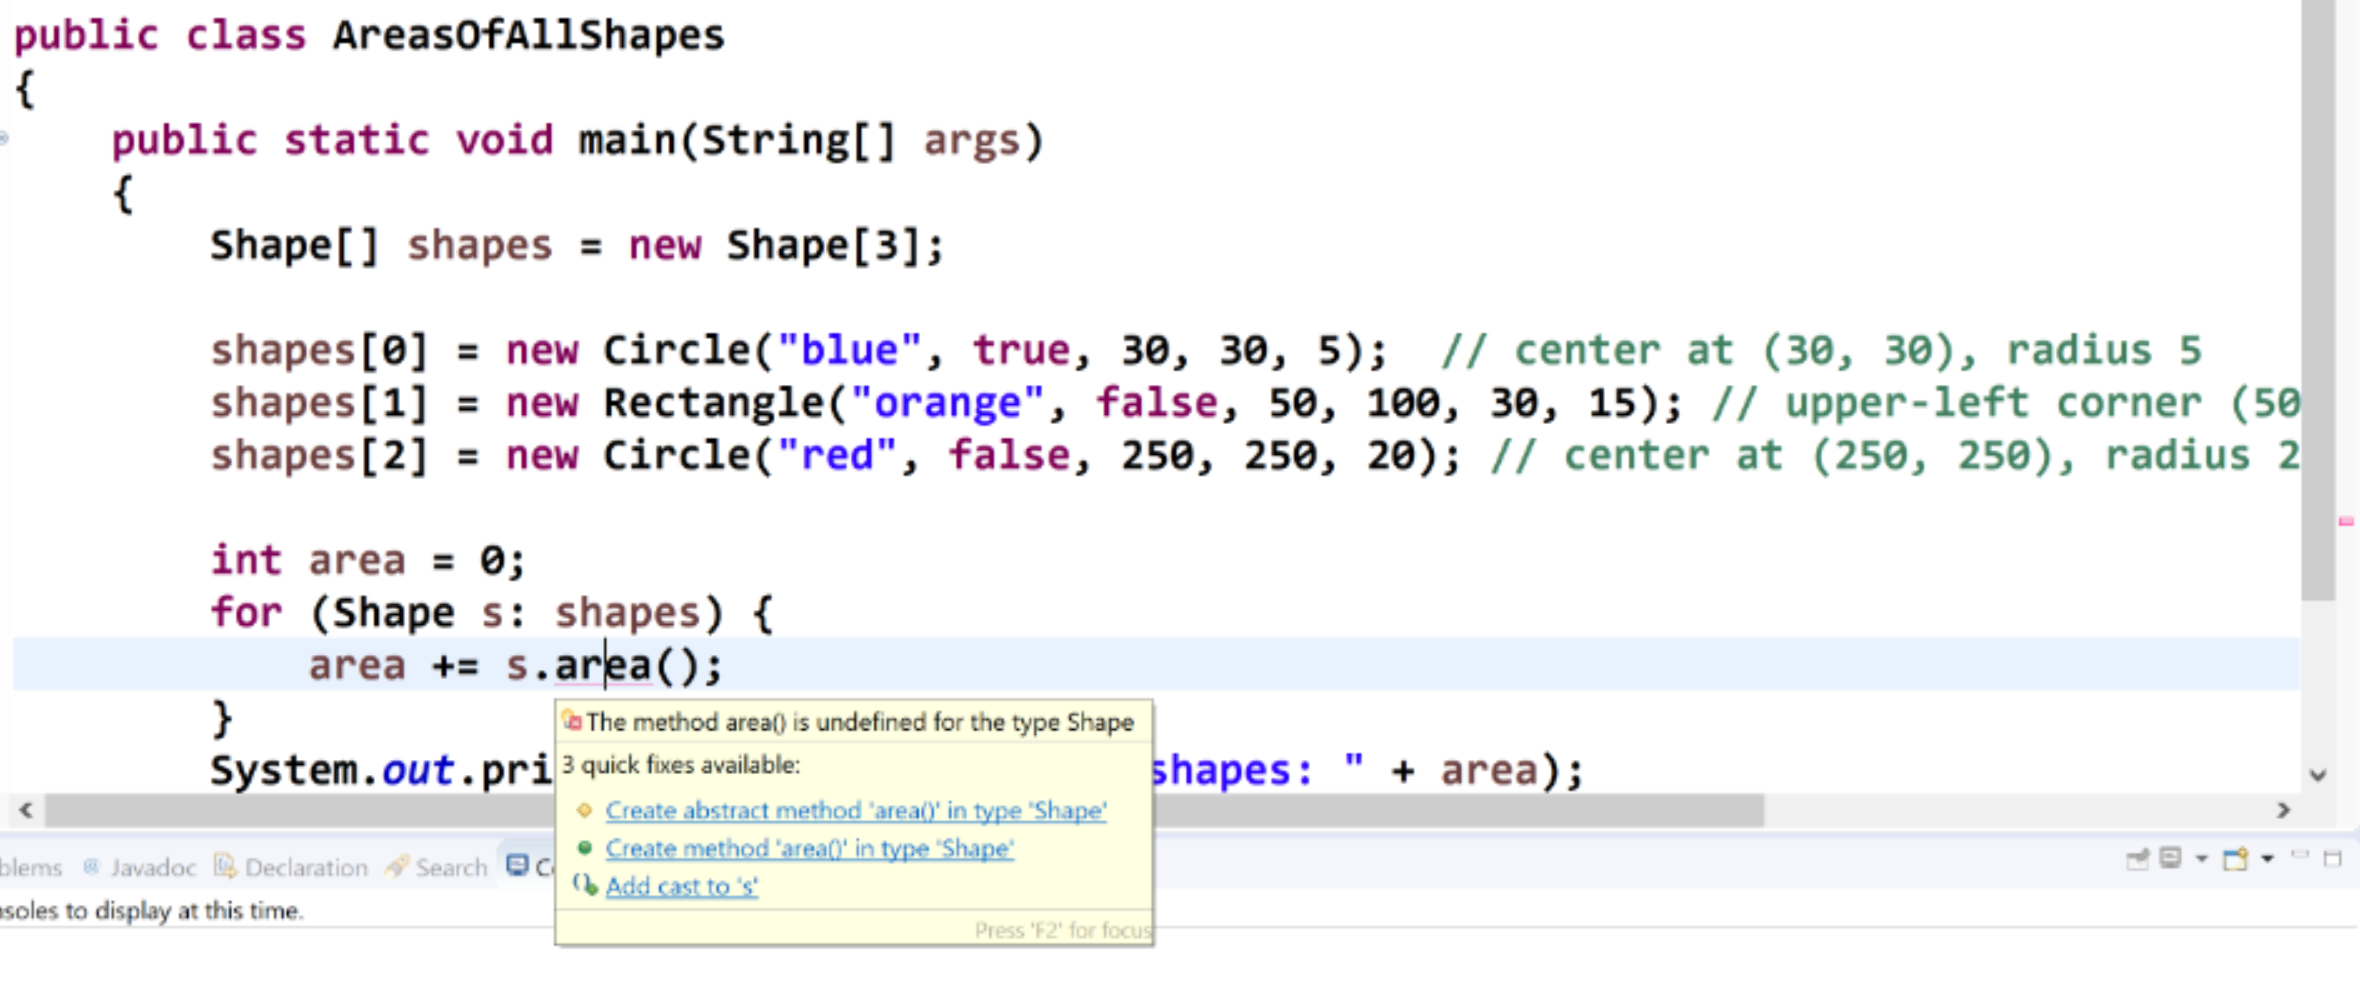
We will get a compile error on line 14 with the method invocation s.area(). There must be a area method in the Shape class in order to get the code compiled. From this experiment, we can see that the abstract method has its syntactic purpose and must be included in the super class in order for polymorphism to work.
We can also confirm that variable m is bound to different objects during run time (thus called dynamic binding) but not at compile time. In fact, for most cases, it is impossible to know what a variable is bound to at compile time.
3.6. Interface
The syntax for defining an interface is very similar to that for defining a class. Interface contains only public abstract method(s). It does not contain any attributes and therefore does not contain any constructors (nothing to initialize). The following is the interface definition for Comparable (included in the standard Java library https://docs.oracle.com/en/java/javase/14/docs/api/java.base/java/lang/Comparable.html). We can see that instead of class, the keyword on the header is interface. For method(s), the keywords public and abstract are skipped, since all methods are public and abstract.
public interface Comparable<T>
{
	int	compareTo(T o);
	/*Compares this object with the specified object for order. Returns a negative integer, zero, or a positive integer as this object is less than, equal to, or greater than the specified object.*/
}
Comparing Abstract Classes and Interfaces: You may say that Interface is really a special abstract class that only contains abstract methods. In fact, this is not correct. The interface mechanism is really "in parallel" with the class inheritance mechanism. It is meant for a class to "implement" the methods. A class can extend a super class or implement an interface. It can also extend a super class and implements an interface at the same time. An abstract class is still a class. That is, it is with the class inheritance mechanism that is "in parallel" with the interface implementation mechanism.
For example, the following class implements Comparable. To implement an interface, (1) the class should be marked on the header as "implements the interface" and (2) the abstract methods in the interface will need to be overridden, otherwise they are "inherited" as is as abstract methods.
public class Circle extends Shape implements Comparable<Shape>
{
    private int x, y;
    private int radius;

	public Circle(String color, boolean filled, int x, int y, int radius)
	{
		super(color, filled);
		this.x = x; 		this.y = y;		this.radius = radius;
	}

    //getters and setters for x, y and radius (not shown)

	@Override
	public String toString()
	{
		return "Circle [@(" + x + ", " + y + "), r: " + radius + "] " + super.toString();
	}

	@Override
	public double area()
	{
		return Math.PI * radius * radius;
	}

	@Override
	public int compareTo(Shape o)
	{
		if (this.area() > o.area())
			return 1;
		else if (this.area() < o.area())
			return -1;
		else
			return 0;
	}
}
You can see that this is the same Circle class as the last section, but with two things added:
-
At the end of the class header, implements Comparable<Shape> is added.
-
A compareTo method is added to the class definition. This is similar to override a method in a super class. The compareTo method returns a positive integer 1 if the Circle object’s area is great than the parameter o's area, returns a negative integer -1 if less than, and returns 0 if equal.
We could do the same for the Rectangle class by making it implement the Comparable interface:
public class Rectangle extends Shape implements Comparable<Shape>
{
    private int x, y;
    private int width, height;

	public Rectangle(String color, boolean filled, int x, int y, int width, int height)
	{
		super(color, filled);
		this.x = x;
		this.y = y;
		this.width = width;
		this.height = height;
	}

    //getters and setters for x, y, width and height (not shown)

	@Override
	public String toString()
	{
		return "Rectangle [@ (" + x + ", " + y + "), w: " + width + ", h: " + height + "] " + super.toString();
	}

	@Override
	public double area()
	{
		return width*height;
	}

	@Override
	public int compareTo(Shape o)
	{
		if (this.area() > o.area())
			return 1;
		else if (this.area() < o.area())
			return -1;
		else
			return 0;
	}
}The same as Shape.java in Example 3Both the Circle and Rectangle classes have no compilation errors. You can see that a class can extend a super class and implement an interface at the same time. A class can only extend one super-class, however, a class can implement more than one interface, which we will talk about later.
Now let’s look at the following program, which intends to use the compareTo methods in Circle and Rectangle to determine the shape with the maximum area. Unfortunately, it contains a compile error.
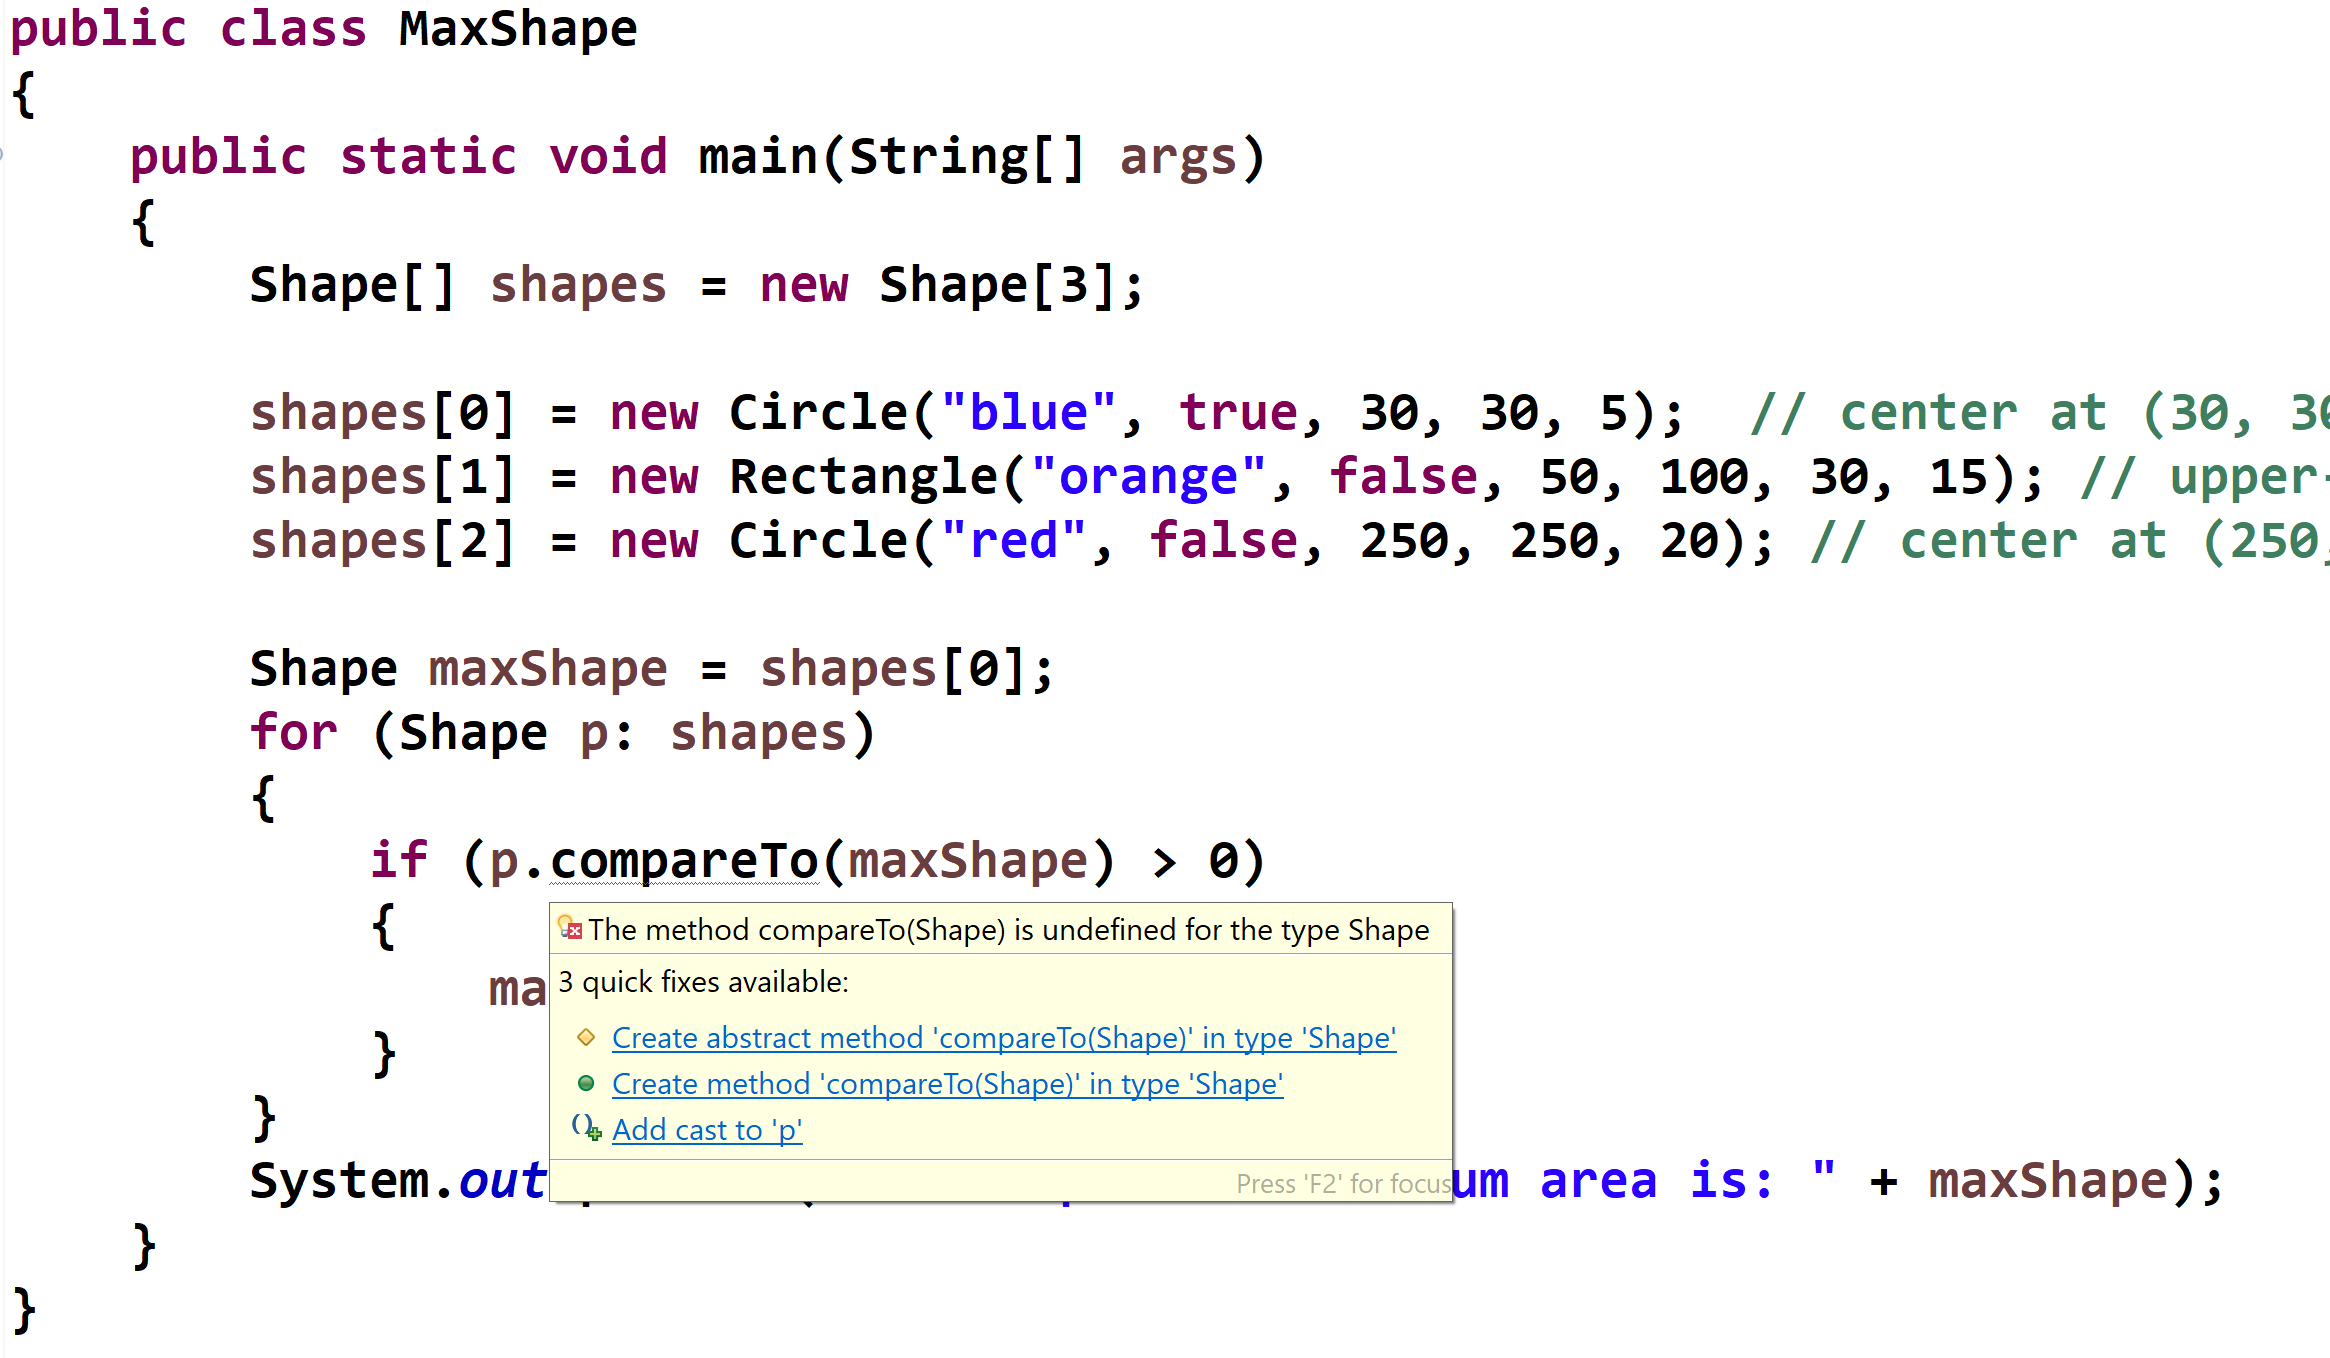
There is an error for p.compareTo(maxShape), since the variable p's type is Shape and there is no compareTo method defined in the Shape class. This is a similar error as the one we see in the experiment for abstract class. The super class Shape needs to contain the method in order for the above code to be compiled.
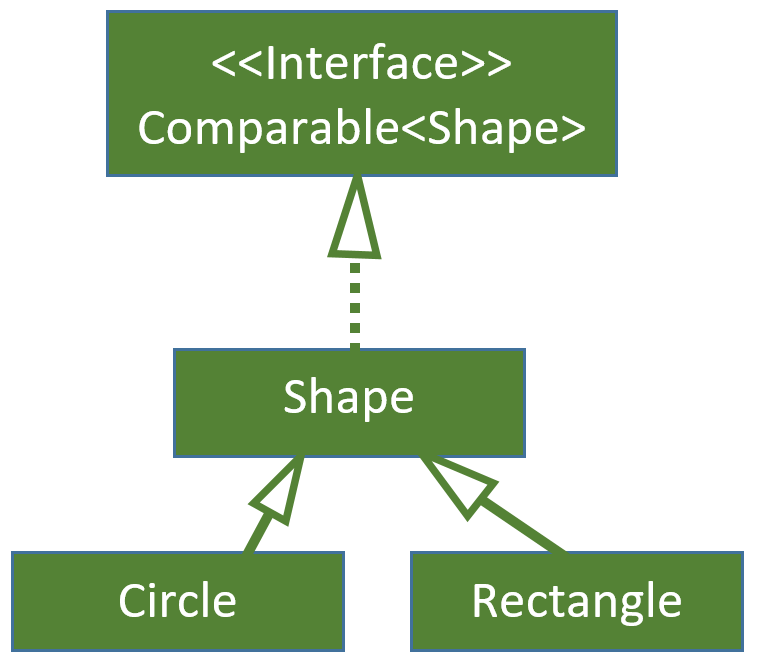
To fix this problem, we will implement the compareTo method in the Shape class, instead of in the Circle class and the Rectangle class. This way, we only need to implement the method once and it will be inherited by all the subclasses (Circle and Rectangle). We will keep the Circle and Rectangle classes the same as the previous section (without the compareTo method). See below for the new Shape class.
The following is the UML that captures the relationship among the classes and the interface in Example 5. The dotted line arrow represents the implementation relationship.
public abstract class Shape implements Comparable<Shape>
{
    private String color;
    private boolean filled;

    public Shape(String color, boolean filled)
    {
		super();
		this.color = color;
		this.filled = filled;
	}

    //getters and setters for color and filled (not shown)

	public abstract double area();

	@Override
	public String toString()
	{
		return "[color=" + color + ", filled=" + filled + "]";
	}

	@Override
	public int compareTo(Shape o)
	{
		if (this.area() > o.area())
			return 1;
		else if (this.area() < o.area())
			return -1;
		else
			return 0;
	}
}The same as Circle.java in Example 3The same as Circle.java in Example 3The same as MaxShape.java in Example 4When you run MaxShape, the program will display the following:
The shape with maximum area is: Circle [@(250, 250), r: 20.0] [color=red, filled=false]
Let us look at the Shape class more carefully. You will see that the method area is abstract. You might wonder whether it is OK for the compareTo method to invoke the area method. It is OK because an abstract class cannot be instantiated. The abstract method area will be overridden by the subclasses Circle and Rectangle and the compareTo method will be inherited by the subclasses Circle and Rectangle. In the loop (line 11-16) in the main method, variables p and maxShape are bound to either a Circle or Rectangle object at any point during execution. The inherited method compareTo will invoke the proper area method defined in either Circle or Rectangle.
This really shows another advantage of using abstract classes. It holds concrete methods that can be implemented so that the sub-classes do not have to implement them and can inherit them as they are. It can also hold abstract methods that it cannot implement but will "force" all the non-abstract subclasses to implement their own version.
3.6.1. A Class Can Implement Multiple Interfaces
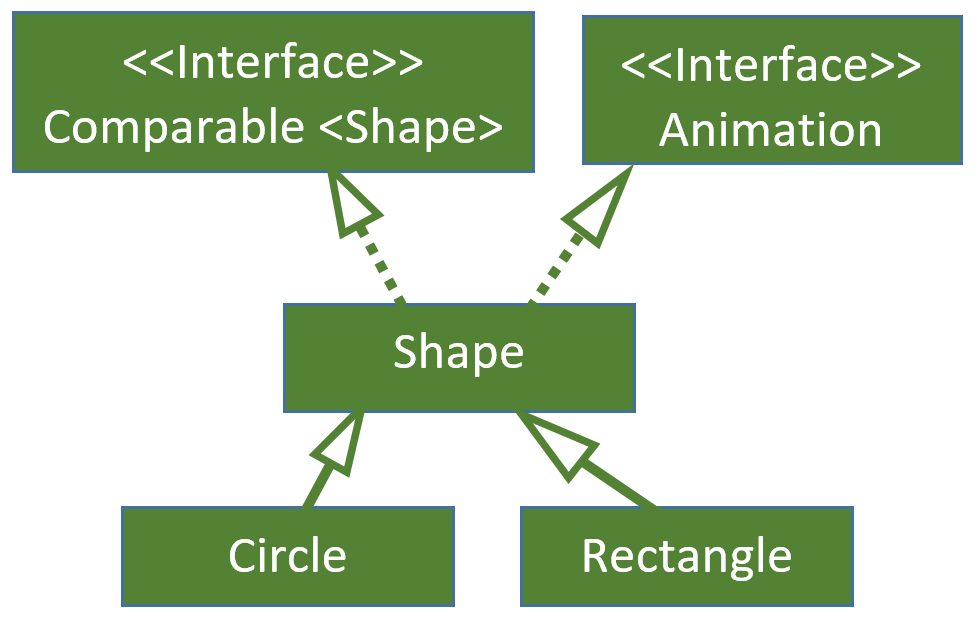
Even though a class can only extend one and only one super class, a class can implement multiple interfaces. We will make the Shape class implement two interfaces Comparable and Animation.
The following is the Animation interface that contains two public abstract methods talk and flipRight.
public interface Animation
{
	void talk(); //Simulate talking by displaying (printing) a message
    void flipRight(); //flip to the right (mirror)
}
When a class implements more than one interface, the interface names are separated with comma(s) on the class header.
public abstract class Shape implements Comparable<Shape>, Animation
{
    private String color;
    private boolean filled;

    public Shape(String color, boolean filled)
    {
		super();
		this.color = color;
		this.filled = filled;
	}

    //getters and setters for color and filled (not shown)

	public abstract double area();

	@Override
	public String toString()
	{
		return "[color=" + color + ", filled=" + filled + "]";
	}

	@Override
	public int compareTo(Shape o)
	{
		if (this.area() > o.area())
			return 1;
		else if (this.area() < o.area())
			return -1;
		else
			return 0;
	}

	@Override
	public void talk()
	{
		System.out.println("I am " + this.toString());
	}
}
The Shape class only implements the talk method of the two methods in the Animation interface. The flipRight method is not implemented in Shape, so it is "inherited" from the interface as is, that is, it is still an abstract method in the Shape class. It is really not possible to implement the flipRight method here, since how a shape flips depends on what the actual shape it is. This method will need to be implemented in the concrete shape classes, Circle and Rectangle (see below).
The following is the UML that captures the relationship among the classes and the interface in Example 6.
public class Circle extends Shape
{
    private int x, y;
    private int radius;

	public Circle(String color, boolean filled, int x, int y, int radius)
	{
		super(color, filled);
		this.x = x; 		this.y = y;		this.radius = radius;
	}

	//getters and setters for x, y, and radius (not shown)

	@Override
	public String toString()
	{
		return "Circle [@(" + x + ", " + y + "), r: " + radius + "] " + super.toString();
	}

	@Override
	public double area()
	{
		return Math.PI * radius * radius;
	}

	@Override
	public void flipRight()
	{
		x = x + 2 * radius;
	}
}
When a circle flips to the right, it flips on the vertical tangent on the right, so its new x coordinate is the current x coordinate plus 2 * radius.
public class Rectangle extends Shape
{
    private int x, y;
    private int width, height;

	public Rectangle(String color, boolean filled, int x, int y, int width, int height)
	{
		super(color, filled);
		this.x = x;
		this.y = y;
		this.width = width;
		this.height = height;
	}

    //getters and setters for x, y, width, height

	@Override
	public String toString()
	{
		return "Rectangle [@ (" + x + ", " + y + "), w: " + width + ", h: " + height + "] " + super.toString();
	}

	@Override
	public double area()
	{
		return width*height;
	}

	@Override
	public void flipRight()
	{
		x = x + width;
	}
}
When a rectangle flips to the right, it flips on the right vertical edge, the original upper right corner becomes the upper left corner for the rectangle at the new location. Therefore, the new x coordinate of the rectangle is the original value plus the width.
The code below will utilize polymorphism to let each shape object (which could be Circle or Rectangle) talk, flip right, and then talk again.
public class AnimateShapes
{
	public static void main(String[] args)
	{
		Shape[] shapes = new Shape[3];

		shapes[0] = new Circle("blue", true, 30, 30, 5);  // center at (30, 30), radius 5
		shapes[1] = new Rectangle("orange", false, 50, 100, 30, 15); // upper-left corner (50, 100), width 30, height 15
		shapes[2] = new Circle("red", false, 250, 250, 20); // center at (250, 250), radius 20

		for (Shape p: shapes)
		{
			p.talk();
			p.flipRight();
			p.talk();
			System.out.println();
		}
	}
}
The following is the output of the program. After flipping right, a circle with center at (30, 30) and radius 5 becomes a circle at (40, 30) and radius not changed; a rectangle with the upper-left corner at (50, 100) with width 30 becomes a rectangle at (80, 100) and dimension not changed; and so on.
I am Circle [@(30, 30), r: 5] [color=blue, filled=true]
I am Circle [@(40, 30), r: 5] [color=blue, filled=true]

I am Rectangle [@ (50, 100), w: 30, h: 15] [color=orange, filled=false]
I am Rectangle [@ (80, 100), w: 30, h: 15] [color=orange, filled=false]

I am Circle [@(250, 250), r: 20] [color=red, filled=false]
I am Circle [@(290, 250), r: 20] [color=red, filled=false]
3.6.2. Polymorphism through Interface
The polymorphism examples so far are all through super classes. In this section, we will see the amazing power of polymorphism through interface, which enables systematically storing and processing seemingly unrelated objects.
First, let us look at a new class, Text, that is very different from Shape. Its only relationship to Shape is that it also implements the Animation interface.
public class Text implements Animation
{
	private String text;

	public Text(String text)
	{
		this.text = text;
	}

    //getter and setter for text (not shown)

	@Override
	public String toString()
	{
		return "Text [text=" + text + "]";
	}

	@Override
	public void talk()
	{
		System.out.println("I am " + this.toString());
	}

	@Override
	public void flipRight()
	{
	    //reverse the text
		String newText = "";
		for (int i = text.length()-1; i >= 0; i--)
		{
			newText = newText + text.charAt(i);
		}
		text = newText;
	}
}
Both methods in the Animation interface are implemented. For the Text class, flipping to the right means reversal of the string text.
public class AnimateShapesTexts
{
	public static void main(String[] args)
	{
		Animation a;

		a = new Circle("blue", true, 30, 30, 5);  // center at (30, 30), radius 5
		a.talk();
		a.flipRight();
		a.talk();

		a = new Rectangle("orange", false, 50, 100, 30, 15); // upper-left corner (50, 100), width 30, height 15
		a.talk();
		a.flipRight();
		a.talk();

		a = new Text("hello");
		a.talk();
		a.flipRight();
		a.talk();
	}
}
The code above demonstrates that an interface can be used as a data type. In a sense, a class implementing an interface is similar to a subclass extending a super class. An interface variable can be used to hold references to objects of any class that implements the interface. Both the Circle and Rectangle classes implement the Animation interface through their super class Shape, so the reference to a Circle or Rectangle object can be stored in an Animation variable. The Text class also implements the Animation interface, so the references to a Text object can also be stored in an Animation variable.
In the example above, variable a is of type Animation (an interface). It is first assigned to the reference to a Circle object, then a Rectangle object, and last a Text object. The following is the output of the program.
I am Circle [@(30, 30), r: 5] [color=blue, filled=true]
I am Circle [@(40, 30), r: 5] [color=blue, filled=true]
I am Rectangle [@ (50, 100), w: 30, h: 15] [color=orange, filled=false]
I am Rectangle [@ (80, 100), w: 30, h: 15] [color=orange, filled=false]
I am Text [text=hello]
I am Text [text=olleh]
Since Circle, Rectangle, and Text all implement Animation, we can store the references to their objects in an Animation array and process them systematically in a loop (see the code below). For a program that manages a large number of objects, ability to store them in an array and process them with a loop in a systematic manner will make programming manageable.
public class AnimateShapesTextsLoop
{
	public static void main(String[] args)
	{
		Animation[] shapesAndTexts = new Animation[3];

		shapesAndTexts[0] = new Circle("blue", true, 30, 30, 5);  // center at (30, 30), radius 5
		shapesAndTexts[1] = new Rectangle("orange", false, 50, 100, 30, 15); // upper-left corner (50, 100), width 30, height 15
		shapesAndTexts[2] = new Text("hello");

		for (Animation a: shapesAndTexts)
		{
			a.talk();
			a.flipRight();
			a.talk();
			System.out.println();
		}
	}
}
This program has exactly the same output as the previous program that does not use a loop. The program creates an Animation array shapesAndTexts with size 3. Each element of the array can store the reference to an object of any class that implements the Animation interface. The references to a Circle object, a Rectangle object, and a Text object are assigned to each element of the array. The program then uses a for-each loop to process the array.
Classes that are very different from each other can relate to each other through the common interface they implement. It is as if that they have a common super class. Interface makes it very convenient for us to take advantage of polymorphism to store very different objects in a data structure (e.g. an array) and process them in a systematic manner.
3.6.3. Interface Inheritance
An interface, just like a class, can have a parent interface. That is, an interface can extend a parent interface. For example, the FullAnimation interface below is a child (sub) interface of the parent (super) interface Animation. The FullAnimation interface inherits the two abstract methods (talk and flipRight) from Animation and adds three new abstract methods flipLeft, flipUp and flipDown.
public interface FullAnimation extends Animation
{
    void flipLeft(); //flip to the left (mirror)
    void flipUp(); //flip to the left (mirror)
    void flipDown(); //flip to the left (mirror)
}The same as Animation.java in Example 6We modified the abstract class Shape so that it implements the FullAnimation instead of Animation. From the code below, we can see that only the talk method is implemented, the other four methods, flipRight, flipLeft, flipUp, and flipDown, will be implemented in the concrete subclasses of Shape, Circle and Rectangle.
public abstract class Shape implements Comparable<Shape>, FullAnimation
{
    private String color;
    private boolean filled;

    public Shape(String color, boolean filled)
    {
		super();
		this.color = color;
		this.filled = filled;
	}

    //getters and setters for color and filled (not shown)

	public abstract double area();

	@Override
	public String toString()
	{
		return "[color=" + color + ", filled=" + filled + "]";
	}

	@Override
	public int compareTo(Shape o)
	{
		if (this.area() > o.area())
			return 1;
		else if (this.area() < o.area())
			return -1;
		else
			return 0;
	}

	@Override
	public void talk()
	{
		System.out.println("I am " + this.toString());
	}
}
The following is the UML that captures the relationship among the classes and the interface in Example 7.
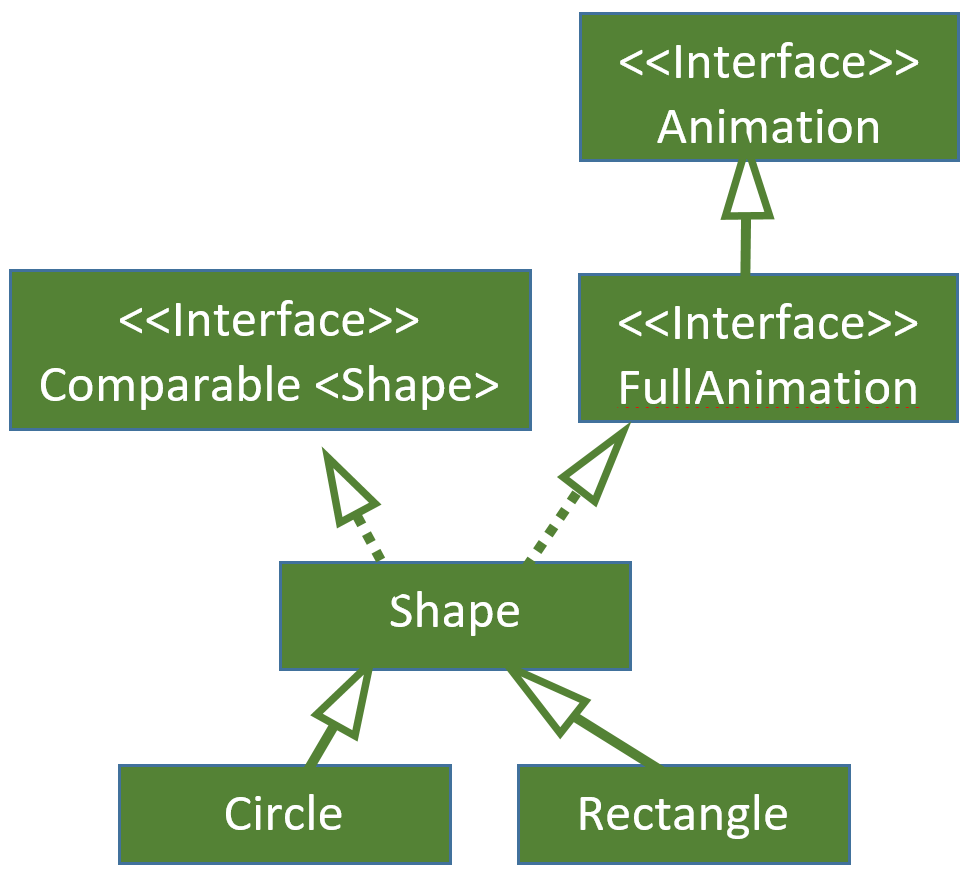
Since the Circle class is a non-abstract class, it needs to implement all the abstract methods in FullAnimation but not implemented yet in Shape.
public class Circle extends Shape
{
    private int x, y;
    private int radius;

	public Circle(String color, boolean filled, int x, int y, int radius)
	{
		super(color, filled);
		this.x = x; 		this.y = y;		this.radius = radius;
	}

	//getters and setters for x, y, and radius

	@Override
	public String toString()
	{
		return "Circle [@(" + x + ", " + y + "), r: " + radius + "] " + super.toString();
	}

	@Override
	public double area()
	{
		return Math.PI * radius * radius;
	}

	@Override
	public void flipRight()
	{
		x = x + 2 * radius;
	}

	@Override
	public void flipLeft()
	{
		x = x - 2 * radius;
	}

	@Override
	public void flipUp()
	{
		y = y - 2 * radius;
	}

	@Override
	public void flipDown()
	{
		y = y + 2 * radius;
	}
}
You can do an experiment. If you remove the flipRight method, there will be a compile error. This just confirms that flipRight is inherited by FullAnimation from Animation and is part of the FullAnimaton interface.
The following is the updated Rectangle class:
public class Rectangle extends Shape
{
    private int x, y;
    private int width, height;

	public Rectangle(String color, boolean filled, int x, int y, int width, int height)
	{
		super(color, filled);
		this.x = x;
		this.y = y;
		this.width = width;
		this.height = height;
	}

    //getters and setters for x, y, width, and height (not shown)

	@Override
	public String toString()
	{
		return "Rectangle [@ (" + x + ", " + y + "), w: " + width + ", h: " + height + "] " + super.toString();
	}

	@Override
	public double area()
	{
		return width*height;
	}

	@Override
	public void flipRight()
	{
		x = x + width;
	}

	@Override
	public void flipLeft()
	{
		x = x - width;
	}

	@Override
	public void flipUp()
	{
		y = y - height;
	}

	@Override
	public void flipDown()
	{
		y = y + height;
	}
}
The following code is very similar to an example described before, but in addition to talk and flip right, each shape can also flip left, up, and down.
public class AnimateShapes
{
	public static void main(String[] args)
	{
		Shape[] shapes = new Shape[3];

		shapes[0] = new Circle("blue", true, 30, 30, 5);  // center at (30, 30), radius 5
		shapes[1] = new Rectangle("orange", false, 50, 100, 30, 15); // upper-left corner (50, 100), width 30, height 15
		shapes[2] = new Circle("red", false, 250, 250, 20); // center at (250, 250), radius 20

		for (Shape p: shapes)
		{
			p.talk();
			p.flipRight();
			p.talk();
			p.flipLeft();
			p.talk();
			p.flipUp();
			p.talk();
			p.flipDown();
			p.talk();
			System.out.println();
		}
	}
}
The following is the output of the program above. We can see that if a shape flip right and then left, it returns to the original location. The same for flipping up and then down.
I am Circle [@(30, 30), r: 5] [color=blue, filled=true]
I am Circle [@(40, 30), r: 5] [color=blue, filled=true]
I am Circle [@(30, 30), r: 5] [color=blue, filled=true]
I am Circle [@(30, 20), r: 5] [color=blue, filled=true]
I am Circle [@(30, 30), r: 5] [color=blue, filled=true]

I am Rectangle [@ (50, 100), w: 30, h: 15] [color=orange, filled=false]
I am Rectangle [@ (80, 100), w: 30, h: 15] [color=orange, filled=false]
I am Rectangle [@ (50, 100), w: 30, h: 15] [color=orange, filled=false]
I am Rectangle [@ (50, 85), w: 30, h: 15] [color=orange, filled=false]
I am Rectangle [@ (50, 100), w: 30, h: 15] [color=orange, filled=false]

I am Circle [@(250, 250), r: 20] [color=red, filled=false]
I am Circle [@(290, 250), r: 20] [color=red, filled=false]
I am Circle [@(250, 250), r: 20] [color=red, filled=false]
I am Circle [@(250, 210), r: 20] [color=red, filled=false]
I am Circle [@(250, 250), r: 20] [color=red, filled=false]
3.7. Summary
Polymorphism can be used to connect different classes through a common super class or a common interface they implement, allowing objects belonging to different classes to be stored and processed systematically.
3.8. Key Terms
Dynamic Binding: In dynamic binding, the method call is bonded to the method body at runtime. This is also known as late binding.
Polymorphism: Polymorphism means that a reference variable can hold references to different types of objects. For example, a reference variable could refer to objects that belong to any of its subclasses. A reference variable can also hold references to objects belonging to different classes that implement the same interface.
Abstract Method: An abstract method is a method that is declared but contains no implementation.
Non-instantiable: A class is non-instantiable if objects of that class can be created.
Abstract Class: A class that contains abstract methods is an abstract class. The class header of an abstract class needs to contain the keyword abstract. Abstract classes may not be instantiated and require subclasses to provide implementations for the abstract methods.
Interface: An interface contains no attributes but only public abstract methods. An interface cannot be instantiated.
Interface Implementation: A class implements an interface by providing implementations of at least one of the abstract methods contained in the interface.
Interface Inheritance: There is also inheritance relationship among interfaces, just like among classes.
Dynamic Binding: In dynamic binding, the method call is bonded to the method body at runtime. This is also known as late binding.
Polymorphism: Polymorphism means that a reference variable can hold references to different types of objects. For example, a reference variable could refer to objects that belong to any of its subclasses. A reference variable can also hold references to objects belonging to different classes that implement the same interface.
Abstract Method: An abstract method is a method that is declared, but contains no implementation.
Non-instantiable: A class is non-instantiable if objects of that class can be created.
Abstract Class: A class that contains abstract methods is an abstract class. The class header of an abstract class needs to contain the keyword abstrast. Abstract classes may not be instantiated, and require subclasses to provide implementations for the abstract methods.
Interface: An interface contains no attributes but only public abstract methods. An interface cannot be instantiated.
Interface Implementation: A class implments an interface by providing implementations of at least one of the abstract methods contained in the interface.
Interface Inheritance: There is also inheritance relationship among interfaces, just like among classes.
3.9. Exercises
3.9.1. Exercise 1
Write a program to store the information for a number of different farm animals in an array or array list and then display the sound the animals make.
-
SuperClass FarmAnimal
-
Attributes: name, gender, weight, and age.
-
Methods:
-
Constructor
-
getters and setters
-
*_toString method that returns a string including all attributes.
-
An abstract method feedLoadingSchedule that does not have any parameters and returns a string. It returns the time(s) to load feeds each day. It is better for this method to be abstract, since only a concrete animal type can actually know the time(s).
-
-
-
Subclasses Chicken, Cow, Duck.
-
Attributes: They should each contain an attribute sound.
-
Methods:
-
Each contain a constructor and getter/setter methods.
-
Override the toString method.
-
Override the feedLoadingSchedule method.
-
Hint: For both the toString and feedLoadingSchedule methods, use the output of the program (see below) to determine the format of the string to return.
-
-
-
Application: Write a program called MyFarm.
-
Create the following six objects, store them in a FarmAnimal array or array list.
-
Print out their information, including their sounds.
-
Print out the feeding schedule for each animal.
-
The following is the output of the program.
Duck Quack Quack [name=Donald, gender=male, weight=3.2, age=5]
Duck Quack Quack [name=Cheese, gender=female, weight=3.6, age=5]
Cow Moo Moo [name=Molly, gender=female, weight=1600.0, age=3]
Chicken Cock-a-Doodle-doo [name=Albert, gender=male, weight=1.6, age=2]
Chicken Cluck Cluck [name=Amelia, gender=female, weight=1.8, age=4]
Chicken Cluck Cluck [name=Dixie, gender=female, weight=1.7, age=4]
Donald: 8am-12pm-6pm
Cheese: 8am-12pm-6pm
Molly: 6am-4pm
Albert: 8am-4pm
Amelia: 8am-4pm
Dixie: 8am-4pm
3.9.2. Exercise 2
Write a program to process different objects that can fly in a systematic mantter through the same interface they implement.
-
Interface Flight: Contain only one void method fly() (no parameters).
-
Two non-abstract classes Airplane and Bird that implement the Flight interface.
-
Airplane class:
-
Two attributes: model and year built
-
-
Bird class:
-
One attribute: type
-
-
Besides the contructors and getters/setters, both the Airplane and Bird classes should implment the fly method. The Airplane’s fly method should print "I’m an airplane that relies on an engine to fly." The Bird’s fly method shoud print "I’m a bird who flaps wings to fly." Each should also include a toString() method.
Hint: For both the toString and feedLoadingSchedule methods, use the output of the program (see below) to determine the format of the string to return.
-
Appication program ThingsThatFly
-
Create one Airplane object and two Bird objects. The program must store these objects in one array or array list.
-
The program must use a loop to print the objects and how they fly. Your program should have the following output:
-
Airplane [model=Boeing 747, year=2016]: I'm an airplane that relies on an engine to fly.
Bird [type=Eagle]: I'm a bird who flaps my wings to fly.
Bird [type=Hummingbird]: I'm a bird who flaps my wings to fly.
3.9.3. Exercise 3
This exercise extends Exercise 2. Define another interface Movement that extends the interface Flight from Exercise 2. It contains two new abstract methods walk() and jump(). Both have no parameters and no return values. Now make the Airplane and Bird classes implement the Movement interface. The program that contains the main method should be called *ThingsThatMove*. It should create the same objects as in Exercise 2 and store them in an array. Your program should have the following output:
Airplane [model=Boeing 747, year=2016]:
I rely on my engine to fly.
I tax on my wheels.
I cannot jump.
Bird [type=Eagle]:
I flap my wings to fly.
I walk on my feet.
I jump by leaping from my feet.
Bird [type=Hummingbird]:
I flap my wings to fly.
I walk on my feet.
I jump by leaping from my feet.
4. Exceptions
4.1. Learning Outcomes
-
Describe what a Java exception is and how it is used in object-oriented programming
-
Handle Java exceptions using try/catch statements
-
Differentiate between handling an exception and simply "throwing" or letting is happen
-
Design effective exception handling
-
Use available Java Exception classes available in the Java API
-
Create and use a custom exception
4.2. Resources
4.2.1. Text and Tutorials
-
Introduction to Programming Using Java- Eighth Edition by David J. Eck: Chapter 8 Chapter 8 - Correctness, Robustness, Efficiency
-
Java, Java, Java: Object-Oriented Problem Solving bby Ralph Morelli and Ralph Walde: http://www.cs.trincoll.edu/~ram/jjj/jjj-os-20170625.pdf Chapter 10 Exceptions: When Things Go Wrong
-
Oracle Java Tutorial Lesson on Exceptions: https://docs.oracle.com/javase/tutorial/essential/exceptions/index.html
4.2.2. Videos
-
The Theory of Exceptions Video : https://www.youtube.com/watch?v=8WTVLa1Xtsk
-
Practical Use of Exceptions Video: https://www.youtube.com/watch?v=RrKmwLBEv-U&t=20s
-
Another Exceptions Video: https://www.youtube.com/watch?v=K_-3OLkXkzY
4.3. Overview
When running your program, it is not uncommon to run into problems which cause the program to terminate or stop running. When these types of errors are detected in Java programs, the run-time environment creates an object known as an exception. Another definition for an exception is a run-time error that causes a program to crash. The name also implies that it is a situation that is not normal execution. The Java API contains a set of classes used as templates for the objects created when the errors are detected. In the package java.lang, these classes are sometimes called the exception classes. In an ideal world, no program would encounter exceptions. However, we don’t live in an ideal world so the Java language contains statements and constructs that allow us to "handle" exceptions when they occur. Handling an exception means that the program contains code to either correct an exception or provide an alternative to allowing the program to crash. Exceptions can be caused by errors generated by external inputs or simply a bad program design. Java uses the term "throw" to describe what happens when an exception occurs. The run-time environment is said to throw an exception when it occurs. What is actually happening is that the run-time environment is gathering information about the type of error that occurred and the line at which it occurred and storing that information into an object that is derived from the Java exception classes. The programmer can also include code which allows for an exception to be thrown by the program itself under certain circumstances. An unhandled exception will cause the running programming to terminate and print a stack trace. To help prevent this, the programmer can include try/catch blocks which allow the programmer to provide an alternate choice to ending the program. This is known as "handling" the exception. In addition, it is possible to write code which creates, throws and handles custom exceptions which inherit from the API provided exception classes. This chapter describes common Java API exceptions, how to programmatically throw exceptions, how to handle exceptions and how to create your own customized exceptions.
4.4. Exception Handling
The idea of handling problems during execution has been a part of programming since there has been programming. However, Java was one of the first languages to provide special statements for the handling of these exceptional problems. Some common errors that generate exceptions are divide by zero errors and array index out of bounds. A pseudocode solution to prevent this error without special statements is shown below.
*Divide by Zero Exception Handling Pseudo Code*
if (denominator not equal to 0)
   answer = numerator/denominator;
else
  inform user that division is not possible due to divide by zero
This traditional approach incorporates the handling of the error into the normal execution of the code. Java has incorporated an exception-handling model into the code itself. In the case of a divide-by-zero error occurring without exception handling code, the run-time environment detects the error and aborts the program. Then it prints a stack trace. An example stack trace for a divide-by-zero error is shown below.
java.lang.ArithmeticException: / by zero
	at DivideException.main(DivideException.java:10)
As you can see, the stack trace first describes the exception that occurs and then lists the call stack ending with the line number and method name where the exception occurs. In this case, the error occurred in the main method of the java file DivideException.java on line 10. The stack trace is intended to help the programmer debug the problem and is not considered a very good error message for a casual user.
The act of detecting the error and causing the program to abort by default is known as "throwing" the exception. The exception shown - java.lang.ArithmeticException - is one of many provided in the Java API. Each exception is a class in the Java library. The diagram below shows a UML diagram of the exception classes in the Java library. As you can see in the diagram, all the Exceptions inherit from the class Throwable.
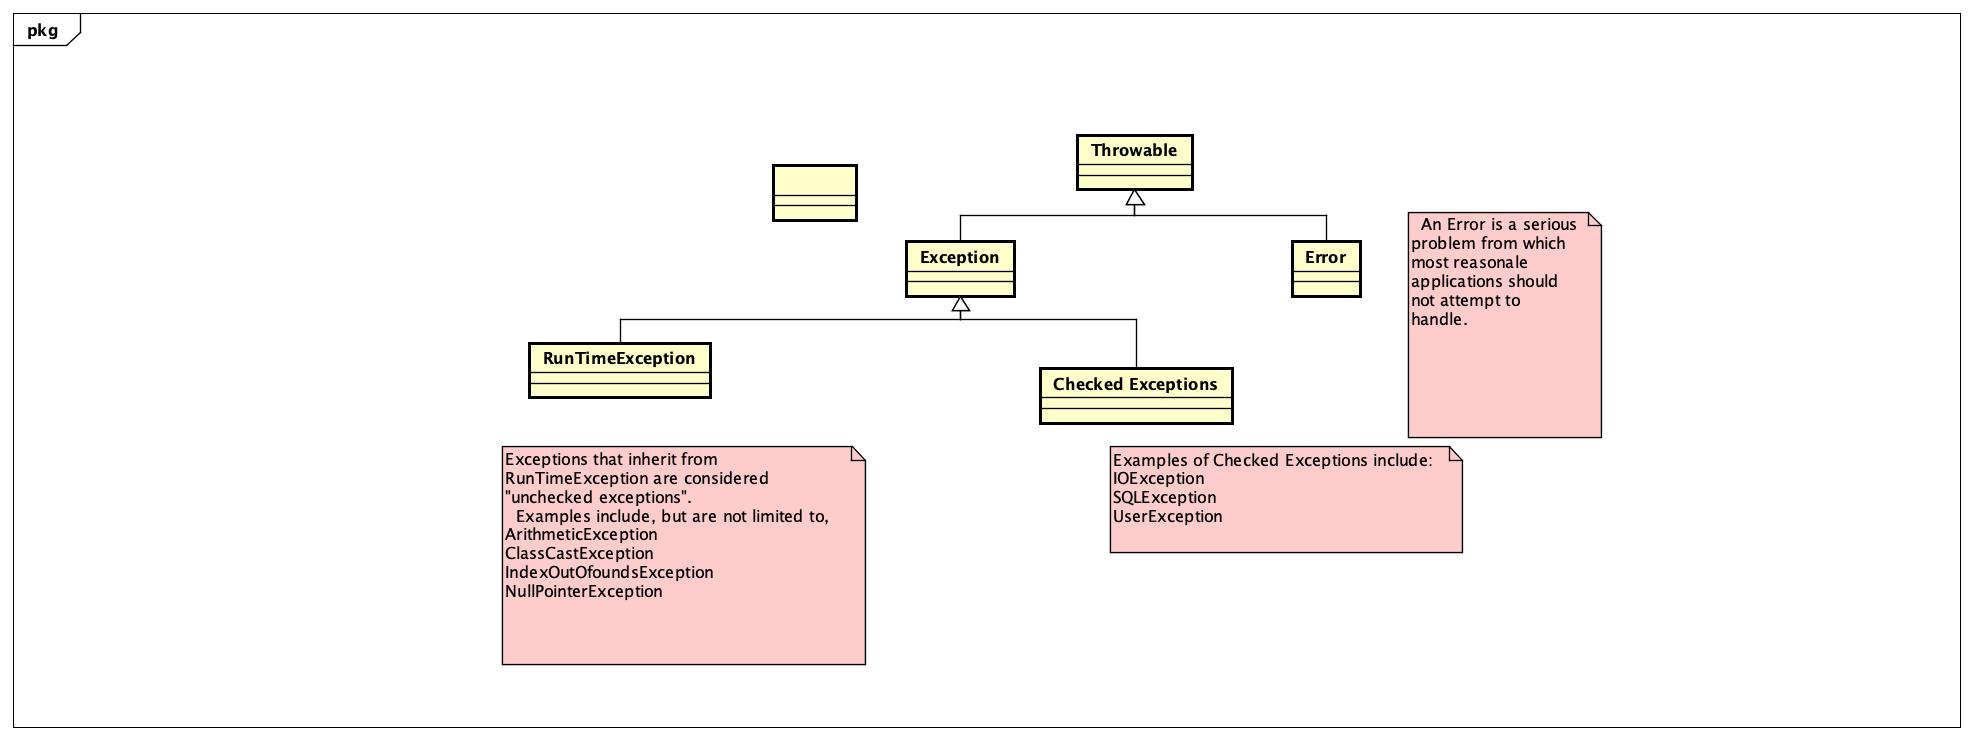
4.5. Checked Exception vs UnChecked Exception
The exception classes are divided into checked and unchecked exceptions. The unchecked exceptions inherit from the class RunTimeException. Unchecked means that the compiler will not require exception handling code around a statement that has the potential to thrown an exception. Divide by zero is an example of an unchecked exception. If it were checked, every division statement would need to have exception handling code. Unchecked exceptions are typically conditions that the program can not anticipate or recover from. Many of these are indications of a logic error in the code that should be corrected by changing the code. For example, passing an object reference variable to a method before it is initialized will result in a NullPointerException being generated. The programmer should make sure that the reference variable is intialized before using it. Checked exceptions are conditions that a well-written program should anticipate and plan for. Many of the checked exceptions involve file processing and are used prominantly in the next chapter on file processing. A call to a method that is capable of throwing an exceptions will receive compiler errors if it does not use exception handling code. Custom designed exception can be either checked or unchecked depending upon which parent exception class they inherit from.
4.6. Try/Catch/Finally Blocks
Exception handling code can be looked at as having three types of operations. *Declaring an exception *Throwing an exception *Catching an exception
4.6.1. Declaring an exception
All executable code in Java belongs to a method. If a method is capable of throwing a checked exception, it contains a throws statement in its header. For example, a method which throws an object of type IOException would look like this: public void aMethod(int a) throws IOException
This does not mean the aMethod will always throw an IOException, it means that the method is capable of doing so.
4.6.2. Throwing an exception
In order for that error to be thrown, there must be code either in aMethod or one of the methods it calls that detects an error, creates the exception object and then throws the exception. Suppose that the program detects that an argument passed to the method is of incorrect type or violates the method contract (a negative value received when a positive one is expected). It could then throw an IllegalArgumentException object. The code belows show how the exception is created and thrown. The code shown assumes that the class java.lang.IllegaalArgumentException has been properly imported into the Java file containing the code.
IllegalArgumentException ex = new IllegalArgumentException("Negative argument received");
throw ex;
Tip: The keyword to declare an exception is throws and the keyword to throw an exception is throw. These are similar, but do different things.
4.6.3. Catching an exception
If a programmer does not want the exception to terminate the program, at some point the exception must be caught in a try-catch block. The try-catch block allows the programmer to separate the code that executes when no exception occurs from the error handling code. The try block contains the desired execution of the code. The catch block contains the code to handle an error if and when it occurs. If no exceptions occur during the execution of the try block, the catch block code is ignored.
try{
// code that could potentially thrown an exception
}
catch (NullPointerException e)
{
  // code that is called if a NullPointerException occurs in the code encased in the try block
}
catch (ArithmeticException e2)
{
  // code that is called if an ArithmeticException occurs in the code encased in the try block
}
The code within the catch block or blocks is the exception handling code. If no handler exists for the exception that occurs, the exception will result in the program terminating. In the example above, there are two catch blocks for the single try block. Syntax only requires one catch block, but it is often useful to be able to do different things for different types of exceptions. It is also possible to use inheritance to catch multiple exceptions in a single catch block.
try
{
// code that could potentially throw an exception
}
catch (Exception ex)
{
   // this will catch any exception thrown by the program since all Exception types inherit from the parent class named Exception.
   }
If using multiple catch blocks- be sure the more general Exception class is last.
// wrong way to do it
try
{
   // code
}
catch (Exception ex)
{
   // this block will catch all exceptions since all handlable exception inherit from Exception
}
catch (NullPointerException e)
{
  // a waste of code- this will never be called because the NullPointerException inherits from Exception
}
// right way
try
{
// code
}
catch (NullPointerException e)
{
// This will handle any NullPointerExceptions
}
catch (Exception ex)
{
// this block will catch any other exceptions that occur - order matters
}An exception object contains valuable information about what happened to cause it. All exceptions inherit the following methods from the parent class Throwable.
String getMessage() - this method returns a string identifying the type of exception that occurred.
void printStackTrace() - this method prints current stack trace to the console and the type of exception thrown.
A stack trace is sometimes called a stack backtrace or even just a backtrace. The stack traceis a list of stack frames. A stack frame indicates a moment during an application’s execution when a method is called. A stack frame contains information about where the method was called from in the Java source code. So the Java stack trace generated when an exception is called is a list of frames that starts at line in the method the exception occurred and extends back to when the program started. While not particularly useful to program user, it provides valuable information to the programmer about where the exception occurred.
4.7. Handling Exception vs Throwing Exception
When a method throws a checked exception or calls another method that does, the compiler will not compile the code unless the exception is either thrown or handled. To handle the exception, the method must contain a try/catch block as described in the previous section. Throwing an exception passes the burden of handling it to the calling method. If this is the main() method, there is no calling method and the exception causes program termination. To throw an exception, the method must use the key word throws in the method header.
public int someMethod() throws IOException
{
  // code that can cause an IOException to occur
}
4.8. Custom Exceptions
It is possible to create and throw customized exceptions for a program. To do this, the first step is to create the custom exception. An exception is a Java class and it must inherit from one of the existing Java Exception classes from the Java API.
// A custom Exception class
// CustomException.java
public class CustomException extends Exception
{
   // custom exceptions must include a constructor that has a single parameter of type String.
   public CustomException(String s)
   {
      // this constructor must call the parent class constructor
      super(s)
   }
}
Once the custom exception class is created and compiled, your program can then explicitly cause that exception to happen.
public void someMethod() throws CustomException
{
   // some code
   if (bad thing happens)
   {
      // note that you throw an object of CustomException - not the class so an object must be created.
      throw new CustomException("A bad thing happened");
   }
   // some more code that only executes if the bad thing didnt happen
}
4.9. An example of Exception Handling used to validate input from user
A common use of exception handling is to make sure that the user enters the type of data desired when reading from the console. When using Scanner objects to read user input, a String input when requesting a numeric input can generate an InputMismatchException causing the program to abruptly terminate. Exception handling can prevent the termination and allow the user to try again. The following example asks the user to enter 4 numbers and then computes the average. The first version has no exception handling and if a letter is entered instead of a number- the program will throw an exception and terminate- download it and try!
/**
 * This class prompts the user for four numbers and then
 * computes the average and prints it.
 *
 */
import java.util.Scanner;

public class AverageCalculator
{

	public static void main(String[] args)
	{

		// declare variables
		Scanner consoleInput = new Scanner(System.in);

		double[] x = new double[4];
		double average = 0;
		double sum = 0;

		// input numbers
		for (int i = 0; i < 4; i++)
		{
			System.out.println("Enter number " + (i + 1) + ":");
			x[i] = consoleInput.nextDouble();
			sum = sum + x[i];
		}
		// compute average
		average = sum / 4.0;

		// output average to console
		System.out.println("The average is " + average);

	}

}
Now let us look at an example with exception handling that simply ignores the exception.
/**
 * This class prompts the user for four numbers and then
 * computes the average and prints it.
 *
 */
import java.util.InputMismatchException;
import java.util.Scanner;

public class AverageCalculatorIgnore
{

	public static void main(String[] args)
	{

		// declare variables
		Scanner consoleInput = new Scanner(System.in);

		double[] x = new double[4];
		double average = 0;
		double sum = 0;

		// input numbers
		for (int i = 0; i < 4; i++)
		{
			try
			{
				System.out.println("Enter number " + (i + 1) + ":");
				x[i] = consoleInput.nextDouble();
				sum = sum + x[i];
			} catch (InputMismatchException ex)
			{
				// ignore the error by reading the lingering delimiter
				consoleInput.nextLine();
			}
		}
		// compute average
		average = sum / 4.0;

		// output average to console
		System.out.println("The average is " + average);

	}

}
The problem with ignoring the bad input is that the user does not get a chance to reenter the correct value. That value is preset to 0 and skews the average. Let’s look at a third version that prompts the user to reenter the mistyped value.
/**
 * This class prompts the user for four numbers and then
 * computes the average and prints it.
 *
 */
import java.util.InputMismatchException;
import java.util.Scanner;

public class AverageCalculatorHandle
{

	public static void main(String[] args)
	{

		// declare variables
		Scanner consoleInput = new Scanner(System.in);

		double[] x = new double[4];
		double average = 0;
		double sum = 0;

		// input numbers
		for (int i = 0; i < 4; i++)
		{
			boolean goodValueReceived = false;
			while (!goodValueReceived)
			{
				try
				{
					System.out.println("Enter number " + (i + 1) + ":");
					x[i] = consoleInput.nextDouble();
					sum = sum + x[i];
					goodValueReceived = true;
				} catch (InputMismatchException ex)
				{
					// read in the bad value
					consoleInput.nextLine();
					System.out.println("Sorry- that wasn't a number -try again");
				}
			}
		}
		// compute average
		average = sum / 4.0;

		// output average to console
		System.out.println("The average is " + average);

	}

}
Note that all of the variables used are declared before the try/catch block. This is because any variable declared in the try block is only usable in the curly braces surrounding the try code due to variable scope. When using exception handling, make sure all variables are declared before the try/catch block.
4.10. Summary
-
Exceptions in Java programs occur when a run-time error occurs that the JRE can not recover from.
-
A Java Exception is an instance of class derived from java.lang.Throwable
-
When a run-time error occurs that causes an Exception class to be instantiated and interrupt the program execution, we say that the exception was thrown
-
Exceptions can be either checked or unchecked
-
Checked exceptions mean the compiler requires the programmer to acknowledge the possibility of the exception through the use of a try/catch block to handle it or a throws clause on the method indicating that handling the exception is being passed to the calling method
-
The compiler does not require that programmers acknowledge unchecked exception possibility.
-
Try/catch blocks allow the user to handle an exception rather than simply letting it end the program
-
Custom exceptions can be created that inherit from existing library Exception classes.
4.11. Key Terms
Exception - An erroneous or anomalous condition that comes up when a program is running.
Exception Handling - An approach that separates a program’s normal code from it’s error-handling code.
Throw - To throw an exception is to create an exception object and pass it off to the run-time environment. This is done explicity in code using the throw keyword.
Stack Trace-A stack trace is sometimes called a stack backtrace or even just a backtrace. The stack traceis a list of stack frames. A stack frame indicates a moment during an application’s execution when a method is called. A stack frame contains information about where the method was called from in the Java source code. So the Java stack trace generated when an exception is called is a list of frames that starts at line in the method the exception occurred and extends back to when the program started.
4.12. Exercises
4.12.1. Exercise 1
Create a simple addition calculator in Java. The program should prompt the user to enter 2 integers, then adds the numbers and prints the result. Make sure the program includes appropriate exception handling in case the user does not enter appropriate integer values.
4.12.2. Exercise 2
Write a Java program to randomly create an array of 50 double values. Prompt the user to enter an index and prints the corresponding array value. Include exception handling that prevents the program from terminating if an out of range index is entered by the user. (HINT: The exception thrown will be ArrayIndexOutOfBounds)
4.12.3. Exercise 3
Create a custom Exception named IllegalTriangleSideException. Create a class named Triangle. The Triangle class should contain 3 double variables containing the length of each of the triangles three sides. Create a constructor with three parameters to initialize the three sides of the triangle. Add an additional method named checkSides with method header - *boolean checkSides() throws IllegalTriangleSideException *. Write code so that checkSides makes sure that the three sides of the triangle meet the proper criteria for a triangle. It will return true if and only if the sum of side1+ side2 is greater than side3 AND the sum side2+side3 is greater than side1 AND the sum of side1+ side3 is greater than side2. If any of those three conditions is not met, the method will create and throw an IllegalTriangleSideException. Add a main method to create and check two to three different triangles.
4.13. Issue Tracker/Comments
5. File Input/Output
5.1. Learning Outcomes
-
Describe the difference between text and binary files
-
Access (open) files for reading and writing
-
Learn the common file handling exceptions and how to handle them
-
Use the API classes BufferedFileReader and BufferedFileWriter for text file access
-
Use Scanner to read and parse text files.
-
Understand the purpose of and use regular expressions
-
Use PrintWriter to output to and create text files.
5.2. Resources
5.2.1. Text and Tutorials
-
Introduction to Programming Using Java- Eighth Edition by David J. Eck: http://math.hws.edu/javanotes/c11/index.html Chapter 11 - Input/Output Streams, Files and Networking
-
Java, Java, Java: Object-Oriented Problem Solving bby Ralph Morelli and Ralph Walde: http://www.cs.trincoll.edu/~ram/jjj/jjj-os-20170625.pdf Chapter 4 and Chapter 11 Files and Streams
-
Java API java.io package reference : https://docs.oracle.com/en/java/javase/11/docs/api/java.base/java/io/package-summary.html
-
Oracle Java Tutorial on Regular Expressions: https://docs.oracle.com/javase/tutorial/essential/regex/index.html
5.2.2. Videos
-
Video on how to read files using Scanner : https://www.youtube.com/watch?v=3RNYUKxAgmw
-
Video on how to write files with PrintWriter : https://www.youtube.com/watch?v=Bws9aQuAcdg&list=PLFE2CE09D83EE3E28&index=81&t=0
-
Video on reading and writing file- only first ten minutes is on text files : https://www.youtube.com/watch?v=_jhCvy8_lGE
5.3. Overview
Computer files are used to store collections of data on a computer storage device such as a hard drive. Java contains a series of API classes to aid in the reading and writing of data to and from these files. In this chapter, we discuss text file input and output. Text files can be viewed as computer files containing a collection of Unicode (or a subset of Unicode such as ASCII) characters. Typically, the data is organized into a series of strings which can be read into a computer program. Binary files are a collection of binary coded data in the native format of the computer and requires a different set of API classes to process the data. Text files are useful to programmers as they can be used to store human readable data that can be edited either within a Java program or externally using text editors. Each file has a short name with a file extension such as "HW1.java" and a path name. The path name describes where the file is stored on the computer storage device. In some computers this is known as the directory or folder location. In a Windows hard drive, an example of a path name might be: "C:\\Users\\cjohns25\\Workspace\\Homework1\\src" . Note that when using the \ character inside a Java String type, we repeat it twice because that character is used to indicate a special nonprinting character inside the String. This chapter explores how to read and use data from a text file in a Java program in a couple of different ways. It also explores how to create and write to text files within a Java program. This is primarily done using a set of Java API classes in the java.io package.
5.4. Streams and Files
All data from external sources coming into or out of a Java program uses streams. Streams are one way connections between an external data source and the Java program. It is useful to think of them as a pipe where only one piece of data may flow at a time. Data can also only flow one way. So we use different streams for reading a file and writing a file. You have been using the System.in stream for reading data from the computer keyboard. You have also been writing data using the System.out stream to write to the console for the user to see. The streams used to read and write files operate similarly and you will recognize some of the methods we will use to read and write to files.
5.5. The File class
Before we can read or write a file, we must "open" the file for reading and writing. The run-time system has been taking care of opening the streams for user input and output, but the programmer is responsible for opening the streams for file handling. The first step is to create an instance of the File class which contains all the information the system needs to know about the location of the file. It provides a platform independent representation of the files name and directory information. You can create a File instance using only the name of the file and allow the IDE to look for it in the default directory for file input. However, this default directory is different for different IDE’s. Consult your IDE documentation for the default file directory if you desire to use only the file name.
// creating a File instance using the default directory
import java.io.File;
File myFile = new File("Hw1.txt");
However, it is best to use a fully realized path name when creating the file. This is going to be different depending upon the operating system of the computer you are using. Refer to your operating system reference to figure out fully realized path names.
// creating a file using fully realized path name in Windows
import java.io.File;
// remember to get a single \ in a Java string we have to put \\
File myFile = new File("C:\\Users\\cjohns25\\Desktop\\HW1.txt");

// a full realized path name on an Apple MacBook
File myMacFile = new File("/users/cjohns25/Documents/2150/HW1.txt");
Once we have created a File object for the file we wish to interact with, we are ready to open our data stream to the file.
5.6. BufferedReader and BufferedWriter
There are actually several ways to read and write from text files using the Java API classes. We are going to look at some common ways to do so. Text files typically consist of human readable characters. When dealing with lines of text, the easiest class to use for reading those lines of text in is the BufferedReader class. The associated output class for writing to files is known as BufferedWriter. There are limitations with these classes since they can only read or write lines of text. BufferedReader has a method named readLine() for reading a line of text. The example below shows an example of reading lines of text from a file named "text.txt" and then writing to the console using System.out.
import java.io.File;
import java.io.BufferedReader;

...
File f = new File("text.txt");
BufferedReader buffer =  null;
try
{
   buffer= new BufferedReader(new FileReader(f));
   String aLine = buffer.readLine();
   System.out.println(aLine);
}
catch (IOException ex)
{
    // code to handle either an empty file or nonexistent file
}
The BufferedReader and BufferedWriter class are useful when dealing with large chunks of data. This is useful in certain situations when dealing with external devices that deal in large chunks of data, but not so much when trying to take discrete pieces of data from a file and place them into various variables. Let’s look at an example where this might be useful.
5.6.1. An Example using BufferedReader and BufferedWriter
The following example shows how to use BufferedReader and BufferedWriter to copy from one file to another. In this code, a file named "example.txt" is copied character by character into a new file titled "exampleCopy.txt". Note that if the text file "exampleCopy.txt" already exists, this program will erase any content currently in the file.
/**
 * This example shows how to copy one text file to another using BufferedReader
 * BufferedWriter classes. Requires that the file "example.txt" be in the
 * default file directory for your IDE.
 *
 */
import java.io.File;
import java.io.FileReader;
import java.io.FileWriter;
import java.io.IOException;
import java.io.BufferedReader;
import java.io.BufferedWriter;

public class BufferedWriterExample
{

	public static void main(String[] args)
	{
		File readFile = new File("example.txt");
		File writeFile = new File("exampleCopy.txt");
		BufferedReader readBuffer = null;
		BufferedWriter writeBuffer = null;
		// open files for reading and writing
		int readResult = 0;
		try
		{
			readBuffer = new BufferedReader(new FileReader(readFile));
			writeBuffer = new BufferedWriter(new FileWriter(writeFile));
			do
			{
				readResult = readBuffer.read();
				// -1 = nothing to read
				if (readResult != -1)
				{
					writeBuffer.write((char) readResult);
				}
			} while (readResult != -1);
			writeBuffer.close();
			readBuffer.close();

		} catch (IOException ex)
		{
			ex.printStackTrace();
			System.out.println("Problem with files");
		}

	}

}
5.7. PrintWriter
The most common way to write to a text file is through the use of the java.io.PrintWriter class. It is capable of writing a variety of data types and is quite versatile. You have also been using the PrintWriter methods everytime you write to the console. System.out is an object of type PrintWriter. Unlike System.out, it is necessary to open a file and create an object of type Printwriter associated with each file you are writing. The constructors for PrintWriter allow you to create with either a File object or just a String containing the file name. Examples below show both ways of opening a text file for writing.
File f = new File("outText.txt");
PrintWriter myWriter = null;
try
{
  // open the file using a File object
   myWriter = new PrintWriter(f);

   myWriter.println("I am writing this to the file");

   myWriter.close();
  }
  catch (IOException ex)
  {
     // handle exception generated if system can not open or write to file
  }
//same example- opening file using only file name
PrintWriter myWriter = null;
try
{
// open the file using a File object
myWriter = new PrintWriter("outText.txt");
myWriter.println("I am writing this to the file");
myWriter.close();
}
catch (IOException ex)
{
// handle exception generated if system can not open or write to file
}Both ways of opening the file are equally effective and efficient. Most programmers choose the second way because it requires less programming. In the example shown, a simple String literal was written to the file using the println() method. You have been using println and print methods to write to the console. Writing to a file using them in an identical fashion.
Note: Opening and writing to a file has potential to generate one of several checked exception that inherit from IOException. Therefore, it is important to open and process files using proper exception handling.
5.7.1. Example of writing data to a text file
In this example, the user is prompted for a file name. A text file of that name is created and written to. It is important to note that if the named file already exists in the file path used, it will erase the current contents of that file and replace them with the text in the example. Also, this is the first time you have seen the use of the finally block in the try/catch blocks used for exception handling. The code in the curly braces of the finally block is executed regardless of whether the code in the try block executes without problem or an exception is encountered. The use in this example is common as we are closing the file in the finally block. A file being written to which is not closed properly at the end of the program is not guaranteed to contain the text written by the program. Closing of the files in a finally block is a common use of the block and is considered a best practice for programmers. The compiler will warn you if the file is not closed, but will allow you to run your program without properly closing the file.
import java.io.File;
import java.io.IOException;
import java.io.PrintWriter;
import java.util.Scanner;

/**
 *
 * Example of opening a text file for writing and writing various information to
 * it.
 *
 */
public class WriteTextFile
{

	public static void main(String[] args)
	{

		// declare variables before try/catch block to avoid scope issues

		// scanner to allow user input values
		Scanner consoleInput = new Scanner(System.in);

		// variable for file name
		String fileName;

		// variable to hold info about the File
		File theFile;

		// PrintWriter object to open for writing to file
		PrintWriter outputFile = null;

		// open file with proper exception handling
		boolean fileOpen = false;

		while (!fileOpen)
		{
			try
			{
				// ask user for a file name
				System.out.println("Please enter name of file to be created and written to:");
				fileName = consoleInput.nextLine();
				theFile = new File(fileName);
				outputFile = new PrintWriter(theFile);
				fileOpen = true;
			} catch (IOException ex)
			{
				System.out.println("Unable to open that file- check directory information and file name");
			}

		}
		// using a second try/catch block to separate writing errors from
		// file opening errors
		try
		{
			// file opened for writing - let's put something in there
			outputFile.println("This is how to write a string literal to a file");
			double x = 55.6;
			outputFile.println("This is how to print a double value: " + x);
			int y = 10;
			String s = "This is a string variable";
			outputFile.println(s + " this is an integer " + y);

		} catch (Exception ex)
		{
			// print the stack trace so programmer can see what line the exception
			// occurred on
			ex.printStackTrace();
			// tell the user something
			System.out.println("Unable to write to the file- program is terminating");
		} finally
		{
			// regardless of whether exception occurred- close the file opened for writing
			outputFile.close();
		}

	}

}
5.8. Scanner
The class we use to read individual bits of data from a text file is Scanner. Yes this is the same Scanner class we use for reading input from the keyboard. So you are already familiar with the common methods for reading information. *next() - for reading a String *nextLine() - for reading a line of text terminated by the end of line character *nextInt() - for reading an integer *nextDouble() - for reading a double
When reading from the keyboard, we create a Scanner object and pass the System.in object as a parameter at construction. To use Scanner to read from a File, we create the Scanner object by passing either a File object or String containing the file name similar to PrintWriter. Also, unlike reading from the keyboard, creating a Scanner object linked to a file can potentially generate a checked exception so it is important to use proper exception handling. See the two examples for opening a Scanner to read a file shown below.
File f = new File("dataFile.txt);
Scanner fileScanner = null;
try
{
  fileScanner = new Scanner(f);
  /*
     alternately could have written
     fileScanner = new Scanner("dataFile.txt");
  */

  while (!fileScanner.hasNext())
  {
       // read the next piece of data in the file- this example shows all String data
       String data = fileScanner.next();
  }
  fileScanner.close();
}
catch (IOException ex)
{
   // code to handle a problem opening or reading from the file.
}
Note above that we used a new method on Scanner that we didn’t use with the keyboard. This method is hasNext(). This method indicates whether or not there is any remaining data in the file that has not already been read. It does not read the data- it simply indicates that there is still data yet to be read. Remember, we are reading from a stream of data and can only read each piece of data once. It is also not possible to reread data so be very careful not to throw data away.
5.8.1. How does Scanner work?
The methods in Scanner used to read data, read input separated by delimiters. Delimiters are the nonprinting characters used to format the text such as blank spaces, tabs and end of line characters. The methods above first skip a delimiter and then read characters until another delimiter is encountered. They do not read the second delimiter. The characters read are then converted to the desired type indicated by which method was called. If the characters do not match what was asked for, an InputMismatchException is generated. For example, if the method nextInt() is called and the characters read contain a non-numeric character, an exception will be generated. The methods next() and nextLine() read and convert characters to Strings. The nextLine() method only uses end of line characters as delimiters. The end of line character is called a line separator in Java and is defined in a String as \r or \n in Windows and \n on Unix. It is platform dependent- as a result you may occasionally see issues using nextLine() on cross platform files.
Files can also be read across the internet assuming the file desired to be read has a URL. Instead of creating a File object to use in constructing Scanner, a java.net.URL object is created.
// opening a file using a URL
String URLString = "www.somedomain.com/someFile.txt";
java.net.URL theURL = new java.net.URL(URLString);
Scanner urlReader = new Scanner(theURL);
5.8.2. File reading Examples
There are lots of ways to read data from a text file. And it mostly depends on the format of the text file. So before writing the program to read a file, the programmer should be aware of the format of the data. In this first example, the file name is determined by prompting the user to enter it. Then each line of the text file is read as a String. By reading the data as a String, the programmer does not have to know if the characters read are text, numeric or symbolic. However, once read that way, it must be parsed to use as anything other than a String.
import java.io.File;
import java.io.FileNotFoundException;
import java.io.IOException;
import java.io.PrintWriter;
import java.util.Scanner;

/**
 *
 * This example shows how to open a text file for reading and read each line as
 * a String and print to console
 *
 */
public class ReadStringsFromFile
{

	public static void main(String[] args)
	{
		// declare variables before using in try/catch loop to avoid scope issues
		// open a Scanner for user input
		Scanner consoleInput = new Scanner(System.in);

		String fileName = null;
		File theFile = null;
		Scanner inputFile = null;

		// open file with proper exception handling
		boolean fileOpen = false;

		while (!fileOpen)
		{
			try
			{
				// ask user for a file name
				System.out.println("Please enter name of file to be created and written to:");
				fileName = consoleInput.nextLine();
				theFile = new File(fileName);
				inputFile = new Scanner(theFile);
				fileOpen = true;
			} catch (FileNotFoundException ex)
			{
				System.out.println("Unable to open that file- check to make sure directory is corerct and file exists");
			}

		}

		// now read from the file - note- program will loop until valid file name
		// entered
		try
		{
			// continue to read while file contains info
			while (inputFile.hasNextLine())
			{
				// read the line
				String line = inputFile.nextLine();
				// output it to console
				System.out.println(line);
			}

		} catch (Exception ex)
		{
			// stack trace for programmer
			ex.printStackTrace();
			// message for user
			System.out.println("Unable to continue reading from file");
		} finally
		{
			inputFile.close();
		}

	}

}
Suppose we want to read a bunch of numbers from file. For example, we might have a file named numbers.txt that contains a bunch of test grades that we want to average. The text file might look like this:
44.5
33.2
-100
66.7
55
2345
-234256
12343256
22.7
10
0
If we use the first example, these numbers will become individual String data items in the program. In order to average them, we would have to convert them to double values. Or we could just read them as double values from the file. This is shown in the example below which reads in the numbers above and averages them all together.
import java.io.File;
import java.io.IOException;
import java.util.Scanner;

/**
 * Use with numbers.txt in default file directory Program reads the numbers.txt
 * file and averages all the numbers
 *
 */
public class ReadNumbersFromFile
{

	public static void main(String[] args)
	{
		// declare variables outside try/catch block to avoid scope issues
		Scanner inputFile = null;
		// keep a running total of numbers read
		double sum = 0;
		// keep count of numbers read
		int numberCount = 0;

		try
		{
			inputFile = new Scanner(new File("numbers.txt"));
			while (inputFile.hasNextDouble())
			{
				double num = inputFile.nextDouble();
				numberCount++;
				sum = sum + num;
			}

		} catch (IOException ex)
		{
			System.out.println("Problem reading file encountered");
			ex.printStackTrace();
		} finally
		{
			// ALWAYS close file when done
			inputFile.close();
		}

		// computer and print average of the numbers
		double average = sum / numberCount;
		System.out.println("The average of the numbers read is: " + average);

	}

}
5.9. Regular Expressions and parsing a file
Regular expressions allow us to expand the definition of what the Scanner sees as delimiters. Delimiters are characters used by Scanner to determine where one piece of data starts and another ends. The types of delimiter are often dictated by the method of Scanner used. For example, the methods used to read a specific type of data- next(), nextInt(), nextDouble(), etc use whitespace characters by default. Whitespace characters are non-printing characters used to provide negative space on a printed page. These provide negative or "white" space on a printed page. Examples are the tab character, the blank space character and the new line character. The method nextLine() only uses the new line character as a delimiter. The input methods work by skipping any delimiters, reading characters until the next delimiter is reached. The characters read are converted into the desired type and returned. If the characters read do not match the desired type (i.e. "abc" is read when calling nextInt()), an InputMismatchException is thrown.
We can modify the characters the Scanner object uses as delimiter by passing in a String known as a regular expression or regex using the Scanner method useDelimiter(String regex).
Some commonly used regex Strings are defined at: https://www.jrebel.com/blog/java-regular-expressions-cheat-sheet . Advanced users of regular expression will use the Java Library class Pattern to define complex regular expressions. A common simple use is to read comma delimited files like those sometimes generated by spreadsheet programs. A comma delimited file contains data in a text file separated by a comma character. Comma characters are not default delimiters used by Scanner. We can add the comma as a delimiter by calling the useDelimiter() method on Scanner and passing in a comma character. See the example below which reads in a comma delimited file named Book1.csv. Here is what the file looks like.
1,2,3,4,5,6,7,8,9,10
If we attempt to read the 10 numbers using nextInt(), we will get InputMismatchException each time a comma is detected. By adding the comma as a delimiter, we fix that problem. See the file below that adds the comma as a delimiter and successfully reads the 10 numbers.
import java.io.File;
import java.io.IOException;
import java.util.Scanner;

/**
 * This example reads a set of numbers stored in a comma delimited file (.csv)
 * output from Excel using regular expressions- it sums the numbers and prints
 * the sum. To run properly need example file Book1.csv in default file location
 *
 */
public class ReadCSVFile
{

	public static void main(String[] args)
	{
		Scanner inputFile = null;
		int sum = 0;
		// define the regular exppression
		String regex = ",";

		try
		{
			inputFile = new Scanner(new File("Book1.csv"));
			inputFile.useDelimiter(regex);
			// scanner will use the String regex to determine where one number starts
			// and another ends
			while (inputFile.hasNext())
			{
				String numString = inputFile.next();
				int num = Integer.parseInt(numString);
				sum = sum + num;
				System.out.println(numString);
			}
		} catch (IOException ex)
		{
			ex.printStackTrace();
			System.out.println("There was a problem opening or reading file");
		} finally
		{
			inputFile.close();
		}

		System.out.println("The sum is : " + sum);

	}

}
5.10. Case Study: A Client Database
Let’s look at an example of using text files to contain information about a business’s client using text files to store the information and object-oriented principles to design the application. Note that the client information is minimal for purposes of brevity. We start by creating a class to hold information about a single client. See the class below. Note that the class contains three attributes about a client and getter methods for the three attributes. The class also implements the Comparable interface in case we want to sort our Client list by name. And the class overrides the default toString() method to print client information in a user-friendly format.
/**
 * This class contains information about a client/customer that is maintained in
 * a business's data store. The class follows good object oriented principles
 * for data encapsulation and hiding.
 *
 */
public class Client implements Comparable<Client>
{
	// attributes of the client
	private int clientNumber;
	private String name;
	private String address;

	// constructor- no default constructor provided so number, name and address info
	// must be provided
	// at construction time. No set methods are provided to enforce this.
	public Client(int clientNumber, String name, String address)
	{
		this.clientNumber = clientNumber;
		this.name = name;
		this.address = address;
	}

	// getter methods to allow information to be viewed outside the class
	/**
	 * @return the clientNumber
	 */
	public int getClientNumber()
	{
		return clientNumber;
	}

	/**
	 * @return the name
	 */
	public String getName()
	{
		return name;
	}

	/**
	 * @return the address
	 */
	public String getAddress()
	{
		return address;
	}

	// compare to method to allow list of clients to be sorted if desired
	@Override
	public int compareTo(Client other)
	{
		// compare clients based on name and if same name- use clientNumber
		if (this.name.equalsIgnoreCase(other.name))
		{
			// name is the same - return based on clientNumber
			if (this.clientNumber < other.clientNumber)
			{
				return -1;
			} else if (this.clientNumber > other.clientNumber)
			{
				return 1;
			} else // they must be equal if none of above is true
			{
				return 0;
			}
		} else // names are not equal- use String compareTo to determine greater than, less
				// than or equal
		{
			return this.name.compareTo(other.name);
		}
	}

	// provide a toString method to print client information in easy to read fashion
	@Override
	public String toString()
	{
		return "clientNumber=" + clientNumber + "\nname=" + name + "\naddress=" + address + "\n";
	}

}
Now we have to write the application to keep a list of our business’s clients. The ClientDatabase class contains methods to read from a text file named "client.txt". The method creates objects of type Client based on the text read in and then stores them in an ArrayList. In applications like this, it is common to hard code the text file name since the business probably is not going to change. We also have a method to write an ArrayList of Client objects to the same text file. By using the same text file name, we will delete the old data and write the new. There are also methods to print a user menu and another to prompt for and read in the information to add a new Client object to the database. By creating separate methods to do these tasks, we break the problem up into smaller easier to solve problems. It also makes the code more modular, readable and reusable. See the code below.
import java.io.File;
import java.io.FileNotFoundException;
import java.io.PrintWriter;
import java.util.ArrayList;
import java.util.Scanner;

/**
 * This class reads data from textfile named client.txt and uses it to populate
 * an ArrayList of Client objects. The user is then able to change the ArrayList
 * by deleting or adding an object. Upon exit, the client.txt file is
 * overwritten with the modified ArrayList
 *
 */
public class ClientDatabase
{

	/*
	 * This method reads in client.txt, creates Client objects based on the data,
	 * and populates theList with the new Client objects
	 *
	 * @param ArrayList<Client>
	 *
	 * @return ArrayList<Client>
	 */
	public ArrayList<Client> readFile(ArrayList<Client> theList)
	{
		String fileName = "client.txt"; // hard coding file name
		File theFile = null;
		Scanner inputFile = null;

		try
		{
			theFile = new File(fileName);
			inputFile = new Scanner(theFile);
		} catch (FileNotFoundException ex)
		{
			System.out.println("Unable to open client file- continuing with empty list");
			return theList;
		}

		// file opened- now let's read from it
		try
		{
			while (inputFile.hasNextLine()) // loop until we get to end of the file
			{
				// first read client Number as String- mixing reading Strings and ints
				// causes issues- so read as String and convert
				String number = inputFile.nextLine();
				int clientNumber = Integer.parseInt(number);

				// now name
				String name = inputFile.nextLine();

				// now address
				String address = inputFile.nextLine();

				// now create Client object and add to ArrayList
				Client c = new Client(clientNumber, name, address);
				theList.add(c);
			}

		} catch (Exception ex)
		{
			ex.printStackTrace();
			System.out.println("Problem reading the client file- continuing with what was read");
		} finally
		{
			inputFile.close();
		}
		return theList;
	}

	/*
	 * This method takes the Client objects in theList and converts them to the
	 * proper format for writing in to the client.txt file. Note existing contents
	 * of client.txt are overwritten.
	 *
	 * @param theList
	 */
	public void writeFile(ArrayList<Client> theList)
	{
		// variable for file name
		String fileName = "client.txt";

		// variable to hold info about the File
		File theFile;

		// PrintWriter object to open for writing to file
		PrintWriter outputFile = null;

		try
		{
			theFile = new File(fileName);
			outputFile = new PrintWriter(theFile);
		} catch (FileNotFoundException ex)
		{
			System.out.println("Unable to write client.txt in default location- check file permissions and try again");
			// print stack trace for debugging - remove when program is working properly
			ex.printStackTrace();
		}

		// now write to and close the file
		try
		{
			// loop through the entries in ArrayList
			for (int i = 0; i < theList.size(); i++)
			{
				// get a local variable to shorten typing
				Client c = theList.get(i);

				// format of file = clientNumber, name, address - each on own line
				outputFile.println(c.getClientNumber());
				outputFile.println(c.getName());
				outputFile.println(c.getAddress());
			}
		} catch (Exception ex) // using exception instead of specific exception because many possible wrong
								// things could happen
		{
			ex.printStackTrace(); // print the stack trace for debug purposes.
		} finally
		{
			outputFile.close();
		}
	}

	/**
	 * Method to print the user menu to console
	 */
	public void printMenu()
	{
		System.out.println("a.  View Client List");
		System.out.println("b.  Add a Client");
		System.out.println("c.  Delete a Client");
		System.out.println("d.  Quit");
	}

	/**
	 * Method to prompt user to enter info for new Client
	 *
	 * @param Scanner
	 * @return Client
	 */
	public Client addClient(Scanner s)
	{
		System.out.println("Please enter client number");
		int number = s.nextInt();

		// read extra delimiter left from reading in a number
		s.nextLine();
		System.out.println("Enter client name");
		String name = s.nextLine();

		System.out.println("Enter client address");
		String address=s.nextLine();

		Client c = new Client(number, name, address);
		return c;

	}

	/**
	 * The main method
	 *
	 * @param args
	 */
	public static void main(String[] args)
	{
		// create scanner to read from console
		Scanner keyboard = new Scanner(System.in);
		// create an instance of this class to use non-static methods
		ClientDatabase theClass = new ClientDatabase();

		// create array list for client list and then read file
		ArrayList<Client> theClientList = new ArrayList<Client>();
		// call method to read file
		theClientList = theClass.readFile(theClientList);
		boolean keepLooping = true;
		// loop until user wants to quite
		while (keepLooping)
		{
			// print the menu
			theClass.printMenu();
			String choice = keyboard.nextLine();

			if (choice.equalsIgnoreCase("a"))
			{
				// print the database
				for (Client c: theClientList)
				{
					System.out.println(c);
				}
			}
			else if (choice.equalsIgnoreCase("b"))
			{
				// add a client
				theClientList.add(theClass.addClient(keyboard));
			}
			else if (choice.equalsIgnoreCase("c"))
			{
				// delete a client
				System.out.println("Enter client number to delete");
				// read as String to avoid delimiter issues
				String num = keyboard.nextLine();
				int clientNumber = Integer.parseInt(num);
				// find record in arrayList wiht matching client number and delete it
				for (int i = 0; i< theClientList.size(); i++)
				{
					Client c = theClientList.get(i);
					if (c.getClientNumber() == clientNumber)
					{
						theClientList.remove(i);
						System.out.println("Client removed");
						break;  // stop searching once found
					}
				}


			}
			else  //if a, b or c not chosen- end loop
			{
				keepLooping = false;
			}

		}

		// write back to file
		System.out.println("Writing new client list to file");
		theClass.writeFile(theClientList);


	}

}
5.11. Key Terms
File - A resource used to store a collection of data on a computer storage device.
Text File - A computer file consisting of human readable Unicode characters. Typically read using a text editor like the one in most IDE’s. Considered human readable.
Binary File - A computer file stored in the native binary code of the computer. Not considered human readable.
Input - Information or data from an external source read into a Java program.
Output - Information or data from a Java program written to an external source.
Open a File- Create a stream of data to or from a computer file.
File Stream - A one way queue of data either to or from a file. The order of data in the queue represents the order of the data in the file.
Close a File- Flush and close a stream of data to or from a file. When writing a file, forces the program to wait until all data in the stream has been written to the file. When reading a file, terminates any further data coming from the file.
Delimiter - Delimiters are whitespace characters used to separate various pieces of data in a text file. Examples are a blank space, tab, or end of line characters which do not show up as print in a text file.
5.12. Exercises
5.12.1. Exercise 1
Write a Java program to read in the 10 numbers in the example file Book1.csv provided above. The program should sum all the numbers, find the lowest number, find the highest number, and computer the average. Upon completion of the processing, the program should write a new text file named stats.txt with the information found in the following format where xxx represents a number calculated above.
The sum of the numbers is: xxx
The lowest number is: xxx
The highest number is : xxx
The average of the numbers is : xxx
5.12.2. Exercise 2
Using the class Poem below. Write a complete Java program that creates three different objects of type Poem. The program shall then open a text file named poems.txt for writing and write the information about each poem to the text file. The program shall NOT write the toString() version of the object to the file, but write first the poem name on a line and then the poet name on a second line for each poem.
/**
 * Poem.java
 *
 * A class representing information about a poem for use in Chapter 5 Exercise 2
 *
 */
public class Poem
{

	private String name;
	private String poet;

	/**
	 * no-arg constructor
	 */
	public Poem()
	{
		// initialize attributes
		name = "unknown";
		poet = "unknown";
	}

	/**
	 * @return the name
	 */
	public String getName()
	{
		return name;
	}

	/**
	 * @param name the name to set
	 */
	public void setName(String name)
	{
		this.name = name;
	}

	/**
	 * @return the poet
	 */
	public String getPoet()
	{
		return poet;
	}

	/**
	 * @param poet the poet to set
	 */
	public void setPoet(String poet)
	{
		this.poet = poet;
	}

	@Override
	public String toString()
	{
		return "Poem [name=" + name + ", poet=" + poet + "]";
	}

}
5.12.3. Exercise 3
Using the Poem class given in exercise 2, write a Java program to read from a text file named poem2.txt provided below. The program shall read the name and poet of each poem, create an object of type Poem for each name/poet pair and print all the read poem infor to the console.
We Real Cool
Gwendolyn Brooks
I Know Why the Caged Bird Sings
Maya Angelou
Hope is the Thing with Feathers
Emily Dickinson
The Road Not Taken
Robert Frost
5.13. Issue Tracker/Comments
6. Generics
6.1. Learning Outcomes
Students will be able to
-
Describe the benefits of generics
-
Create generic methods, generic classes and interfaces
6.2. Resources
6.2.1. Text
-
The Bastics of Java Generics by baeldung
-
Generics by Oracle
-
Generic Methods by Oracle
-
Generics by Gilad Bracha
-
Generics: How They Work and Why They are Important by Josh Juneau
6.2.2. Videos
-
Java Generics by Deege U
-
Java Generics by Imtiaz Ahmad
6.3. Introduction
Generics is "to detect errors at compile time rather than at runtime." (Liang, 2018)
Generics is "to detect errors at compile time rather than at runtime." (Liang, 2018) In this chapter, you will learn about Generics. In the previous chapters and open textbook, you learned about the ArrayList class and Comparable interface. They are examples of a generic class and a generic interface. Generics enable types to be parameters when defining classes, interfaces and methods. With this capability, you can define a class, an interface or a method with a generic type that the compiler can replace with concrete types. This chapter covers the following topics for generics:
-
Motivations and Benefits
-
Defining Generic Classes and Interfaces
-
Generic Methods
-
Raw Types and Backward Compatibility
-
Wildcard Generic Types
-
Erasure
-
6.4. Motivations and Benefits
"The motivation for using Java generics is to detect errors at compile time." (Liang, 2018)
In chapter 6 from Programming Fundamentals , you learned about ArrayLists. The ArrayList class (java.util.ArrayList) is generic and has been since JDK 1.5. Generic means that the class can be reused with any reference data type. However, before JDK 1.5, ArrayList used Object as the data type so one can add instances of arbitrary classes to the list. Such a pre-generic array list has two disadvantages. First, because its elements are interpreted as instances of the topmost Object class, casting is required every time you use an element as an object of its actual, intended type. Second, allowing heterogeneous objects in the list can cause type errors that are not detected at compile time but cause exceptions at runtime. Since JDK 1.5, the ArrayList class has been generic. Generics obviate the need of casting and allow for type checking at compile time rather than runtime which eliminates potential run time exceptions. The class Main below demonstrates an exception caused when using the pre-generic ArrayList which is not type-safe. In this example, list is meant as an array list of integers. However, created as a raw type, it allows arbitrary objects to be added. If one mistakenly adds the string "Strawberry" to the list by calling list.add("Straweberry"), a ClassCastException will occur at runtime when the method printSum attempts to cast the string to an integer in the statement sum += (Integer) i; in order to compute the sum of all elements which are expected to be integers.
 //before JDK 1.5
import java.util.ArrayList;

public class Main
{
    public static void main(String[] args)
    {
        ArrayList list = new ArrayList(); //<--  ArrayList without generic called raw type
        list.add(67);
        list.add(56);
        list.add(4);
        list.add("Straweberry"); //<-- it will throw the ClassCastException
        list.add(52);
        printSum(list);
    }

    private static void printSum(ArrayList n)
    {
        Integer sum = 0;
        for(Object i: n)
        {  //ArrayList (java.util.ArrayList) has the Object as a type
            sum += (Integer)i;//You need to type cast these to each particular data type every time
        }
    }
}
The following class demonstrates the use of a parametrized type ArrayList<Integer> of the generic class ArrayList<T>. Here the concrete argument type Integer takes the place of the formal type parameter T in the creation of the array list, where the bracket notation <Integer> specifies that every element of the array list is an instance of the Integer class. There is no need to cast when using the elements as integers. When one attempts to add a non-Integer object (e.g. a string) to the list, the compiler will generate an error.
//Since JDK 1.5 - this example shows how the generic types can be used.
import java.util.ArrayList;
public class Main
{
    public static void main(String[] args)
    {
        ArrayList<Integer> list = new ArrayList<>();  // <-- ArrayList with generic
        list.add(67);
        list.add(56);
        printSum(list);
    }

    private static void printSum(ArrayList<Integer> n)
    {
        int sum = 0;
        for(int i: n){
            sum += i;
        }
    }
}
Basic form to create an instance of generic class
BaseType<Type> object = new BaseType<Type>();
For the type argument, we cannot use a primitive type (e.g. int, char, double, boolean).Let’s look at another scenario. What if you want to develop a container that has the ability to hold objects of various types? First, you create a Container class as below.
public class Container
{
    private Object obj;

    public Object getObj()
    {
        return obj;
    }

    public void setObj(Object obj)
    {
        this.obj = obj;
    }
}
The following ContainerWithoutGenerics class uses a container to store and retrieve values. The main method creates a container and stores 23, "Java" and 45.98 in this order. So now 45.98 is the stored value. Then you need to use an explicit cast to retrieve the value.
import java.util.ArrayList;
import java.util.List;

public class ContainerWithoutGenerics
{
    public static void main(String[] args)
    {
        Container obj = new Container();
        obj.setObj(23); //store an int which is autoboxed to an Integer object
        obj.setObj("Java");//then store a string
        obj.setObj(45.98);//then store an double which is autoboxed to a Double object - current value

        List list = new ArrayList();
        list.add(obj);

        Double doubleValue = (Double)((Container)list.get(0)).getObj(); //current value is a double value
        System.out.println("doubleValue: " + doubleValue);
    }
}
In contrast, the following Container class uses a generic type T. In the type parameter section <T>, the angle brackets enclose the formal type parameter T.
public class Container<T>
{
    private T obj;

    public T getObj()
    {
        return obj;
    }

    public void setObj(T obj)
    {
        this.obj = obj;
    }
}
The main method of the ContainerTester class creates a container object of the parametrized class Container<String>, and stores different types of values to the container. The statement string.setObj(10.56) will cause a compilation error as a result of type-checking.
public class ContainterTester
{
    public static void main(String[] args)
    {
        Container<String> string = new Container<String>();
        string.setObj("Cupertino"); //Correct type value - String
        string.setObj(10.56); //won't compile because 10.56 is not a string value but a double value.
    }
}
Following class (a) is to identify if a person(e.g. Joe, Jesse) is an employee of classes: Microsoft, Apple, Google, or Adobe. The purpose of the program is to make sure only correct Company type where the employee is working. However, even though Google object named joe is created but you still can add joe to the company Apple and (b) is to show how generic class (Company<T>) is useful to fix the bug from the code (a).If you see Main class(b), you only can add employees from correct company. If _ Jesse_ is an employee of Microsoft, addEmployee() can only take Jesse.
a.
import java.util.ArrayList;

public class Main
{
    public static void main(String[] args)
    {
        Google joe = new Google("Joe"); // Joe is an employee of Google
        Microsoft jesse = new Microsoft("Jesse");
        Adobe bill = new Adobe("Bill");


        Company google = new Company("Google");
        google.addEmployee(joe);
        google.addEmployee(jesse);
        google.addEmployee(jesse);

        Company apple = new Company("Apple");
        apple.addEmployee(joe); //joe is an object of Google not Apple but still you can pass joe in addEmployee().
        apple.addEmployee(bill);


    }
}
    class Employee
    {
        private String name;

        public Employee(String name)
        {
            this.name = name;
        }

        public String getName()
        {
            return name;
        }


    }
    class Google extends Employee
    {
        public Google(String name) {//name is an employee name
            super(name);
        }
    }

    class Adobe extends Employee
    {
        public Adobe(String name)
        {
            super(name);
        }
    }

    class Company
    {
        private String name;
        private ArrayList<Employee> eList = new ArrayList<>();
        public Company(String name)
        {
            this.name = name;
        }

        public String getName()
        {
            return name;
        }

        public boolean addEmployee(Employee employee)
        {
            if(eList.contains(employee))
            {
                System.out.println(employee.getName() +  " is already confirmed as an employee of " + this.name);
                return false;
            }
            else {
                eList.add(employee);
                System.out.println(employee.getName() + " is an employee of  " + this.name);
                return true;
            }
        }
    }

    class Microsoft extends Employee
    {
        public Microsoft(String name){//name is an employee name
            super(name);
        }
    }

b.

import java.util.ArrayList;

public class Main
{
    public static void main(String[] args)
    {
        Google joe = new Google("Joe");
        Microsoft jesse = new Microsoft("Jesse");
        Adobe bill = new Adobe("Bill");

        Company<Google> google = new Company("Google");
        google.addEmployee(joe);
       //google.addEmployee(jesse);
       //jesse is an object of Microsoft so you cannot pass jesse in addEmployee() when it is called by google. (1)

      //google.addEmployee(bill); //same reason. (2)

         Company<Microsoft> microsoft = new Company("Microsoft");
        microsoft.addEmployee(jesse);
       // microsoft.addEmployee(bill); //same reason (3)
        //microsoft.addEmployee("Bill"); //(4) you also cannot pass a string to addPlayer() method.

    }
}
class Employee
{
    private String name;

    public Employee(String name)
    {
        this.name = name;
    }

    public String getName()
    {
        return name;
    }
}

class Google extends Employee
{
    public Google(String name)
    { //name is an employee name
        super(name);
    }
}

class Adobe extends Employee
{
    public Adobe(String name)
    {
        super(name);
    }
}

class Company<T>
{
    private String name;
    private ArrayList<T> eList = new ArrayList<>();
    public Company(String name)
    {
        this.name = name;
    }

    public String getName()
    {
        return name;
    }

    public boolean addEmployee(T employee)
    {
        if(eList.contains(employee))
        {
            System.out.println((((Employee)employee).getName() +  " is already confirmed as an employee of " + this.name));
            return false;
        }
        else
        {
            eList.add(employee);
            System.out.println((((Employee)employee).getName() + " is an employee of  " + this.name));
            return true;
        }
    }
}

class Microsoft extends Employee
{
    public Microsoft(String name)
    {
        super(name);
    }
}
In this program b, when you declare google.addEmployee(jesse) or google.addEmployee(bill) or microsoft.addEmployee(bill) by trying to pass incorrect type object or microsoft.addEmployee("Bill") by trying to pass a string "Bill", java will show errors (see (1),(2),(3),(4)). This is what we have defined the addEmployee() method in Company<T> (see c. below). So the Company<T> class require us to use Employee class or a subclass of Employee. And also String type parameter is not taken from the addEmployee() method. Instead, it is taking generic type object(T employee).
c.
public boolean addEmployee(T employee)
{
        if(eList.contains(employee))
        {
            System.out.println((((Employee)employee).getName() +  " is already confirmed as an employee of " + this.name));
            return false;
        }
        else
        {
            eList.add(employee);
            System.out.println((((Employee)employee).getName() + " is an employee of  " + this.name));
            return true;
        }
    }
In a nutshell, the key benefit of generics is to enable errors to be detected at compile time rather than at runtime (ensuring compile-time safety). A generic class or method permits you to specify allowable types of objects that the class or method can work with. If you attempt to use an incompatible object, the compiler will detect that error. Generics also helps to reuse the code for any type we want to use.
6.5. Defining Generic Classes
As you have seen from multiple examples above, here is a simple example of defining Generic class: GenericClass<T> and a tester program.
/**
 * Class:GenericClass
 * @param <T>
 */
//Use <> to specify parameter type and define generic class
public class GenericClass<T>
{

    //Type T reference variable named object declaration.
    T object;
    //constructor
    GenericClass(T object)
    {
        this.object = object;
    }

    public T getObject()
    {
        return this.object;
    }
}


public class Main {
    public static void main(String[] args)
    {
        GenericClass<String> stringObject = new GenericClass<String>("\"String Value and check constructor param\"");
        System.out.println(stringObject.getObject());

        GenericClass<Integer> integerObject = new GenericClass<Integer>(23); // unboxing of new Integer(23);
        System.out.println(integerObject.getObject());
    }
}
6.5.1. Type Parameters/Type Variables
"Type parameters (a.k.a. type variables) are used as placeholders to indicate that a type will be assigned to the class at runtime."(Juneau, 2014)
By convention, type parameters are a single uppercase. Following list is the standard type parameters:
-
E: Element
-
K: Key
-
N: Number
-
T: Type
-
V: Value
-
S,U,V in a multiparameter situation.
6.5.2. How to Use Generics?
-
Create a generic class: public class GenericClass<T> { … }
-
Instantiate the object. Each of Type parameter (in this case, it is T) is replaced with the Integer type. GenericClass<Integer> integerObject = new GenericClass<Integer>();
-
Generics can also be used within constructors to pass type parameters for class field initialization. GenericClass ob1 = new GenericClass(3); GenericClass ob2 = new GenericClass("Georgia");
-
Generics has raw type for backward compatibility. It will eliminate type-checking at compile time. GenericClass rawRef = new GenericClass();
-
Generics does not support sub-typing List<Number> numbers = new ArrayList<Integer>(); //won’t compile. Integer isa subtype of Number. List<Integer> numbers = new ArrayList<Integer>();
6.5.3. Defining Generic Interfaces
Here are two examples of using generics with interfaces List and Iterator in the package java.util:
 public interface List<E>
 {
        void add(E x);
        Iterator<E> iterator();
    }

 public interface Iterator<E>
 {
        E next();
        boolean hasNext();
    }
6.6. Generic Methods
As you define generic classes, and interfaces, you can also use generic types to define generic methods. To declare a generic method named print(), you place the generic type <E> after the keyword static in the method header and static (class) and non-static (instance) methods are allowed.
public static <E> void print(E[] list) { //... }Following NonGenericMethodDemo program has overloaded print() methods to print different types of arrays (Integer, Double, Character, and String).
public class NonGenericMethodDemo
{
    public static void main(String[] args)
    {

        // create arrays of Integer, Double, Character, and String
        Integer[] integerArray = {1, 2, 3, 4};
        Double[] doubleArray = {2.1, 22.2, 31.65, 10.5};
        Character[] characterArray = {'G', 'E', 'N', 'E', 'R','I','C','S'};
        String[] stringArray =  {"Lawrenceville", "Duluth", "Chicago", "New York", "Atlanta"} ;

        System.out.println("Array integerArray contains:");
        print(integerArray); // pass an Integer array
        System.out.println("Array doubleArray contains:");
        print(doubleArray); // pass a Double array
        System.out.println("Array characterrArray contains:");
        print(characterArray); // pass a Character array
        System.out.println("Array stringArray contains:");
        print(stringArray); // pass a Character array
    }

    /**
     * method print to print Integer array
     * @param arr
     */
    public static void print(Integer[] arr)
    {
        // display array elements
        for (Integer element : arr)
            System.out.print(element + " ");

        System.out.println();
    }

    /**
     * method print to print Double array
     * @param arr
     */
    public static void print(Double[] arr)
    {
        // display array elements
        for (Double element : arr)
            System.out.print(element + " ");

        System.out.println();
    }

    /**
     * method print to print Character array
     * @param arr
     */
    public static void print(Character[] arr)
    {
        // display array elements
        for (Character element : arr)
            System.out.print(element + " ");

        System.out.println();
    }

    /**
     * method print to print String array
     * @param arr
     */
    public static void print(String[] arr)
    {
        for(String element: arr){
            System.out.print(element + " ");
        }
    }
}
While each print() method above is written for a different data type, their code is otherwise identical and uses a for-each loop to display array elements. By using generics, we can write a single generic print() method for all data types with a generic type E. The header of the generic method is public static <E> void print(E[] arr). A complete GenericMethodDemo program is provided as follows. Based on the types of the arguments passed to the generic method, the compiler handles each method call appropriately. The outputs of GenericMethodDemo and MethodWithoutGenerics are identical.
public class GenericMethodDemo
{
    public static void main(String[] args)
    {
      // create arrays of Integer, Double, Character, and String
        Integer[] integerArray = {1, 2, 3, 4};
        Double[] doubleArray = {2.1, 22.2, 31.65, 10.5};
        Character[] characterArray = {'G', 'E', 'N', 'E', 'R','I','C','S'};
        String[] stringArray =  {"Lawrenceville", "Duluth", "Chicago", "New York", "Atlanta"} ;

        System.out.println("Array integerArray contains:");
        print(integerArray); // pass an Integer array
        System.out.println("Array doubleArray contains:");
        print(doubleArray); // pass a Double array
        System.out.println("Array characterrArray contains:");
        print(characterArray); // pass a Character array
        System.out.println("Array stringArray contains:");
        print(stringArray); // pass a Character array
    }

    public static <E> void print(E[] arr)
    {
          //  System.out.println(Arrays.toString(list));
            for(E element: arr)
            {
             System.out.print(element + " ");
            }
            System.out.println();
    }
}
6.6.1. The Bounded Generic Type
A generic type can be specified as a subtype of another superclass type. This subtype is called bounded. Let’s say if you want to restrict the types that can be used as type arguments in a parametrerized type. It may be more clear to know how to declare a bounded type parameter. First, list the type parameter’s name followed by the extends keyword and by its upper bound or superclass. For example, if a method operates on numbers, you may want to make it only accept instances of Number or its subclasses like <T extends Number>
* <T extends superclass>
//this class only accepts type parameters as any class which extends superclass or superclass itself. It means that if any other type is passing
//it will cause compile time error.
If you see (1) from b (see below), Company class takes a generic type T parameter and this example shows that we can use a single bound when we specify the Company type T parameter. So it is restricting Company to being created for objects that type T is inherited from the Employee class or some class of employee only. Java allows multiple bound. As a subclass is inherited from one superclass and implements from multiple interfaces, same rule applies.
a.
class Company<T>
{
    private String name;
    private ArrayList<T> eList = new ArrayList<>();
    public Company(String name)
    {
        this.name = name;
    }

    public String getName()
    {
        return name;
    }

    public boolean addEmployee(T employee)
    {
        if(eList.contains(employee))
        {
            System.out.println((((Employee)employee).getName() +  " is already confirmed as an employee of " + this.name));
            return false;
        }
        else {
            eList.add(employee);
            System.out.println((((Employee)employee).getName() + " is an employee of  " + this.name));
            return true;
        }
    }
}

b.
class Company<T extends Employee>
{  //(1)
    private String name;
    private ArrayList<T> eList = new ArrayList<>();
    public Company(String name)
    {
        this.name = name;
    }

    public String getName()
    {
        return name;
    }

    public boolean addEmployee(T employee)
    {
        if(eList.contains(employee))
        {
            System.out.println(employee.getName() +  " is already confirmed as an employee of " + this.name); //
            return false;
        }
        else
        {
            eList.add(employee);
            System.out.println(employee.getName() + " is an employee of  " + this.name);
            return true;
        }
    }
}
6.7. Raw Types and Backward Compatibility
"A generic class or interface used without specifying a concrete type, called a raw type. This raw type enables backward compatibility with earlier version of java (before JDK 1.5)" (Liang, 2018) The raw types should be used for backward compatibility and eliminate all the benefits of using a generic class. Basically raw types behaves exactly like they were before generics. So when we us ArrayList without generic type and with raw type (see example 1), code runs just fine and it is legal at compile-time. This is the drawback discussed in the motivations and benefits in 6.4 in this chapter.
example 1.
ArrayList list = new ArrayList(); //raw type -- equivalent to -- ArrayList<Object> list = new ArrayList<Object>();example 2.
Container<T> is a generic Container class

public class Container<T>
{
   public void set(T t){ // }
}

To create a parameterized type of *_Container<T>_*, you must provide a concrete type argument for the generic type parameter T as below.
Container<Double> doubleContainer = new Container<>();

If the concrete type is omitted, you will create a raw type of Container<T> and it is

Container rawContainer = new Container();

*Using raw types are not safe, you should avoid using raw types.*
6.8. Wildcard Generic Types
"You can use unbounded wildcards, bounded wildcards, or lower bound wildcards to specify a range for a generic type."(Liang, 2018) These are useful in certain cases but not used as often as bounded generic types.
The first type of wildcard is called the unbounded wildcard type. It is specified using the wildcard character form ? and again it is called the unbounded wildcard. ? is the same as ? extends Object (e.g. List<?>). Unbounded type is useful when a method does not specify with the actual type of the parameter taking. For example, when you invoke a method with unbounded type, it means that the method will take some specific type but it does not know till you add specific type. From the following example, printList() method takes list with unspecified type and it is a list of unbounded/non-specific type passed as a parameter to a method that takes a list of unbounded type.
public class UnboundedDemo
{
   public void printList(List<?> list)
    {
      for(Object e: list)
      {
        System.out.println(e);
      }
    }

   public static void main(String[] ags)
    {
       ArrayList<Integer> list1 = new ArrayList<>();
       list1.add(45);
       list1.add(5);
       list1.add(105);
       printList(list1);
       ArrayList<String> list2 = new ArrayList<>();
       list2.add("Banana");
       list2.add("Orange");
       list2.add("Apple");
       printList(list2);

     }
}
The second type of wildcard is called (upper)bounded wildcard and it is specified writing "? extends T" (e.g. <? extends Foo> ). When you use upper-bound, argument can be any type or subclass of type.
Source: https://tudip.com/blog-post/java-generics-lower-upper-bound/
public static void validateStringTypes(Collection<? extends String> collection){
        //Wild card with Upper bound
        // Accept collection of objects of type string or SUB-CLASS of String
    }
The third type of wildcard is lower bounded wildcard and it is specified writing "? super T" (e.g. <? super Integer>)
Source: https://tudip.com/blog-post/java-generics-lower-upper-bound/
public static void validateTillStringType(Collection<? super String> collection){
        //Wild card with Lower bound
        // Accept collection of objects of type string or SUPER-CLASS of String
    }
* complete example.
import java.util.ArrayList;
import java.util.Collection;
public class GenericsDemo {
public static void validateTillStringType(Collection<? super String> collection){
//Wild card with Lower bound
// Accept collection of objects of type string or SUPER-CLASS of String
}
public static void validateStringTypes(Collection<? extends String> collection){
//Wild card with Upper bound
// Accept collection of objects of type string or SUB-CLASS of String
}
public static void main(String [] args){
GenericsDemo.validateTillStringType(new ArrayList<Object>());//OK
// GenericsDemo.validateTillStringType(new ArrayList<Integer>());//Error
// GenericsDemo.validateStringTypes(new ArrayList<Object>());//Error
GenericsDemo.validateStringTypes(new ArrayList<String>());//OK
}
}6.9. Erasure
"The information on generics is used by the compiler but is not available at runtime. This is called type erasure." by Daniel Liang.
Generics were introduced to the Java language to provide tighter type checks at compile time and to support generic programming. To implement generics, the Java compiler applies type erasure to:
-
Replace all type parameters in generic types with their bounds or Object if the type parameters are unbounded. The produced bytecode, therefore, contains only ordinary classes, interfaces, and methods.
-
Insert type casts if necessary to preserve type safety.
-
Generate bridge methods to preserve polymorphism in extended generic types.
Type erasure ensures that no new classes are created for parameterized types; consequently, generics incur no runtime overhead.
6.9.1. Class Type Erasure
During the type erasure process, the Java compiler erases all type parameters and replace all type parameters in generic types with their bounds or Object if the type parameters are unbounded. The produced bytecode, therefore, contains only ordinary classes, interfaces, and methods.Insert type casts if necessary to preserve type safety. Generate bridge methods to preserve polymorphism in extended generic types.Type erasure ensures that no new classes are created for parameterized types; consequently, generics incur no runtime overhead."
Source: https://www.baeldung.com/java-type-erasure[Baeldung]
public static  <E> boolean containsElement(E [] elements, E element)
{
    for (E e : elements)
    {
        if(e.equals(element))
        {
            return true;
        }
    }
    return false;
}

After the compilation, the the compiler replaces the unbound type parameter E with Object.

public class Stack
{
    private Object[] stackContent;

    public Stack(int capacity)
    {
        this.stackContent = (Object[]) new Object[capacity];
    }

    public void push(Object data)
    {
        // ..
    }

    public Object pop()
    {
        // ..
    }
}
6.9.2. Erasure of Generic Methods
When the compiler translates generic method print into bytecodes, it removes the type-parameter and replace the type parameter with actual type. This process is known as erasure.
print method with type parameter.

 public static <E> void print(E[] arr)
 {
    for (E element : arr)
    {
        System.out.printf("%s ", element);
    }
}
By default all generic types are replaced with type Object as you see follows.
Upon compilation, the compiler replaces the type paramter E with Object.
public static void print(Object[] arr)
{
for (Object element : arr)
{
System.out.printf("%s ", element);
}
}6.10. Key Terms
bounded type: A generic type being specified as a subtype of another type
upper bounded wildcard (<? extends E>): bounds with upper inheritance constraint by using etends keyword.
lower bound wildcard (<? super E>): bounds is using the wildcard character (?), following by the super keyword by its lower bound.
unbounded wildcard(<?>): bounds which is specified using <?>. this is called unknown type.
raw type: a name of a generic class or interface without any type arguments.
type erasure: the process of type checking only at compile time and discarding the element type information at runtime.
6.11. Exercises
6.11.1. Exercise 1 (Palindrome)
Write a generic method to count the number of palindromes in a collection. Step 1: Use a generic ITester interface with a method name test defined as follows:
public interface ITester<T> { public boolean test(T obj); }
Step 2: Write Palindrome class and this class implements generic ITester interface and define the test method to test if the value is a palindrome or not.
Palindrome is a word, verse, or setence or a number that reads the same backward or forward (such as "Race car","Madam I’m Adam.","1881","Amore, Roma","King, are you glad you are king?" Step 3: Write a Counter class and define a generic method named countIf. This method will count the number of elements in a collection that have palindromes and also will ignore non-alpha characters and white spaces.
6.11.2. Exercise 2
Write a generic method to swap the positions of two different elements in an array.
6.11.3. Exercise 3
Write a generic method that displays array element
6.11.4. Exercise 4
Write a generic method selectionSort based on the selectionSort method as follows. Use the generic swap method from the Exercise 2. Use <T extends Comparable<T>> in the type-parameter section for this method. Make sure use compareTo to compare the objects of the type that T represents.
    public static void selectionSort(double[] list)
    {
        for (int i = 0; i < list.length - 1; i++)
        {
            int smallest = i;
            for (int index = i + 1; index < list.length; index++)
                if (list[index] < list[smallest])
                    smallest = index;
            swap(list, i, smallest); // swap smallest element into position
        }
    }
6.11.5. Exercise 5
Write a test program that inputs, sorts, and outputs an Double array and Integer array. Use the generic swap method, generic displayArray method, and generic selectionSort method.
Here is the sample run:
Original Double array elements
[2.3, 45.6, 4.5, 11.6, 2.0]
Double array elements after the selection sort
[2.0, 2.3, 4.5, 11.6, 45.6]
Original Integer array elements
[3, 56, 1, 12, 7, 90, 45, 23]
Double array elements after the selection sort
[1, 3, 7, 12, 23, 45, 56, 90]
6.12. References
Baeldung.(2020). The Bastics of Java Generics. Retrieved from https://www.baeldung.com/java-generics Juneau, J. (2014). Generics: _How They Work and Why They Are Important, Retrieved https://www.oracle.com/technical-resources/articles/java/juneau-generics.html.
Liang, D. (2018). Introduction to Java: Programming and Data Structures (11th ed.). Pearson
6.13. Issue Tracker/Comments
7. Recursion
7.1. Learning Outcomes
-
Understand the basics of recursion
-
Learn why recursion can be useful
-
Learn how to apply recursion to solve simple problems
-
Learn why you should not use recursion for fibonacci numbers and factorials
7.2. Resources
7.2.1. Text and Tutorials
-
Introduction to Programming Using Java- Eighth Edition by David J. Eck: Chapter 9 Chapter 9 - Linked Data Structures and Recursion
-
Java, Java, Java: Object-Oriented Problem Solving by Ralph Morelli and Ralph Walde: http://www.cs.trincoll.edu/~ram/jjj/jjj-os-20170625.pdf Chapter 12 Recursive Problem Solving
7.2.2. Videos
-
Java Recursion : https://www.youtube.com/watch?v=neuDuf_i8Sg
-
Algorithm Recursion : https://www.youtube.com/watch?v=KEEKn7Me-ms
7.3. Introduction
Recursion is an action that describes a method calling itself. The following is an simple example of recursion which calculates the n-th fibonacci number
1
2
3
4
5
6
7
8
9
10
11
public int getFib(int num)
{
if(num == 1 || num == 2)
{
return 1;
}
else
{
return getFib(num - 1) + getFib(num + 2);
}
}
The fibonnacci sequence defines a sequence of numbers where the n-th number is the addition of the (n-1) th and (n-2) th number. Notice that this recursive solution to calculating the fibonacci number is very slow. In fact, it is much slower than the iterative (using loops) version.
The reason for this is because the same method call gets called over and over again. For example, calculating the 5th fibonnacci number would take 5! calls to getFib().
Solving problems recursively may not always result in the most efficient solution but the reason recursion is useful is because recursion can lead to solutions that are easy to understand and implement. (This will be apparent in traversals in binary trees)
When solving programming recursively, you must think of the base case and the recursive case.
-
Base case: the simplest case to consider
-
Recursive case: calling the recursion method with a simplified (or smaller) value
For example, consider the problem of finding the reverse of a string.
1
2
3
4
5
6
7
8
9
10
11
public String getReverseString(String str)
{
if (str.length() == 0)
{
return "";
}
else
{
return str.substring(str.length()-1) + getReverseString(str.substring(0,str.length()-1));
}
}
Notice that the base case handles when the length of the string is zero. Of course, when the length of the string is zero, the empty string is returned. In the recursive case, the same method is called again with a value that is "closer" to the base case.
Here is another example where using recursion results in a simpler solution than the iterative version. The problem is printing all binary numbers with n-digits.
1
2
3
4
5
6
7
8
9
10
public static void printBinaryNumber(String str, int length)
{
if (length == 0)
{
System.out.println(str);
return;
}
printBinaryNumber(str + "0", length - 1);
printBinaryNumber(str + "1", length - 1);
}
The iterative version of printing all binary numbers is a bit more complicated and involves using a List.
1
2
3
4
5
6
7
8
9
10
11
12
13
14
public static void printBinaryNumberIterative(int length)
{
ArrayList<String> list = new ArrayList<String>();
list.add("0");
list.add("1");
int max = (int) Math.pow(2, length);
while (list.size() < max)
{
String temp = list.remove(0);
list.add(temp + "0");
list.add(temp + "1");
}
System.out.println(list);
}
This illustrates that recursion can lead to solutions that are easier to understand. With a bit of creativity you can write every iterative solution to a recursive one and vice-versa. Please watch the following video as a review of the basic concepts of recursion:
7.4. Permutations and Combinations
A famous application of recursion is found in generating permutations. For example, generating all the permutations of the word "car" results in "car", "cra", "acr", "arc", "rca", and "rac". Notice that if there are n-characters in a word, it will result in n! permutations. The following image illustrates how an recursion generates the permutations.
1
2
3
4
5
6
7
8
9
10
11
12
13
14
15
16
17
18
19
20
21
22
public static ArrayList<String> permutations(String str)
{
ArrayList<String> result = new ArrayList<>();
if (str.length() == 1)
{
result.add(str);
return result;
}
for (int i = 0; i < str.length(); i++)
{
String part = str.substring(0, i) + str.substring(i + 1);
ArrayList<String> permutes = permutations(part);
for (String s : permutes)
{
result.add(str.charAt(i) + s);
}
}
return result;
}
Here is an example of generating the combinations of a string. This recursive solutions uses a helper method.
1
2
3
4
5
6
7
8
9
10
11
12
13
14
15
16
17
18
19
20
21
22
23
24
25
26
27
28
29
public static ArrayList<String> combinations(String str)
{
ArrayList<String> combos = new ArrayList<String>();
for (int i = 1; i <= str.length(); i++)
{
combinations(i, str, combos);
}
return combos;
}
public static ArrayList<String> combinations(int length, String str, ArrayList<String> combos)
{
if (str.length() == length)
{
if (!combos.contains(str))
{
combos.add(str);
}
}
else
{
for (int i = 0; i < str.length(); i++)
{
String shortened = str.substring(0, i) + str.substring(i + 1);
combos = combinations(length, shortened, combos);
}
}
return combos;
}
7.5. Using Recursion in Mazes
An interesting problem that can be solved with recursion are mazes. Mazes can be solved very naturally with recursion as play itself maps to recursion very well. The idea is to try out all paths and select the path that leads to the exit. The following code illustrates how recursion can be used to find the solution to a maze.

1
public boolean findPath(Maze maze, Point position)
7.6. Summary
-
Make sure you have a base case and checks to avoid infinite recursion
-
Understand that you can rewrite any recursive method iteratively and vice-versa
-
Be able to solve simple problems using recursion
7.7. Key Terms
recursion: computation that invovles a function (or method) calling itself
base case: the simplest case in a recursive solution
recursive case: mirrors the overall solution but with simplified input values
direct recursion: when the same method calls itself
indirect recursion: when more than one method is involved in a recursion
recursive backtracking: when recursion is used to build a set of candidate solutions and a criteria is applied to select the right ones
7.8. Exercises
-
Write a recursive method that reverses a string. For example, your method should print out "rac" given the word "car".
-
Investigate how to draw a fractal using recursion.
-
Investigate the Tower of Hanoi puzzle and solve it using recursion.
7.9. Issue Tracker/Comments
8. Basic Data Structures and Sorting
8.1. Learning Objectives
Students will be able to:
-
Define and describe four basic abstract data structures: List, Stack, Queue and Priority Queue.
-
Apply the basic abstract data structures to devise efficient algorithms for solving computational problems.
-
Implement efficient algorithms involving the data structures, using the classes and methods for the data structures from the Java APIs.
-
Describe and implement six sorting algorithms: Selection Sort, Insertion Sort, Bubble Sort, Heap Sort, Merge Sort and Quick Sort.
-
Compare the sorting algorithms in terms of efficiency and other properties such as stability.
-
Apply Arrays.sort, Arrays.sort and Collections.sort to provide efficient solutions to problems where sorting is beneficial.
8.2. Resources
8.2.1. Text
-
Thomas Cormen, Chalres Leiserson, Ronald Rivest and Clifford Stein. Introduction to Algorithms, 3rd Edition. The MIT Press.
-
Daniel Liang. Introduction to Java Programming and Data Structures, 11th Edition. Pearson.
8.3. Introduction
In programming, a data structure is a means to organize a collection of data. A data structure not only stores the data, but also provides methods for accessing and manipulating its elements. When you have a single or a few data items, you can simply declare a variable or create an object to represent each item. However, doing so is clearly infeasible when you have a large collection, say of a million data items. In this situation, how the data is represented and organized is crucial for the correctness and efficiency of the program.
The first data structure you have learned, and perhaps the simplest of all data structures, is an array. An array is a sequence of elements of the same data type occupying contiguous locations in the memory. It is fundamental and very commonly used, due to its simplicity and the efficiency in accessing any element of the array. However, a major drawback of an array is that it is static; that is, once an array is declared, its length is fixed, and one cannot add a new element to the array or remove an existing element from the array. For the many applications where the data needs to grow (and shrink) dynamically, we desire a dynamic data structure that supports efficient operations for insertion and deletion, among other important operations.
In this chapter, we introduce four basic dynamic data structures: lists, stacks, queues and priority queues. The focus here is to define them and describe their usage. In ITEC 3150: Advanced Programming, you will learn their implementations as well as their efficiency.
8.4. Lists
Akin to an array, a list is a sequentially ordered collection of (possibly duplicate) objects. A fundamental difference between a list and an array, is that a list is dynamic in the sense that one can add new elements to a list and remove existing elements from a list, whereas an array is static. Moreover, adjacent elements in a list may not reside in contiguous locations in the memory, as in the case of a linked list that is discussed below.
8.4.1. The Java List Interface
The Java List interface, which is contained in the java.util package, extends the Collection interface and provides an abstraction of a list data structure described above. You can find all the methods of the List interface as well as their detailed descriptions at https://docs.oracle.com/javase/8/docs/api/java/util/List.html.
Below we summarize some commonly used methods in the interface List<E>, where E is the generic type of the list elements specified at the creation of the list.
-
boolean add(E e). Adds the specified element to the end of the list, and returns true if the element is successfully added.
-
boolean addAll(Collection<? extends E> c). Adds all the elements of the specified collection to the end of the list in the order defined by the collection’s iterator, and returns true if all the elements are successfully added. The method throws a NullPointerException if the specified collection is null.
-
void add(int index, E e). Adds the specified element to the list at the specified index. The method throws an IndexOutOfBoundException if the specified index is out of range, i.e. if (index < 0 || index > size()).
-
E remove(int index). Removes and returns the element at the specified index from the list. The method throws an IndexOutOfBoundException if the specified index is out of range, i.e. if (index < 0 || index >= size()). Notice the slight difference in the out-of-range condition between add and remove.
-
boolean remove(Object o). Removes the first occurrence of the specified object from the list, if the object exists. The method returns true if the specified object is present in the list, and false otherwise.
-
E get(int index). Returns the element at the specified index in the list. The method throws an IndexOutOfBoundException if the specified index is out of range, i.e. if (index < 0 || index >= size()).
-
E set(int index, E e). Replaces the element at the specified index with the specified element, and returns the element previously stored at the specified index. The method throws an IndexOutOfBoundException if the specified index is out of range, i.e. if (index < 0 || index >= size()).
-
boolean contains(Object o). Returns true if and only if the list contains the specified object.
-
int indexOf(Object o). Returns the index of the first occurrence of the specified object if the object is in the list, and -1 otherwise.
-
int lastIndexOf(Object o). Returns the index of the last occurrence of the specified object if the object is in the list, and -1 otherwise.
-
int size(). Returns the size of the list, i.e. the number of elements in the list.
-
boolean isEmpty(). Returns true if and only if the list is empty, i.e. size() == 0.
-
void clear(). Clears the list. Note that the implementation of this method need not remove the elements of the list. All it needs is to create a new empty list.
-
boolean equals(Object o). Returns true if and only if the specified object is a list that contains the same elements in the same order as this list.
-
ListIterator<E> listIterator(). Returns a list iterator starting at the beginning of the list that allows one to traverse the list in both directions and manipulate the list en route. We will discuss the List Iterator in more details, in the subsection devoted to it.
-
ListIterator<E> listIterator(int index). Returns a list iterator starting at the specified position in the list. The method throws an IndexOutOfBoundsException if the index is out of range (index < 0 || index > size()).
8.4.2. The ArrayList and LinkedList Classes
ArrayList and LinkedList are the two classes that implement the List interface.
Array List
You already learned the ArrayList class in ITEC 2140: Programming Fundamentals. You learned how to create an ArrayList object and how to manipulate an ArrayList by calling its methods. To add to your knowledge, we briefly describe here how an array list is implemented.
The ArrayList class implements a list with a resizable array. That is, the backing data structure of an ArrayList is an array. The backing array is an instance variable of an ArrayList object and stores all the elements of the list. Therefore internally, accessing an element of the array list by index, which is required for methods such as get(int index) and set(int index, E e), is simply accessing the element in the backing array by index. When a new element is added to the list and the backing array is about to be full, the add method would create a new larger array whose length is 1.5 times the length of the (old) backing array, copy all the elements from the (old) backing array as well as the new element to the new array, and make the new array the backing array. While resizing is an expensive operation, such an event occurs infrequently.
Linked List
In a linked list, every list element, usually called a node, has a data field and maintains two pointers (i.e. references) - one pointing to the previous node and the other pointing to the next node. There are two special nodes - the head which is the first node of the list, and the tail which is the last node of the list. The node previous to the head is null, so is the node next to the tail. The following figure depicts a linked list of integer elements.
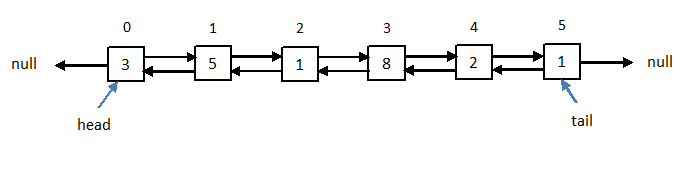
In the figure, each square represents a node of the list. The leftmost node is the head and the rightmost one is the tail. The number inside each node represents the value of its data, and the number above represents its index. At each node, the arrow pointing to the right represents the pointer to the next node, and that pointing to the left represents the pointer to the previous node. From each node one can directly access both neighbors by following the pointers. The two neighbors are however the only nodes that are directly accessible from a node, because the nodes of a linked list could reside in arbitrary memory locations, as opposed to contiguous memory locations as in the case of an array list. Therefore, accessing elements of a linked list by index, which is required for methods such as get(int index) and set(int index, E e), is a slow operation, as it requires to traverse the entire list to search for the node at the specified index.
In principle, a linked list can be represented by either its head or its tail, because from either end one can traverse the entire list. For convenience and efficiency however, a standard implementation, as the one for the Java LinkedList class, tracks both the head and the tail of a linked list object as its private instance variables, as illustrated by the two blue arrows in the above figure.
You can find all the methods of the LinkedList class as well as their detailed descriptions at https://docs.oracle.com/javase/8/docs/api/java/util/LinkedList.html.
Because it is easy to access and update both ends of a linked list, in addition to the common methods of the List interface, the LinkedList class provides the following methods involving just the head or the tail of a LinkedList<E> object, where E is the generic type of the list elements.
-
void addFirst(E e). Adds the specified element to the head of the list. After this method, a new head is created and points to the old head as its successor. The newly added element now resides at the head of the list.
-
void addLast(E e). Adds the specified element to the tail of the list. Same as the method add(E e) (except for the return type). After this method, a new tail is created and points to the old tail as its predecessor. The newly added element now resides at the tail of the list.
-
E removeFirst(E e). Removes and returns the element at the head of list. After this method, the successor (in the original list) to the removed head becomes the new head of the list. The method throws a NoSuchElementException if the list is empty.
-
E removeLast(E e). Removes and returns the element at the tail of list. After this method, the predecessor (in the original list) to the removed tail becomes the new tail of the list. The method throws a NoSuchElementException if the list is empty.
-
E getFirst(). Returns the data at the head of the list. The method throws a NoSuchElementException if the list is empty.
-
E getLast(). Returns the data at the tail of the list. The method throws a NoSuchElementException if the list is empty.
As the ArrayList<E> class, the LinkedList<E> class has the following two constructors.
-
The default constructor LinkedList() creates an empty linked list.
-
The constructor LinkedList(Collection<? extends E> c) creates a linked list that contains the elements of the specified collection, in the same order as defined by the collection’s iterator.
8.4.3. The List Iterator
The ListIterator interface specifies an iterator that allows one to traverse a list in both directions and manipulate the list en route. Its implementation depends on the type of the underlying list. When the list is an array list, its iterator traverses the list using the indices of the backing array. When the list is a linked list, its iterator does so by following the forward or backward pointers of the list nodes. The list iterator is crucial as it underlies every method that requires to search the list.
At https://docs.oracle.com/javase/8/docs/api/java/util/ListIterator.html, you can find a detailed description of the ListIterator<E> interface. Below we summarize its methods.
-
boolean hasNext(). Returns true if and only if the list has more elements in the forward direction (i.e. the cursor is not at the end of the list).
-
E next(). Returns the next element in the list and advances the cursor forward, if the next element exists (i.e. if hasNext() would return true). Otherwise the method throws a NoSuchElementException.
-
int nextIndex(). Returns the index of the next element in the list if the it exists (i.e. if hasNext() would return true); otherwise returns the size of the list.
-
boolean hasPrevious(). Returns true if and only if the list has more elements in the backward direction (i.e. the cursor is not at the beginning of the list).
-
E previous(). Returns the previous element in the list and moves the cursor backward, if the previous element exists (i.e. if hasPrevious() would return true). Otherwise the method throws a NoSuchElementException.
-
int previousIndex(). Returns the index of the previous element in the list if the it exists (i.e. if hasPrevious() would return true); otherwise returns -1.
-
void add(E e). Adds the specified element before the next element and after the previous element, if they both exist. The element is added to the beginning (resp. end) of the list if the cursor is at the beginning (resp. end) of the list.
-
void remove(). Removes the last element that was returned by next() or previous(). The method throws an IllegalStateException if neither next() nor previous() has been called.
-
void set(E e). Replaces the last element returned by next() or previous() with the specified element. The method throws an IllegalStateException if neither next() nor previous() has been called.
8.4.4. Putting Things Together By Examples
We now use a few code examples to illustrate how to manipulate lists with some of the aforementioned methods.
Basic list operations
In the first example below, we demonstrate how to create a list, add elements to and remove elements from a list, and traverse a list in both directions using its list iterator.
1
2
3
4
5
6
7
8
9
10
11
12
13
14
15
16
17
18
19
20
21
22
23
24
25
26
27
28
29
30
31
32
33
34
35
36
37
38
39
40
41
42
43
44
45
46
47
48
49
50
51
52
53
54
55
56
import java.util.*;
public class ListDemo {
public static void main(String[] args) {
List<Integer> arrayList = new ArrayList<>();
for (int i = 0; i < 10; i++) {
arrayList.add(i);
}
System.out.println("arrayList:");
System.out.println(arrayList);
arrayList.add(0, 10);
arrayList.add(3, 30);
System.out.println("\narrayList after add(0, 10) and add(3, 30):");
System.out.println(arrayList);
LinkedList<Object> linkedList = new LinkedList<>(arrayList);
System.out.println("\nlinkedList:");
System.out.println(linkedList);
linkedList.add(3, "hello");
linkedList.remove(4);
System.out.println("\nlinkedList after add(3, \"hello\") and remove(4):");
System.out.println(linkedList);
linkedList.removeFirst();
linkedList.removeLast();
linkedList.removeFirst();
linkedList.removeLast();
System.out.println("\nlinkedList after the removeFirst and removeLast calls:");
System.out.println(linkedList);
linkedList.addFirst("red");
linkedList.addFirst("green");
linkedList.addFirst("blue");
linkedList.addLast("red");
linkedList.addLast("green");
linkedList.addLast("blue");
System.out.println("\nlinkedList after the addFirst and addLast calls:");
System.out.println(linkedList);
System.out.println("\nDisplay the linked list forward:");
ListIterator<Object> listIterator = linkedList.listIterator();
while (listIterator.hasNext()) {
System.out.print(listIterator.next() + " ");
}
System.out.println("\n\nDisplay the linked list backward:");
listIterator = linkedList.listIterator(linkedList.size());
while (listIterator.hasPrevious()) {
System.out.print(listIterator.previous() + " ");
}
}
}
The output of the program is
arrayList:
[0, 1, 2, 3, 4, 5, 6, 7, 8, 9]

arrayList after add(0, 10) and add(3, 30):
[10, 0, 1, 30, 2, 3, 4, 5, 6, 7, 8, 9]

linkedList:
[10, 0, 1, 30, 2, 3, 4, 5, 6, 7, 8, 9]

linkedList after add(3, "hello") and remove(4):
[10, 0, 1, hello, 2, 3, 4, 5, 6, 7, 8, 9]

linkedList after the removeFirst and removeLast calls:
[1, hello, 2, 3, 4, 5, 6, 7]

linkedList after the addFirst and addLast calls:
[blue, green, red, 1, hello, 2, 3, 4, 5, 6, 7, red, green, blue]

Display the linked list forward:
blue green red 1 hello 2 3 4 5 6 7 red green blue

Display the linked list backward:
blue green red 7 6 5 4 3 2 hello 1 red green blue
We now explain the above code and its output. On Lines 6 - 9, the program creates arrayList, an empty array list of integer elements using the default constructor, then adds integers 0 to 9 to the list in this order. Then on Lines 13 - 14, it calls arrayList.add(0, 10) and arrayList.add(3, 30) to add the new elements 10 and 30 to the list at the specified indices. Note that 10 is first added to the beginning (i.e. index 0) of the list, then 30 is added at index 3 of the resulting list. The element 2, which was at index 3 before arrayList.add(3, 30) was called, now moves to the next index down the list, so does every element after it.
Next on Line 18, the program creates linkedList, a linked list of Objects from arrayList, using the second constructor LinkedList(Collection<? extends E> c). Since every class is a descendent of the Object class, this list allows any object to be added. At this point, linkedList and arrayList contain the same elements in the same order, even though internally they are represented differently. Note that when you use System.out.println to print a list, it implicitly traverse the list using its iterator.
Next on Lines 22 - 23, the program calls linkedList.add(3, "hello") and linkedList.remove(4) to add the string "hello" at index 3 of the list and then remove the element at index 4 from the resulting list. After "hello" is added at index 3, the element 30, which was at index 3 before linkedList.add(3, "hello") was called, now moves to index 4. Therefore, the subsequent call linkedList.remove(4) removes the element 30 from the list.
A careful reader may have noticed that unlike the object arrayList which was declared on Line 6 as a List, the object linkedList was declared on Line 18 as a LinkedList. This is because we want to call methods on it that are not specified in the List interface but pertain only to the LinkedList class. Next on Lines 27 - 30, the program calls linkedList.removeFirst() and linkedList.removeLast(), then repeats them. This sequence of calls removes the first two elements and the last two elements of the list.
Next on Lines 34 - 40, the program calls the methods linkedList.addFirst and linkedList.addLast to add strings "red", "green" and "blue" to the front and back of the list respectively. Notice that addLast adds the new elements to back in the order given, whereas addFirst adds the elements to the front in the reverse order.
Finally on Lines 44 - 54, the program prints linkedList forward and backward, explicitly using its list iterator to traverse the list in both directions.
Multiple ways to traverse a list
The next example is a smiple method that computes the sum of the elements of a list.
1
2
3
4
5
6
7
8
9
public static int sum(List<Integer> list) {
int sum = 0;
ListIterator<Integer> listIterator = list.listIterator();
while (listIterator.hasNext()) {
sum += listIterator.next();
}
return sum;
}
The method sum explicitly uses the iterator of the given list to traverse the list and sums the elements en route. Alternatively and equivalently, one can write the method using a foreach loop as follows.
1
2
3
4
5
6
7
8
public static int sum2(List<Integer> list) {
int sum = 0;
    for (int x : list) {
        sum += x;
    }
return sum;
}
Although the method sum2 does not explicitly use a list iterator, the foreach loop
for (int x : list) {
sum += x;
}implicitly uses the iterator of the given list to traverse the list. Therefore, even though they are written differently, the methods sum and sum2 are identical in terms of execution.
The following is yet another way to write the method.
1
2
3
4
5
6
7
8
public static int sum3(List<Integer> list) {
int sum = 0;
for (int i = 0; i < list.size(); i++) {
sum += list.get(i);
}
return sum;
}
However, while functionally equivalent to sum and sum2, the method sum3 should not be used because it is inefficient when the given list is a linked list. As mentioned earlier, elements of a linked list are not directly accessible by index. Therefore, in the loop of sum3, each call of list.get(i) requires a search over the entire list for the element at index i. Hence when you need to iterate over a linked list, or a list in general whose type is unknown, you should never do so by indices; instead you should either explicitly use the iterator of the list, or use a foreach loop that would use the list iterator implicitly.
A foreach loop is nice because it is efficient and also simplifies the code when it is applicable. However, one limitation of a foreach loop is that it only allows you to access a data structure but does not allow you to modify it. Therefore, to efficiently search and update an entire list, you may still need to use its iterator explicitly.
Using an iterator to add and remove - an illustration
The next example is a simple method that removes all the odd numbers from a given list of integers. This method must explicitly use the iterator of the list because of the need to modify the list.
1
2
3
4
5
6
7
8
9
public static void removeOdds(List<Integer> list) {
ListIterator<Integer> listIterator = list.listIterator();
while (listIterator.hasNext()) {
int x = listIterator.next();
if (x % 2 != 0) {
listIterator.remove();
}
}
}
In the last example of the section, we write a method
<E> void addAtIndex(List<E> list, int index, E element)that adds the specified element at the specified index of the given list. The effect of addAtIndex(list, index, element) is identical to that of list.add(index, element). However, addAtIndex(list, index, element) does not call List.add(index, element) or use any method of the list other than its list iterator. It only calls three methods of the list iterator: nextIndex(), next() and add(). Therefore, the code illustrates how to implement the add(index, element) method for a list using its iterator only.
1
2
3
4
5
6
7
8
9
10
11
public static <E> void addAtIndex(List<E> list, int index, E element) {
if (index < 0 || index > list.size()) {
throw new IndexOutOfBoundsException("Index " + index + " is out of bound");
}
ListIterator<E> listIterator = list.listIterator();
while (listIterator.nextIndex() < index) {
listIterator.next();
}
listIterator.add(element);
}
The method throws an IndexOutOfBoundsException if the specified index is outside the valid range of indices. If the index is within the valid range, the while loop advances the cursor of the list iterator until the position immediately before the element currently occupying the index if the index < list.size(), or to the end of the list if the index equals list.size(). Once the method exits the loop, it adds the specified element at the right place.
The above implementation of the method always starts the list iterator at the front of the list. It is slow when the specified index is near the back of the list. One can make an improvement to the method by starting the iterator at the end that is closer to the specified index. We leave this as an exercise.
8.4.5. Notes on Efficiency: Array List vs. Linked List
We conclude the section on lists with some remarks on the efficiency of array lists and linked lists. Accessing elements of an array list by index is very efficient because its backing data structure is an array. On the other hand, as already mentioned, accessing elements of a linked list by index is very inefficient, because it requires to search the entire list for the index. Consequently, for applications that require many random accesses to the elements of your list, an array list is preferred.
On the other hand, a linked list is more efficient for adding to or removing from the two ends of the list. For an array list, while removing from the back is fast and adding to the back is usually fast, adding to the front or removing from the front is very slow as it requires to shift the entire list.
Lists are the simplest general-purpose data structures that allow one to search for and update elements, add new elements and remove existing elements. However all the methods of a list requiring a search of an element, are inefficient, whether the underlying list is an array list or a linked list. These methods include contains(Object o), remove(Object o), indexOf(Object o), and several others. In the worst case one needs to search the entire list for the given object of interest. Therefore, lists are not ideal for the many applications that require a large number of search, update, insertion and deletion operations. For such applications you would desire an efficient data structure such as a hash map or a balanced binary search tree, which you will learn in ITEC 3150: Advanced Programming.
8.5. Stacks
A stack is a very special list with one end "closed", so that it is only accessible from the other end. To visualize a stack, we envision a vertical stack of plates, where adding or removing is only possible at the top. See the following image from Wikipedia.

A stack has two fundamental operations:
-
push, which adds an element to the top of the stack; and
-
pop, which removes the element at the top of the stack.
For convenience, a peek operation is introduced that allows one to read the element at the top without removing it.
Because a stack is only accessible from the top, it has the property known as last in, first out (LIFO). That is, the last element that enters the stack is the first element that comes out. In other words, every time the stack is popped, the element that comes out is the most recently added element in the stack at that time.
8.5.1. The Stack Class
The Stack class is much simpler than the LinkedList or the ArrayList class. You can find a detailed description of the Stack<E> class at https://docs.oracle.com/javase/8/docs/api/java/util/Stack.html. Below we summarize the important methods of the class.
-
E push(E e). Adds the specified element to the top of the stack and returns the added element.
-
E pop(E e). Removes and returns the element at the top of the stack. The method throws an EmptyStackException if the stack is empty.
-
E peek(E e). Returns the element at the top of the stack without removing it. The method throws an EmptyStackException if the stack is empty.
-
boolean addAll(Collection<? extends E> c). Adds all the elements of the specified collection to the stack in the order defined by the collection’s iterator, and returns true if all the elements are successfully added. The method throws a NullPointerException if the specified collection is null.
-
int size(). Returns the size of the stack, i.e. the number of elements in the stack.
-
boolean empty(). Returns true if and only if the stack is empty (i.e. size() == 0).
-
void clear(). Clears the stack.
The very simple code below shows how to create a Stack object and use its methods.
1
2
3
4
5
6
7
8
9
10
11
12
13
14
15
16
17
18
19
20
import java.util.*;
public class StackDemo {
public static void main(String[] args) {
Stack<Integer> stack = new Stack<>();
for (int i = 1; i <= 6; i++) {
stack.push(i);
}
System.out.println("Stack after elements are added: ");
System.out.println(stack);
System.out.println();
System.out.println("Popping the stack: ");
while (!stack.empty()) {
System.out.print(stack.pop() + " ");
}
}
}
The following is the output of the program, which demonstrates the LIFO nature of a stack
Stack after elements are added:
[1, 2, 3, 4, 5, 6]

Popping the stack:
6 5 4 3 2 1
Integers 1 to 6 are added to the stack in this order. They come out in the reverse order due to the LIFO nature of the stack. The following image from Wikipedia demonstrates the steps in the execution of the program.
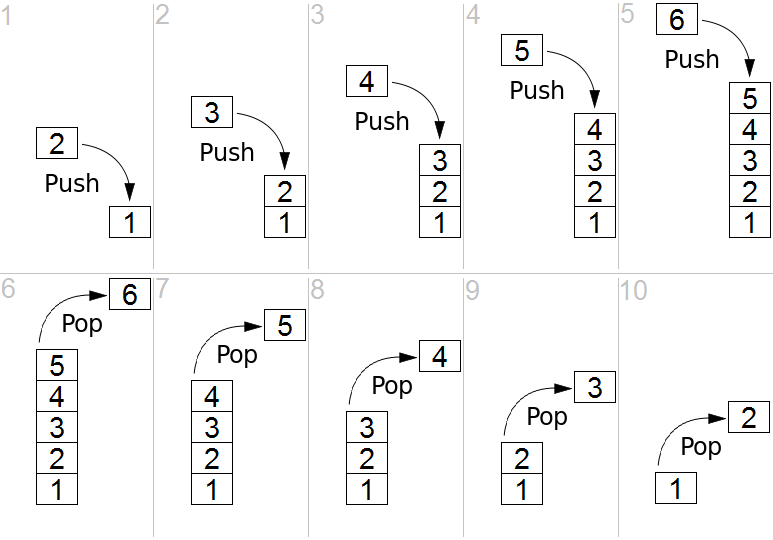
8.5.2. Applications of Stacks
A curious reader may ask at this point why we care about the LIFO property and what nontrivial tasks we can accomplish with a stack. It turns out that stacks are surprisingly useful and powerful in programming despite their simplicity. Here we very briefly mention some important applications of stacks in nontechnical terms.
A stack is used to implement the undo function of applications such as Microsoft Word. The app pushes all the actions to a stack as they occur. When the user presses the undo button, the app pops the stack to undo the most recent action.
A less obvious application is program execution. When a program is executed, the runtime system uses a call stack to execute its functions or methods. Roughly speaking, the call stack maintains all the active methods awaiting execution. The method at the top of the stack is the next one to execute. When a method (the caller) in execution calls another method (the callee), the caller has to suspend its execution until the callee returns. Therefore, the runtime system pushes the caller to the top of the stack and executes the callee. When the callee returns, the system pops the stack and resumes the execution of the caller.
In Chapter 7 you learned the powerful technique of recursion that solves problems with a divide-and-conquer strategy, where a method keeps calling itself until a base case is reached. From the preceding paragraph you can see that a stack is essential for the execution of all recursive methods.
Stacks are commonly used to implement a fundamental algorithm known as Depth First Search (DFS) that you will learn in ITEC 3150: Advanced Programming. Among many other applications, DFS is crucial for uncovering important properties and structures of large, sophisticated computer or social networks. It is used, for example, by search engines to crawl the Web.
Yet another application is parsing in program compilation. When the source code of a program is compiled, the parser of the compiler uses a stack to parse the expressions and statements in the code for syntax errors.
The abovementioned applications are sophisticated and beyond the scope of this course. Next we present a classical problem that is still nontrivial but can be readily solved using a stack.
8.5.3. A Classical Application: Checking for Balanced Parentheses
We conclude the section on stacks with a classical parsing problem that is amenable to a stack.
We consider here a sequence of parentheses '(' and ')'. The same applies to '[' and ']', or '{' and '}'. A sequence of parentheses is balanced if every ')' closes a preceding '(', and conversely every '(' is closed by a subsequent ')' in the sequence. For example, sequences ( ), ( )( ), ( ( ) ), and ( ( ) ( ) ) ( ) are all balanced, whereas sequences )(, ( ) ), ( ( ) and ( )( ) ) are not balanced. The problem of interest here is to decide whether a given sequence of parentheses is balanced. The problem comes up in the parsing of programs for syntax errors. (Can you see how this is relevant?)
The problem does not appear easy as it may seem hard to find matching pairs of '(' and ')'. The key observation is if a sequence is balanced, then as we process it from left to right, every ')' closes the last preceding '(' that remains to be closed. This is LIFO! With this idea in mind, we have the following simple method that solves the problem.
1
2
3
4
5
6
7
8
9
10
11
12
13
14
15
16
17
public static boolean isBalanced(String parentheses) {
Stack<Character> stack = new Stack<>();
for (char p : parentheses.toCharArray()) {
if (p == '(') {
stack.push(p);
}
else { // i.e. if p == ')'
if (stack.empty()) {
return false;
}
stack.pop();
}
}
return stack.empty();
}
We assume that every character in the input string is either '(' or ')'. The method processes the input from left to right. Upon seeing each '(', the method pushes it to the stack. Upon seeing a ')', the method attempts to find a matching '(' by popping the stack. If at this point the stack is empty (before the whole input is processed), then the current character is an outstanding ')' that does not close a preceding '('. Therefore, the input is not balanced and the method returns false. If the method exits the loop after processing the whole input but the stack is not empty, then there is some outstanding '(' early in the input that is not closed by a subsequent ')'. Therefore, the input is balanced if and only if the stack is empty after the whole input is processed. This is what the method returns.
In one of the exercises, you will be asked to use a stack to solve a variant of the problem, where '(', ')', '[', ']', '{' and '}' could all be present in the input. This has been a popular interview questions for positions in the software industry!
8.6. Queues
A queue is another very special list where elements are added only to the back (or tail) and removed only from the front (or head). Traditionally, the operation of adding to the back of a queue is called enqueue, and that of removing from the front of a queue is called dequeue. In this writing however we use the more casual terms add and remove. The following image from Wikipedia depicts a queue.

In contrast to a stack, a queue has the property known as first in, first out (FIFO). That is, the first element that enters the queue is the first element that comes out.
8.6.1. The Queue Interface
The Queue interface extends the Collection interface and provides an abstraction of a queue data structure. Note that in Java Queue is not a class. It is an interface with several implementations. Most often, a standard FIFO queue is implemented by a LinkedList. This is not surprising because a queue is a special linked list where we add at one end and remove from the other.
At https://docs.oracle.com/javase/8/docs/api/java/util/Queue.html you can find a detailed description of the Queue<E> interface. Below we summarize the important methods of the interface.
-
boolean add(E e). Adds the specified element to the tail of the queue and returns true as long as the element is successfully added.
-
boolean offer(E e). Same as add(E e).
-
E remove(). Removes and returns the element at the head of the queue. The method throws a NoSuchElementException if the the queue is empty.
-
E poll(). Same as remove(), but returns null if the the queue is empty.
-
E peek(). Returns the element at the head of the queue without removing it. Returns null if the queue is empty.
-
E element(). Same as peek(), but throws a NoSuchElementException if the the queue is empty.
-
boolean addAll(Collection<? extends E> c). Adds all the elements of the specified collection to the queue in the order defined by the collection’s iterator, and returns true if all the elements are successfully added. The method throws a NullPointerException if the specified collection is null.
-
int size(). Returns the size of the queue, i.e. the number of elements in the queue.
-
boolean isEmpty(). Returns true if and only if the queue is empty (i.e. size() == 0).
-
void clear(). Clears the queue.
The very simple code below shows how to create a queue and use its methods.
1
2
3
4
5
6
7
8
9
10
11
12
13
14
15
16
17
18
19
20
import java.util.*;
public class QueueDemo {
public static void main(String[] args) {
Queue<Integer> queue = new LinkedList<>();
for (int i = 1; i <= 6; i++) {
queue.add(i);
}
System.out.println("Queue after elements are added: ");
System.out.println(queue);
System.out.println();
System.out.println("Emptying the queue: ");
while (!queue.isEmpty()) {
System.out.print(queue.remove() + " ");
}
}
}
Notice that in the program the queue is created as a linked list. The following is the output of the program, which demonstrates the FIFO nature of a queue.
Queue after elements are added:
[1, 2, 3, 4, 5, 6]

Emptying the queue:
1 2 3 4 5 6
The elements leave the queue in the same order as they enter the queue.
8.6.2. Applications of Queues
Like stacks, queues have many important applications despite their simplicity. Due to their FIFO nature, queues are used to implement schedulers of resources that are shared among many customers, where the customers are served on a first come, first serve basis.
Queues are the data structures for implementing another fundamental algorithm known as Breadth First Search (BFS) that you will learn in ITEC 3150: Advanced Programming. Along with DFS, BFS plays a crucial role in the discovery of important properties and structures of large networks.
8.7. Priority Queues
A priority queue is a collection of elements that are associated with a "priority" value. Unlike a FIFO queue where the earliest arriving element is first served, in a priority queue the element with the "highest priority" is first served. To give a concrete example, let’s consider the emergency room of a hospital where many patients wait to be admitted. Ideally the most ill patient should be first served. One idea to implement this is to assign a "priority" to each patient based on the severity of his/her illness. When a patient room is available, the ER admits the waiting patient with the "highest priority". This is a real-world example of a priority queue.
But exactly what is priority? How do we systematically represent and implement priority in our programs? We must carefully answer these questions in order to precisely define a priority queue.
Here we assume that the elements of our collection are objects from a class that has an order. This means that we can compare any two objects x and y of the class, and the result of the comparison is one of the three possible outcomes:
-
x is smaller than y; or
-
x equals y; or
-
x is greater than y (i.e. y is smaller than x).
Some data types and classes have a natural ordering. The simplest example is integers, which are ordered by their numerical values. Another example is the class of strings, which are ordered alphabetically. More generally, we can take any class that implements the Comparable interface; in this case an order is defined by the compareTo method of the class.
Sometimes it is not enough to rely on the natural ordering of a class, or the order pre-defined by the compareTo method of a class. We may need to take a previously unordered class and impose an order, or take a class with an already existing order but define a new order on demand for the class. Fortunately, Java allows us to do so by defining our own custom comparators, using the Comparator interface that we will discuss shortly.
We can now define a priority queue as a collection of objects, each associated with a priority that is determined by a given ordering, whether natural or custom. The object with the "highest" priority is first served. There are two types priority queues, min priority queues and max priority queues, that have opposite notions of priority. In a min priority queue, smaller elements have higher priorities. In contrast, in a max priority queue, larger elements have higher priorities. Here smaller or larger is with respect to a specified ordering. For example, in a min priority queue of integers with the natural ordering, 1 would have a higher priority than 2; whereas in a max priority queue, 2 would have a higher priority than 1. In Java, a priority queue is by default a min priority queue.
8.7.1. The PriorityQueue Class
At https://docs.oracle.com/javase/8/docs/api/java/util/PriorityQueue.html you can find a detailed description of the PriorityQueue<E> class. Below we summarize the important methods of the class.
-
boolean add(E e). Adds the specified element to the priority queue and returns true as long as the element is successfully added. The method throws a ClassCastException if an order is not defined for the class E, and a NullPointerException if the element is null.
-
boolean offer(E e). Same as add(E e).
-
E remove(). Removes and returns the element with the highest priority in the queue. The method throws a NoSuchElementException if the the queue is empty.
-
E poll(). Same as remove(), but returns null if the the queue is empty.
-
E peek(). Returns the element at the head of the queue without removing it. Returns null if the queue is empty.
-
E element(). Same as peek(), but throws a NoSuchElementException if the the queue is empty.
-
boolean addAll(Collection<? extends E> c). Adds all the elements of the specified collection to the priority queue in the order defined by the collection’s iterator, and returns true if all the elements are successfully added. The method throws a NullPointerException if the specified collection is null or any element of the collection is null.
-
int size(). Returns the size of the queue, i.e. the number of elements in the queue.
-
boolean isEmpty(). Returns true if and only if the queue is empty (i.e. size() == 0).
-
void clear(). Clears the priority queue.
The PriorityQueue class has many constructions. Here we discuss three of them. The first two constructors create priority queues for classes that have a natural ordering defined. The third constructor creates a priority queue for an arbitrary class - it takes a custom comparator for the class as a parameter, and creates a priority queue that orders the elements of the class according to the given comparator.
-
PriorityQueue(). Creates an empty priority queue that orders its elements according to the natural ordering of the generic class E. If an ordering is not defined for the class, the constructor will still create an empty queue; however in this case when one attempts to add an object of the class to the queue, the add method will throw a ClassCastException.
-
PriorityQueue(Collection<? extends E> c). Creates a priority queue that consists of the elements in the specified collection and orders its elements according to the natural ordering of the generic class. The constructor throws a ClassCastExeption if an ordering is not defined for the class, and a NullPointerException if any element of the collection is null.
-
PriorityQueue(Comparator<? super E> comparator). Creates an empty priority queue that orders its elements according to the specified comparator for the generic class. This constructor allows you to define a custom comparator to order the elements of the priority queue. In Java, a priority queue is by default created as a min priority queue. If the generic class has a natural ordering, you can use this contructor to create a max priority queue by passing Collections.reverseOrder() as the comparator.
We now give a simple example that demonstrates how to use the constructors and methods of the PriorityQueue class.
1
2
3
4
5
6
7
8
9
10
11
12
13
14
15
16
17
18
19
20
21
22
23
24
25
26
27
28
29
import java.util.*;
public class PQDemo {
public static void main(String[] args) {
PriorityQueue<Integer> pq1 = new PriorityQueue<>();
pq1.add(5); pq1.add(3); pq1.add(2);
pq1.add(6); pq1.add(4); pq1.add(1);
System.out.print("Emptying pq1: ");
while (!pq1.isEmpty()) {
System.out.print(pq1.remove() + " ");
}
PriorityQueue<Integer> pq2 = new PriorityQueue<>(Collections.reverseOrder());
pq2.add(5); pq2.add(3); pq2.add(2);
pq2.add(6); pq2.add(4); pq2.add(1);
System.out.print("\n\nEmptying pq2: ");
while (!pq2.isEmpty()) {
System.out.print(pq2.remove() + " ");
}
PriorityQueue<String> pq3 = new PriorityQueue<>(
Arrays.asList("Shanghai", "Boston", "New York", "Zurich", "Atlanta"));
System.out.print("\n\nEmptying pq3: ");
while (!pq3.isEmpty()) {
System.out.print(pq3.remove() + " ");
}
}
}
The following is the output of the program.
Emptying pq1:  1 2 3 4 5 6

Emptying pq2:  6 5 4 3 2 1

Emptying pq3:  Atlanta  Boston  New York  Shanghai  Zurich
The program first creates a (min) priority queue pq1 of integers using the default constructor, then adds 5, 3, 2, 6, 4, 1 to the queue. When the elements are removed pq1, they come out in ascending order. Next the program uses the third constructor above to create a max priority queue pq2 of integers, with Collections.reverseOrder() as the comparator, then adds the same numbers to the queue. When the elements are removed pq2, they come out in descending order. Finally, the program uses the second comparator above to create a (min) priority queue of strings from an existing collection, which is the list ["Shanghai", "Boston", "New York", "Zurich", "Atlanta"]. When the elements are removed pq3, they come out in ascending alphabetic order.
8.7.2. The Comparator Interface
The Comparator interface allows one to define a custom comparator for any class by implementing the compare method. At https://docs.oracle.com/javase/8/docs/api/java/util/Comparator.html#compare-T-T- you can find all details of the interface Comparator<T>, where T is a generic class to define a comparator for. Here we only discuss the method
public int compare(T o1, To2)which is the method to implement in order to define your comparator on the class T. The method takes two objects o1 and o2 of the class T as parameters, and returns an integer which is interpreted as follows:
-
If the returned value is negative, then o1 is smaller than o2.
-
If the returned value is zero, then o1 and o2 are equal.
-
If the returned value is positive, then o1 is greater than o2.
We illustrate how to implement the compare method with a few examples as follows.
We know that the String class already has a natural ordering which is the alphabetic ordering. But suppose that in an application we need to impose a different ordering that orders strings first by length. If two strings have the same length, then we order them alphabetically. There are several ways to implement this comparator. The traditional way is to explicitly define a comparator class as follows.
1
2
3
4
5
6
7
8
9
10
class StringLenComparator implements Comparator<String> {
public int compare(String s1, String s2) {
if (s1.length() != s2.length()) {
return s1.length() - s2.length();
}
else {
return s1.compareTo(s2);
}
}
}
In the code above, we define a class StringLenComparator that implements the Comparator interface for String. In the class all we need to do is to implement the compare method. If the parameters s1 and s2 have different lengths, then the compare method determines their order by length. In this case the method returns
s1.length() - s2.length()Notice that if s1 is shorter than s2, then the returned value s1.length() - s2.length() is negative, therefore s1 precedes s2 in the new order. Conversely, if s1 is longer than s2, then the returned value s1.length() - s2.length() is positive, therefore s2 precedes s1 in the new order.
If s1 and s2 have the same length, then the compare method returns
s1.compareTo(s2)which orders the two strings by the natural ordering of the String class.
Once we define the StringLenComparator, we can use it to create a priority queue as follows.
1
2
3
4
5
6
7
8
9
10
11
12
13
14
15
16
17
18
19
20
21
22
public class ComparatorDemo1 {
public static void main(String[] args) {
List<String> list = Arrays.asList(
"Violet", "Indigo", "Blue", "Green", "Yellow", "Orange", "Red", "Cyan", "Gold", "Purple");
PriorityQueue<String> pq = new PriorityQueue<>(new StringLenComparator());
pq.addAll(list);
System.out.println("Order imposed by the new comparator: ");
while (!pq.isEmpty()) {
System.out.print(pq.remove() + " ");
}
System.out.println("\n\nNatural order: ");
PriorityQueue<String> pq2 = new PriorityQueue<>();
pq2.addAll(list);
while (!pq2.isEmpty()) {
System.out.print(pq2.remove() + " ");
}
}
}
The program creates a priority queue pq of strings that orders elements according to the new ordering imposed by StringLenComparator. It does so by passing to the constructor an object of the StringLenComparator as the comparator. After that, the program adds the elements of a list to pq and then empty pq. For contrast, the program also creates, using the default constructor, a priority queue pq2 that orders elements by the natural alphabetic ordering, and repeats the above for pq2. The following is the output of the program.
Order imposed by the new comparator:
Red  Blue  Cyan  Gold  Green  Indigo  Orange  Purple  Violet  Yellow

Natural order:
Blue  Cyan  Gold  Green  Indigo  Orange  Purple  Red  Violet  Yellow
The string "Red", which is of length 3, is the shortest of all the strings in the list. Therefore, "Red" appears first as elements are removed from the priority queue pq. It is followed by "Blue", "Cyan" and "Gold", each of length 4. Because they have the same length, they are order alphabetically among them. They are followed by "Green" which is of length 5. The string "Green" is followed by "Indigo", "Orange", "Purple", "Violet" and "Yellow", each of which is of length 6. Again because these five are of the same length, they are order alphabetically among them. In the meantime, you see that the same strings come out in the alphabetic order as they leave the priority queue pq2.
Alternatively, we can use a lambda expression to define the comparator and simplify the above code, as follows.
1
2
3
4
5
6
7
8
9
10
11
12
13
14
15
16
17
18
19
20
21
22
23
24
25
26
27
import java.util.*;
public class ComparatorDemo2 {
public static void main(String[] args) {
List<String> list = Arrays.asList(
"Violet", "Indigo", "Blue", "Green", "Yellow", "Orange", "Red", "Cyan", "Gold", "Purple");
Comparator<String> cmp = (s1, s2) -> {
if (s1.length() != s2.length()) {
return s1.length() - s2.length();
}
else {
return s1.compareTo(s2);
}
};
PriorityQueue<String> pq = new PriorityQueue<>(cmp);
pq.addAll(list);
System.out.println("Order imposed by the new comparator: ");
while (!pq.isEmpty()) {
System.out.print(pq.remove() + " ");
}
}
}
We now return to the emergency room example that was discussed at the beginning of the section. Suppose that the following class has been created to represent a patient.
1
2
3
4
5
6
7
8
9
10
11
12
13
14
15
class Patient {
String name;
int arrival;
int severity;
public Patient(String name, int arrival, int severity) {
this.name = name;
this.arrival = arrival;
this.severity = severity;
}
public String toString() {
return String.format("(%s, %d, %d)", name, arrival, severity);
}
}
Here the attribute severity quantifies the severity of the illness of a patient. The larger the value of severity, the more severe the illness of the patient. The attribute arrival represents the patient’s arrival time. The smaller the value of arrival, the earlier the patient arrived.
We now define an ordering of patients in order to decide the order to admit them. We first order patients by severity in descending order. That is, patients with a higher severity value should be seen earlier. If two patients have the same severity value, we then order them by arrival in ascending order. That is, patients with the same level of severity are seen on the first come, first serve basis. The following program implements this ordering.
1
2
3
4
5
6
7
8
9
10
11
12
13
14
15
16
17
18
19
20
21
22
23
24
25
26
27
import java.util.*;
public class ER {
public static void main(String[] args) {
List<Patient> list = Arrays.asList(
new Patient("Alice", 1, 6), new Patient("Bob", 2, 9), new Patient("Carol", 3, 8),
new Patient("Frank", 4, 7), new Patient("Eve", 5, 8), new Patient("Dan", 6, 7));
Comparator<Patient> cmp = (p1, p2) -> {
if (p1.severity != p2.severity) {
return p2.severity - p1.severity;
}
else {
return p1.arrival - p2.arrival;
}
};
PriorityQueue<Patient> pq = new PriorityQueue<>(cmp);
pq.addAll(list);
System.out.println("Order to admit the patients: ");
while (!pq.isEmpty()) {
System.out.print(pq.remove() + " ");
}
}
}
The program creates a comparator cmp that compares patients by the ordering specified above. Notice that when patients p1 and p2 have different values for severity, the comparator returns p2.severity - p1.severity, not p1.severity - p2.severity. This is because the patients are to be ordered first in descending order of severity. If
p1.severity > p2.severity,then
p2.severity - p1.severity < 0,therefore returning p2.severity - p1.severity will make p1 precede p2.
The following is the output of the program.
Order to admit the patients:
(Bob, 2, 9)  (Carol, 3, 8)  (Eve, 5, 8)  (Frank, 4, 7)  (Dan, 6, 7)  (Alice, 1, 6)
Bob appears first because he has the highest severity value 9. He is followed by Carol and Eve who both have the same severity value 8. Carol precedes Eve because Carol arrived earlier. They are followed by Dan and Frank who both have the same severity value 7. Frank precedes Dan because Frank arrived earlier. Finally comes Alice, who has the lowest severity value 6.
8.7.3. Applications of Priority Queues
The most direct application of priority queues is sorting, which is the problem of arranging a collection of elements according to a specific order. Indeed, as you see from the examples of the section, after building a priority queue containing the elements of a collection, the elements come out in the sorted order as they are removed from the queue. We will revisit this method of sorting in the next section which is devoted to sorting.
Priority queues are used to implement priority-based resource scheduling, where a resource is shared among many customers with different priorities. The emergency room example given in this section is one such example. Another example is CPU scheduling, where the CPU of a computer is shared by many processes with different priorities, and the operating systems maintains a priority queue of active processes waiting to be executed.
Priority queues have many other applications. For example, a priority queue underlies the famous Dijkstra’s algorithm, an efficient algorithm that computes single-source shortest paths in a graph and has made digital navigation a reality. Variants of Dijkstra’s algorithm are corner stones for navigations systems such as Google Maps, and the Open Shortest Path First (OSPF) protocol for routing packets on the Internet.
Priority Queues are also used in Huffman codes which are used to compress MP3 and JPEG files.
8.8. Sorting
Sorting is the problem of arranging an array of elements according to a specified order. It is one of the most fundamental problems in computing and is inherent in many applications, too many to enumerate. It is also one of the best studied problems in computing, and sorting algorithms abound. In this section, we present six sorting algorithms. We first describe three simple algorithms known as Selection Sort, Insertion Sort and Bubble Sort. Chances are that you have inadvertently used at least one of them when you sort a small collection of numbers. While they are intuitive and straightforward, they are very slow when the collection to sort is large. We then discuss three efficient algorithms known as Heap Sort, Merge Sort and Quick Sort. These three algorithms are more subtle and clever than the aforementioned ones, and are very fast even when the input is large.
For simplicity and without loss of generality, we describe and demonstrate all the algorithms in this section for sorting an array of integers in the ascending order. The algorithms extend readily for arrays of any generic type that either implements the Comparable interface, or is supplied with a custom comparator. In describing the algorithms we also envision that the input array is laid out horizontally, with the low index 0 on the far left end and the high index, which is the length of the array minus 1, on the far right end.
8.8.1. Naive Iterative Algorithms
Selection Sort
Selection Sort iteratively sorts an array by maintaining a sorted subarray on the left and an unsorted subarray on the right. Initially the sorted subarray is empty and the unsorted subarray consists of the entire input array. (Here we assume that the input array is unsorted.) In each iteration, the algorithm finds the smallest element of the unsorted subarray, swaps it with the leftmost element of the unsorted subarray, and moves boundary between the sorted and unsorted subarrays one position to the right. Notice that every element of the unsorted subarray is always greater than or equal to every element of the sorted subarray during the execution of the algorithm. By the end of the algorithm, the sorted subarray consists of all elements of the entire array in the sorted order, while the unsorted subarray becomes empty. The following figure from Daniel Liang’s textbook, Introduction to Java Programming and Data Structures, illustrates each iteration of the algorithm when the input array is [2, 9, 5, 4, 8, 1, 6]. In the figure, each line represents an iteration of the algorithm. In each iteration, the elements colored blue on the left are elements of the sorted subarray, while the remaining elements to the right are elements of the unsorted subarray.
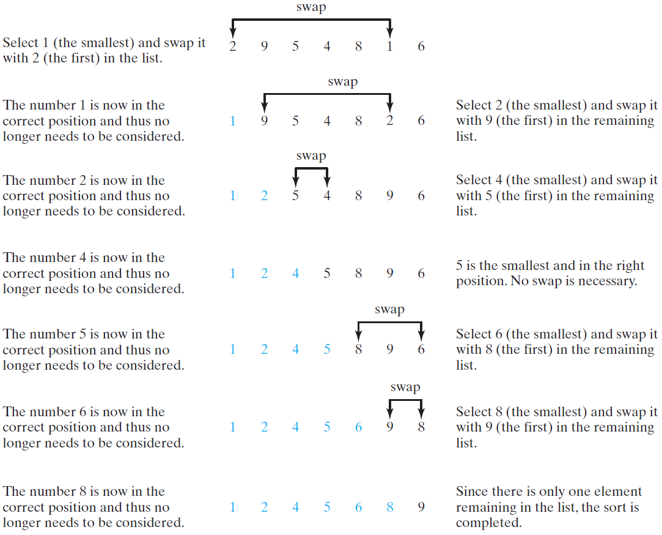
The following code implements Selection Sort.
1
2
3
4
5
6
7
8
9
10
11
12
13
14
15
16
17
18
19
20
21
22
23
24
25
26
27
28
29
30
31
32
33
public static void selectionSort(int[] A) {
/**
* In each iteration, i is the index of the leftmost element
* of the unsorted subarray
*/
for (int i = 0; i < A.length - 1; i++) {
int minIndex = i;
/**
* Find the index of the smallest element of the unsorted subarray
*/
for (int j = i + 1; j < A.length; j++) {
if (A[j] < A[minIndex]) {
minIndex = j;
}
}
/**
* Swap the leftmost element and the smallest element of the
* unsorted subarray
*/
if (minIndex != i) {
swap(A, i, minIndex);
}
}
}
public static void swap(int[] A, int i, int j) {
int temp = A[i];
A[i] = A[j];
A[j] = temp;
}
Insertion Sort
Like Selection Sort, Insertion Sort maintains a sorted subarray on the left which is initially empty and eventually consists of the entire array in the sorted order, and an unsorted subarray on the right which initially consists of the entire input array and eventually becomes empty. However, unlike in Selection Sort, elements of the unsorted subarray may be smaller than elements of the sorted subarray during the execution of Insertion Sort. In every iteration, Insertion Sort inserts the leftmost element of the unsorted subarray into the sorted subarray at the correct position, by comparing it with and shifting elements of the sorted array starting at the back. The following figure from Daniel Liang’s textbook, Introduction to Java Programming and Data Structures, illustrates each iteration of the algorithm when the input array is [2, 9, 5, 4, 8, 1, 6]. In the figure, each line represents an iteration of the algorithm. In each iteration, the elements colored red on the left are elements of the sorted subarray, while the remaining elements to the right are elements of the unsorted subarray.

The following code implements Insertion Sort.
1
2
3
4
5
6
7
8
9
10
11
12
13
14
15
16
17
18
19
20
21
22
23
24
25
26
27
public static void insertionSort(int[] A) {
for (int i = 1; i < A.length; i++) {
/**
* The current element to insert into the sorted subarray
*/
int current = A[i];
int j = i - 1; // Start at the back of the sorted subarray
/**
* Shift elements of the sorted subarray one position to the right
* until an element less than or equal to the current element is found
* or the beginning of the sorted subarray is passed
*/
while (j >= 0 && A[j] > current) {
A[j+1] = A[j];
j--;
}
/**
* Insert the current element at the correct position
*/
A[j+1] = current;
}
}
Selection Sort vs. Insertion Sort
While Selection Sort and Insertion Sort are both very simple and intuitive, Insertion Sort is usually faster than Selection Sort for the following reason. In every pass of Insertion sort, the inner loop can stop as soon as it finds the correct position for the "current" element to insert into the sorted subarray. In contrast, in every pass of Selection Sort, the inner loop must exhaust the entire unsorted subarray to find the minimum. In particular, when the input array is nearly sorted, Insertion Sort is a lot faster than Selection Sort.
Bubble Sort
Bubble Sort iteratively sorts an array by maintaining an unsorted subarray on the left which initially consists of the entire input array and eventually becomes empty, and a sorted subarray on the right which is initially empty and eventually consists of the entire array in the sorted order. During the execution of the algorithm, every element of the unsorted subarray is smaller than or equal to every element of the sorted subarray. In every pass, the algorithm moves the largest element of the unsorted subarray to the correct position by comparing and swapping adjacent elements. The following figure from Daniel Liang’s textbook, Introduction to Java Programming and Data Structures, illustrates every pass of the algorithm when the input array is [2, 9, 5, 4, 8, 1].
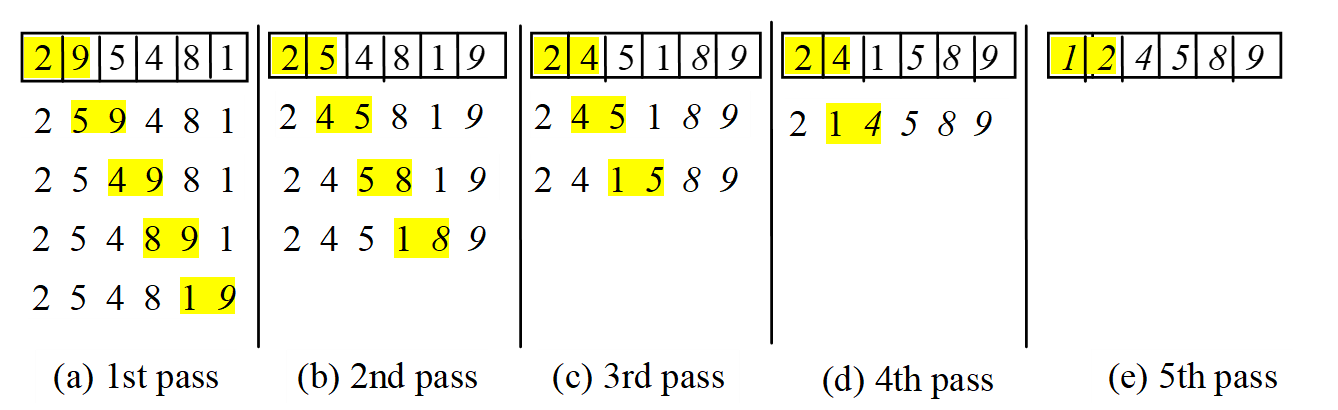
Generalizing the idea in the example above results in an algorithm that sorts an array in exactly n-1 passes, where n is the length of the array. This however could be wasteful because the array may be sorted in much fewer passes. For example, if the input array is [6, 1, 2, 3, 4, 5], then it is easy to check that the array would be sorted in just one pass, therefore the next passes become unnecessary. We can improve the algorithm by stopping its execution just when the array is sorted, using the following idea. In each pass, we have the algorithm check whether a swap occurs between any pair of adjacent elements of the unsorted subarray. If no swap occurs during the entire pass, then the array is already sorted, so the next passes are not needed.
The following code implements Bubble Sort.
1
2
3
4
5
6
7
8
9
10
11
12
13
14
15
16
17
18
19
20
21
22
23
24
25
26
27
28
29
30
public static void bubbleSort(int[] A) {
for (int pass = 1; pass < A.length; pass++) {
boolean noSwap = true;
/*
* i = 0 to A.length - pass are indices of the
* unsorted subarray
*/
for (int i = 0; i < A.length - pass; i++) {
/**
* If an element is larger than the next element, then
* swap them and set the noSwap flag to false
*/
if (A[i] > A[i+1]) {
swap(A, i, i+1);
noSwap = false;
}
}
/**
* If no swap occurs during the entire pass, then the array is
* already sorted, so terminate the execution of the algorithm
*/
if (noSwap) {
break;
}
}
}
8.8.2. Efficient Algorithms
The three sorting algorithms discussed so far, namely Selection Sort, Insertion Sort and Bubble Sort, are all very simple and obviously correct. They work fine when the input array is small (for example when the length of the input array is in the order of 10,000 or less). However, they are very slow when the input array is large. More precisely, they each have time complexity O(n^2). Your will study time complexity of algorithms and the Big O notation in ITEC 3150: Advanced Programming. Roughly speaking, this means that for sorting an array of length n, the number of operations each of the three algorithms uses in the worst case, is proportion to n^2. For example, to sort an array of 10 million elements (i.e. when n = 10,000,000 = 10^7), Selection Sort, Insertion Sort and Bubble Sort each take approximately 10^14 operations in the worst case. A modern commodity PC executes about one billion (10^9) operations per second. Therefore, on such a platform, it takes each of the three naive algorithms about 10^14 / 10^9 = 100,000 seconds, which is about 28 hours, to sort an array of 10 million elements.
In this subsection, we present three efficient sorting algorithms - Heap Sort, Merge Sort and Quick Sort, which are very fast even when the input is large. More precisely, they each have time complexity only O(n log n), where the logarithm is of base 2. Notice that while 10 million may be large, the base-2 logarithm of 10 million is less than 24, which is small! Therefore, to sort an array of 10 million elements, Heap Sort, Merge Sort and Quick Sort each take about only 2.4 * 10^8 operations, as opposed to 10^14 in the case of the three naive algorithms. On a platform that executes one billion operations per second, it takes each of Heap Sort, Merge Sort and Quick Sort only about 0.3 second to sort an array of 10 million elements!
Heap Sort
As we saw from the section on Priority Queues, every priority queue gives rise to a sorting algorithm as follows:
-
Construct a priority queue consisting of all elements of the input array, where the priority is defined by either the natural ordering of the elements, or the ordering imposed by a custom comparator.
-
Remove one element at a time from the priority queue until it is empty.
By the priority queue property, the elements appear in the sorted order as they exit the queue. This algorithm is known as Heap Sort when the priority queue is implemented using a heap, a data structure that you will learn in ITEC 3150: Advanced programming. Indeed, a Java priority queue is heap-based. The following code implements Heap Sort.
1
2
3
4
5
6
7
8
9
10
11
12
13
14
15
16
17
18
public static void heapSort(Integer[] A) {
/**
* Construct a priority queue consisting of all elements of the
* input array. Using this constructor is more efficient than using
* the default constructor to create an empty priority queue and then
* adding each element of the array to the queue.
*/
PriorityQueue<Integer> pq = new PriorityQueue<>(Arrays.asList(A));
/**
* Remove one element at a time from the priority queue and copy it
* to the array until the priority queue is empty.
*/
for (int i = 0; i < A.length; i++) {
A[i] = pq.remove();
}
}
Merge Sort
Merge Sort is an efficient algorithm that sorts an array by recursion, a powerful technique you learned in Chapter 7. In the base case where the array is of length one, the algorithm does nothing, as a singleton is sorted. In general, the algorithm divides the array into two halves - a left half consisting of elements from the start to the middle index of the array and a right half consisting of the remaining elements, then recursively sorts the two halves, and finally merges the two sorted halves into a whole sorted array. This is an instance of a general algorithm design paradigm known as divide-and-conquer. The following figure from Daniel Liang’s textbook, Introduction to Java Programming and Data Structures, illustrates the execution of the algorithm when the input array is [2, 9, 5, 4, 8, 1, 6, 7].
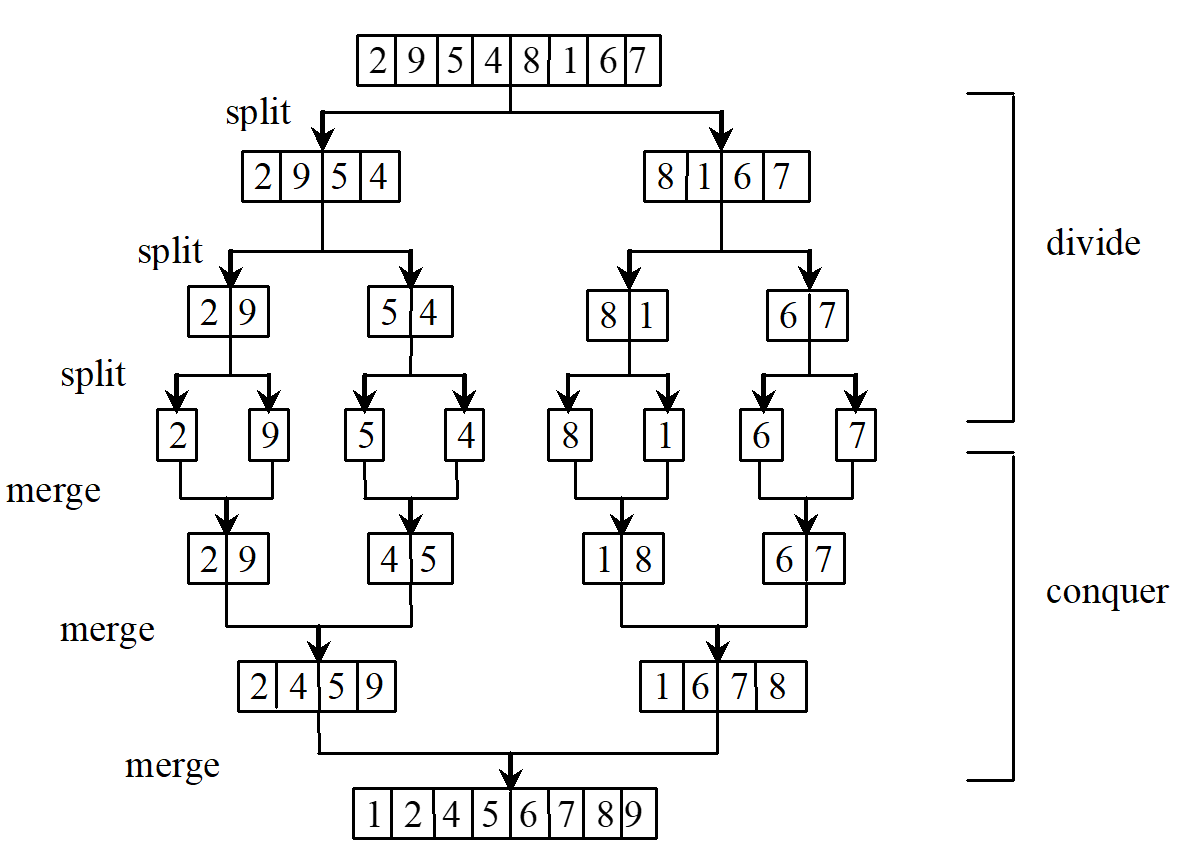
As you can see, the actual sorting happens when subarrays are merged. The following code implements Merge Sort as well as the method for merging two sorted arrays into a single one.
1
2
3
4
5
6
7
8
9
10
11
12
13
14
15
16
17
18
19
20
21
22
23
24
25
26
27
28
29
30
31
32
33
34
35
36
37
38
39
40
41
42
43
44
45
46
47
48
49
50
51
52
53
54
55
56
57
58
59
60
61
62
63
64
65
public static void mergeSort(int[] A) {
/**
* Base Case: If the array is of length 1, then do nothing
*/
if (A.length == 1) {
return;
}
int n = A.length;
int m = n / 2; //Find the middle index of the array
/**
* Divide the array into two halves: left and right
*/
int[] left = new int[m];
int[] right = new int[n-m];
for (int i = 0; i < m; i++) {
left[i] = A[i];
}
for (int i = 0; i < n-m; i++) {
right[i] = A[m+i];
}
/**
* Recursively sort the left and right halves
*/
mergeSort(left);
mergeSort(right);
/**
* Merge the two sorted subarrays into a whole sorted array
*/
merge(left, right, A);
}
/**
* Merges two sorted arrays into a single sorted array
*
* @param left a sorted array
* @param right another sorted array
* @param A the destination to store the merged array
*/
public static void merge(int[] left, int[] right, int[] A) {
int curL = 0;
int curR = 0;
int cur = 0;
while (curL < left.length && curR < right.length) {
if (left[curL] < right[curR]) {
A[cur++] = left[curL++];
}
else {
A[cur++] = right[curR++];
}
}
while (curL < left.length) {
A[cur++] = left[curL++];
}
while (curR < right.length) {
A[cur++] = right[curR++];
}
}
Quick Sort
Quick Sort is another efficient divide-and-conquer sorting algorithm. In the base case where the array is of length zero or one, there is nothing to do. In general, the algorithm picks a pivot element from the array, then partitions the array around pivot into two subarrays - a left subarray where every element is no greater than the pivot, and a right subarray where every element is greater than the pivot. After the partition, the algorithm recursively sorts the left subarray and the right subarray. The pivot element is usually chosen randomly among all array elements. It is clear that partitioning the array around the pivot is the essential part of the algorithm, where sorting actually takes place. An obvious way to implement that is to create two auxiliary arrays for the left and right subarrays respectively. Once the pivot is chosen, one can simply iterate over the array and compare each element with the pivot. If an element is smaller than or equal to the pivot, then copy it to the left subarray; otherwise copy it to the right subarray. It is however wasteful to create the extra space and copy elements back and forth between the original and auxiliary arrays whenever we can avoid it. It turns out that partitioning can be done in place, that is, in the original array itself without any auxiliary data structure, as illustrated in the following figure from Daniel Liang’s textbook, Introduction to Java Programming and Data Structures, for the input array [5, 2, 9, 3, 8, 4, 0, 1, 6, 7].

We now briefly explain the in-place partition algorithm. The illustration above assumes that the first element of the input array is chosen as the pivot. In general, when the pivot is not the first element, one can swap it with the first element and then proceed with the same method. The algorithm maintains two pointers, a low pointer that starts at second index of the input array, and a high pointer that is initially at the far-right end of the array. The algorithm repeatedly advances the low pointer to the right until an element greater than the pivot is found, advances the high pointer to the left until an element smaller than or equal to the pivot is found, and swaps the two elements, until the two pointers cross each other. At this point, all elements to the left of the low pointer are smaller than or equal to the pivot, while all elements to the right of the high pointer are greater than the pivot. The algorithm completes the partition by swapping the pivot which was at the beginning of the input array, with the element at the high pointer which is now to the immediate left of the low pointer. After the swap, all elements to the left of the pivot are smaller than or equal to the pivot, and all elements to the right of the pivot are greater than the pivot. The following code implements Quick Sort as well as the partition method.
1
2
3
4
5
6
7
8
9
10
11
12
13
14
15
16
17
18
19
20
21
22
23
24
25
26
27
28
29
30
31
32
33
34
35
36
37
38
39
40
41
42
43
44
45
46
47
48
49
50
51
52
53
54
55
56
57
58
59
60
61
62
63
64
65
66
67
68
69
70
71
72
73
74
75
76
77
78
79
80
81
82
83
84
85
86
87
88
89
90
91
92
93
94
95
96
97
98
99
100
101
102
103
104
105
106
107
108
109
110
public static void quickSort(int[] A) {
quickSortHelper(A, 0, A.length, new Random());
}
/**
* The recursive helper method for Quick Sort that sorts in place a section of
* an array with a start index (inclusive) and an end index (exclusive)
*
* @param A an array
* @param start the start index of the section to sort
* @param end the end index of the section to sort
* @param rand the Random object for picking a pivot element
*/
public static void quickSortHelper(int[] A, int start, int end, Random rand) {
/**
* Base Case: If the array is of length 0 or 1, then do nothing
*/
int n = end - start;
if (n <= 1) {
return;
}
/**
* Pick a random index between start (inclusive) and end (exclusive),
* choose the element at this index as the pivot element, and
* swap the pivot with the element at start
*/
int pivotIdx = rand.nextInt(n) + start;
swap(A, start, pivotIdx);
/**
* Partition the section of A between start and end
* around the pivot
*/
pivotIdx = partition(A, start, end);
/**
* Recursively sort the left subarray and the right subarray
*/
quickSortHelper(A, start, pivotIdx, rand);
quickSortHelper(A, pivotIdx+1, end, rand);
}
/**
* Partitions the section of an array between a start index and an end index
* around a pivot element which is initially at the start index
*
* @param A an array
* @param start the start index of the section
* @param end the end index of the section
* @return the index of the pivot after the partition
*/
public static int partition(int[] A, int start, int end) {
int pivot = A[start];
int low = start + 1;
int high = end - 1;
/**
* Repeat until the low pointer and high pointer cross each other
*/
while (low <= high) {
/**
* Advance the low pointer to the right until
* an element greater than the pivot is found
*/
while (low <= high && A[low] <= pivot) {
low += 1;
}
/**
* Advance the high pointer to the left until an element
* smaller than or equal to the pivot is found
*/
while (low <= high && A[high] > pivot) {
high -= 1;
}
/**
* Swap the elements at the low and high indices
*/
if (low < high) {
swap(A, low++, high--);
}
}
/**
* Swap the pivot which was at the start index with
* the element at the high index. After the swap the
* partition is complete. The pivot is now at the
* high index. All elements in A[start], ..., A[high-1]
* are smaller than or equal to the pivot. All elements
* in A[high+1], ..., A[end-1] are greater than the pivot.
*/
swap(A, start, high);
/**
* Return the high index which is now the pivot index
*/
return high;
}
A Comparison of Heap Sort, Merge Sort and Quick Sort
Both Heap Sort and Merge Sort have worst-case time complexity O(n log n). However, due to the cost to maintain a heap, Heap Sort is usually slower than Merge Sort.
In the worst case, Quick Sort could have time complexity O(n^2). This happens when bad pivot elements are chosen during the execution of the algorithm that result in unbalanced partitions. An extreme case is where in every recursive call the algorithm picks the smallest or the largest element of a subarray as the pivot, so that all elements of the subarray appear on one side of the pivot after the partition. Such worst-case scenarios are however extremely unlikely if the pivot is chosen randomly as we do in our implementation above. On average and in the overwhelming majority of all cases, Quick Sort has time complexity O(n log n). Moreover, in practice Quick Sort is usually faster than Merge Sort, a primary reason being that Quick Sort is in place. In contrast, Merge Sort needs to allocate auxiliary memory space and copy elements between the input and auxiliary space to merge sorted subarrays. Even on a modern computer, memory operations are still significantly slower than arithmetic operations. When speed is our primary concern, Quick Sort is usually the sorting algorithm of choice.
However, Merge Sort has a nice property known as stability that makes it desirable for sorting complex objects. A sorting algorithm is stable if it respects the order of the elements in the original input; that is, for elements of the same priority, the algorithm preserves their order in the original input. This notion of stability makes no sense for elements of a primitive type. However, it is meaningful when we sort objects of a class. We demonstrate the meaning and usefulness of stability using the example given at this site. Consider the following class that represents students taking a course with several sections.
1
2
3
4
5
class Student {
String lastName;
String firstName;
int section;
}
Suppose that we are given an input array of Student objects that are already sorted by name, as follows:
1
2
3
4
5
6
7
8
9
10
11
John Alisson 2
Nabeel Aronowitz 3
Joe Jones 2
James Ledbetter 2
Ilya Lessing 1
Betty Lipschitz 2
Betty Neubacher 2
John Neubacher 3
Katie Senya 1
Jim Smith 3
Ping Yi 1
Suppose that now we sort the students by section. After sorting the given array using Merge Sort (or any stable sorting algorithm), the array becomes
1
2
3
4
5
6
7
8
9
10
11
Ilya Lessing 1
Katie Senya 1
Ping Yi 1
John Alisson 2
Joe Jones 2
James Ledbetter 2
Betty Lipschitz 2
Betty Neubacher 2
Nabeel Aronowitz 3
John Neubacher 3
Jim Smith 3
Notice that the students are not only sorted by section - students within each section are also sorted by name. This is because prior to the sorting by section, the students were already sorted by name. Because Merge Sort is stable, as it sorts the students by section, it preserves the original order (by name) of the students with the same section number.
In contrast, Quick Sort is instable, because the in-place partition algorithm is not order preserving. The following is one possible outcome when we apply Quick Sort to sort the same input by section:
1
2
3
4
5
6
7
8
9
10
11
Ilya Lessing 1
Ping Yi 1
Katie Senya 1
Betty Lipschitz 2
Betty Neubacher 2
Joe Jones 2
James Ledbetter 2
John Alisson 2
John Neubacher 3
Jim Smith 3
Nabeel Aronowitz 3
Therefore, for sorting complex objects, when stability is required, Merge Sort is usually the preferred algorithm.
Arrays.sort, Collections.sort and Arrays.parallelSort
Sorting is so fundamental that every modern programming language provides efficient generic methods or functions for sorting in their APIs. Java provides two such methods - Arrays.sort for sorting arrays, and Collections.sort for sorting lists. All the details of the two methods can be found here and here. When sorting a list, Collections.sort first copies the list elements to an array, then sorts the array using Arrays.sort, and finally copies the elements from the sorted array back to the list. Below we elaborate on Arrays.sort.
Arrays.sort is defined for arrays of all primitive types with a natural ordering (all numerical types and characters), as well as arrays of objects. For sorting objects, Arrays.sort applies to every class that implements the Comparable interface, and an arbitrary class when supplied with a custom comparator for the class. For example, if A is an array of objects of a class C that implements Comparable, then
Arrays.sort(A)sorts A according to the ordering defined by the compareTo method of Class C.
If A is an array of objects of an arbitrary class and cmp is a custom comparator defined for the class, then
Arrays.sort(A, cmp)sorts A according to the ordering specified by the comparator cmp.
Arrays.sort employs two sorting algorithms - it uses a fast version of Quick Sort known as Dual Pivot Quicksort to sort primitives, and uses a fast variant of Merge Sort known as Timsort to sort objects.
We finally mention that in Java 8 another sorting method, Arrays.parallelSort, was introduced which improves the performance of Arrays.sort by multithreading, a topic you will learn in ITEC 3150: Advanced Programming.
8.9. Exercises
8.9.1. Exercise 1
You are not allowed to use the Collections.reverse method for this exercise.
(a) Write a generic method
public static <E> void reverseArrayListInPlace(ArrayList<E> list)that reverses the order of the elements of a given array list in place, that is, in the original list itself without using any auxiliary data structure. Since the input list is an array list, it is efficient to access its elements by index. For this method, you are allowed to iterate over the input list by index, and use the get and set methods of the list to read and modify the element at any index.
(b) Write a generic method
public static <E> LinkedList<E> reverseLinkedList(LinkedList<E> list)that on input a linked list, returns another linked list that contains the elements of the original list in the reverse order. Since the input list is a linked list, it is inefficient to access its elements by index. For this method, you are not allowed to access the elements of the input list by index. Instead, you must use the iterator of the input list to iterate over the list just once in either direction, and en route add each element to an output list using a proper add method.
(c) Write a generic method
public static <E> void reverseLinkedListInPlace(LinkedList<E> list)that reverses the order of the elements of a given linked list in place. As in Part (b), you are not allowed to access the elements of the input list by index. Instead, you must iterate over the list just once using its list iterator. (Hint: Use two iterators, one starting at the head and the other starting at the tail of the input list.)
8.9.2. Exercise 2
Implement the following generic methods using the list iterator(s) of the input list(s). For each method involving an index, start the iterator at the end of the list that is closer to the index.
(a)
public static <E> void add(List<E> list, int index, E element)This method adds the given element to the given list at the specified index. The method should throw an IndexOutOfBoundException if the specified index is out of range, i.e. if (index < 0 || index > list.size()). You are not allowed to use the add(int index, E e) method of the input list.
(b)
public static <E> E remove(List<E> list, int index)This method removes the element at the specified index from the given list. The method should throw an IndexOutOfBoundException if the specified index is out of range, i.e. if (index < 0 || index >= list.size()). You are not allowed to use the remove(int index) method of the input list.
(c)
public static <E> E get(List<E> list, int index)This method returns the element of the given list at the specified index. The method should throw an IndexOutOfBoundException if the specified index is out of range, i.e. if (index < 0 || index >= list.size()). You are not allowed to use the get(int index) method of the input list.
(d)
public static <E> void set(List<E> list, int index, E element)This method replaces the element of the given list at the specified index with the given element. The method should throw an IndexOutOfBoundException if the specified index is out of range, i.e. if (index < 0 || index >= list.size()). You are not allowed to use the set(int index, E element) method of the input list.
(e)
public static <E> int indexOf(List<E> list, E element)This method returns the index of the first occurrence of the specified element in the given list if the element is in the list, and -1 otherwise. You are not allowed to use the indexOf(Object o) method of the input list.
(f)
public static <E> int lastIndexOf(List<E> list, E element)This method returns the index of the last occurrence of the specified element in the given list if the element is in the list, and -1 otherwise. You are not allowed to use the lastIndexOf(Object o) method of the input list.
(g)
public static <E> boolean remove(List<E> list, E element)This method removes the first occurrence of the specified element from the given list, if the element exists. The method returns true if the specified element is present in the list, and false otherwise. You are not allowed to use the remove(Object o) method of the input list.
(h)
public static <E> boolean equals(List<E> list1, List<E> list2)This method returns true if the two given list contains the same elements in the same order. You are not allowed to use the equals(Object o) method of either input list.
8.9.3. Exercise 3
We mentioned that a stack is a very special list with one end closed. In this exercise you are to implement a stack using a linked list. Create a public generic class MyStack<E>. The class should have a backing linked list as a private instance variable:
private LinkedList<E> backingList;The backing list underlies the stack you are about to implement. You can use either end of the backing list as the top of the stack.
Implement the following methods for the MyStack<E> class, using the proper methods of the backing list:
-
A constructor that takes no parameter and creates a new, empty stack.
-
public void push(E e). This method adds the specified element to the top of the stack.
-
public E pop(E e). This method removes and returns the element at the top of the stack. It throws an EmptyStackException if the stack is empty.
-
public E peek(E e). This method returns the element at the top of the stack without removing it. It throws an EmptyStackException if the stack is empty.
Except when checking for an empty stack, the push, pop and peek methods should only use the addFirst, removeFirst and getFirst methods, or the addLast, removeLast and getLast methods of the backing list, depending on which end of the list you use as the top of the stack.
8.9.4. Exercise 4
We mentioned that a queue is also a very special list where elements are only add at one end and removed at the other end of the list. In this exercise you are to implement a queue using a linked list. Create a public generic class MyQueue<E>. The class should have a backing linked list as a private instance variable:
private LinkedList<E> backingList;The backing list underlies the queue you are about to implement.
Implement the following methods for the MyQueue<E> class, using the proper methods of the backing list:
-
A constructor that takes no parameter and creates a new, empty queue.
-
public void add(E e). This method adds the specified element to the tail of the queue.
-
public E remove(). This method removes and returns the element at the head of the queue. It throws a NoSuchElementException if the queue is empty.
-
public E peekHead(). This method returns the element at the head of the queue without removing it. It throws a NoSuchElementException if the queue is empty.
-
public E peekTail(). This method returns the element at the tail of the queue without removing it. It throws a NoSuchElementException if the queue is empty.
Except when checking for an empty queue, the add, remove, peakHead and peakTail methods should only use the methods for accessing the two ends of the backing list.
8.9.5. Exercise 5
In this exercise, you are to solve variant of the balanced parentheses problem with three different types of parentheses, where '(', ')', '[', ']', '{' and '}' could all be present in the input. Such a sequence of parentheses is balanced if every open parenthesis is closed by a closing parenthesis of the same type and every closing parenthesis closes an opening parenthesis of the same type in the correct order. For example, "{([])}" and "()[]{}" are balanced, whereas "(]" and "[(])" are not balanced.
Using a stack, write a method
public static boolean isBalanced2(String parentheses)that on an input string consisting of '(', ')', '[', ']', '{' and '}', decides whether or not the input is a balanced sequence of parentheses.
8.9.6. Exercise 6
Using a priority queue, write a generic method
public static <E> List<E> kSmallest(List<E> A, int k, Comparator<E> cmp)that on input a list A of objects of the generic class E, an integer k < A.size(), and a comparator cmp on the class E, returns a list consisting of the k smallest elements in the order that is defined by cmp. You are to write the method following the steps below:
-
Create a priority queue for objects of the generic class E, using the given comparator cmp.
-
Add all elements of the input list A to the priority queue.
-
Call a proper method to remove from the priority queue k times. Each time an element is removed from the priority queue, add it to an output list.
-
Return the output list.
8.9.7. Exercise 7
The Point class defined below represents points in a two-dimensional plane.
public class Point {
    private int x;
    private int y;

    public Point(int x, int y) {
        this.x = x;
        this.y = y;
    }

    public int getX() {
        return x;
    }

    public int getY() {
        return y;
    }
}
Here the x and y instance variables represent the x and y-coordinates of a point in the plane.
Write a generic method
public static List<Point> kClosestToOrigin(List<Point> A, int k)that on input a list A of points and an integer k < A.size(), returns a list consisting of the k closest points to the origin (0, 0).
Hint:
-
Define a comparator for the Point class that gives higher priorities to points closer to the origin.
-
Call the method kSmallest from the previous exercise.
8.9.8. Exercise 8
For two numbers x and y, we define their distance to be |x - y|, i.e. the absolute value of the difference between x and y. In this exercise, you are to write two different methods to solve the following problem: Given an array of integers, find the distance between the closest pair of elements, i.e. find the minimum distance among all pairs of elements in the array. For example, if the input array is [8, 12, 19, 3, 15], then your methods should return 3, because the closest pair of elements in the array is [12, 15] and their distance is |12 - 15| = 3.
(a) Write a method
public static long closestPairBruteForce(long[] A)that finds the minimum distance among all pairs of elements in the input array A, by exhaustively searching for the minimum through all pairs of elements using a nested loop.
(b) In this part, you are to write a much more efficient method for solving the same problem than the brute-force method you wrote in Part (a). Write a method
public static long closestPairSort(long[] A)that finds the minimum distance among all pairs of elements in the input array A, by first sorting the input array using Arrays.sort or Arrays.parallelSort, then finding the minimum distance among only the adjacent pairs of elements in the sorted array.
(c) Write a main method to test and compare your code for closestPairBruteForce and closestPairSort, as follows:
-
First generate a small (say of length 10) array of random integers, call both methods on the same input array and be sure that they both give the same correct answer. Repeat this several times.
-
Now try the following input sizes: 1000, 10,000, 100,000 and 1000,000. For each input size, generate an array of that size consisting of random integers, call both methods on the same input array and time your methods. Repeat this several times for each input size. What do you observe? If your implementations are correct, you should observe that closestPairSort is much faster closestPairBruteForce as the input size increases. Can you explain this phenomenon, using time complexity that is briefly discussed in this chapter?
8.9.9. Exercise 9
Implement a generic version of Selection Sort, Insertion Sort, Bubble Sort, Heap Sort, Merge Sort and Quick Sort for sorting an array of objects from a generic class that implements Comparable. The headers of the methods should be as follows:
public static <T extends Comparable<? super T>> void selectionSort(T[] A)public static <T extends Comparable<? super T>> void insertionSort(T[] A)public static <T extends Comparable<? super T>> void bubbleSort(T[] A)public static <T extends Comparable<? super T>> void heapSort(T[] A)public static <T extends Comparable<? super T>> void mergeSort(T[] A)public static <T extends Comparable<? super T>> void quickSort(T[] A)Also write a main method to test the above six methods as follows. Create a small array of strings or objects from any class that implements Comparable. Call each of the six methods above, as well as Arrays.sort or Arrays.parallelSort, to sort the same input array and verify that they all give the correct result.
8.9.10. Exercise 10
(a) Implement a generic version of Selection Sort, Insertion Sort, Bubble Sort, Heap Sort, Merge Sort and Quick Sort for sorting an array of objects from a generic class when supplied with a custom comparator. The headers of the methods should be as follows:
public static <T> void selectSort(T[] A, Comparator<T> cmp)public static <T> void insertionSort(T[] A, Comparator<T> cmp)public static <T> void bubbleSort(T[] A, Comparator<T> cmp)public static <T> void heapSort(T[] A, Comparator<T> cmp)public static <T> void mergeSort(T[] A, Comparator<T> cmp)public static <T> void quickSort(T[] A, Comparator<T> cmp)The parts below are for testing and comparing your methods in Part (a).
(b) Create the following class that represents students taking a course with several sections:
1
2
3
4
5
class Student {
String lastName;
String firstName;
int section;
}
Write a constructor and a toString method for the class.
Define a comparator cmp for the Student class that orders students first by last name in alphabetic order, then by first name in alphabetic order when two students have the same last name.
(c) Write a main method to test your methods from Part (a) as follows.
Create an array consisting of the following Student objects in the given order:
1
2
3
4
5
6
7
8
9
10
11
John Neubacher 3
Ilya Lessing 1
Nabeel Aronowitz 3
Joe Jones 2
Katie Senya 1
John Alisson 2
Betty Neubacher 2
James Ledbetter 2
Betty Lipschitz 2
Ping Yi 1
Jim Smith 3
Call each of the six methods from Part (a), as well as Arrays.sort or Arrays.parallelSort, to sort the array using the comparator cmp from Part (b). All the seven methods should give
1
2
3
4
5
6
7
8
9
10
11
John Alisson 2
Nabeel Aronowitz 3
Joe Jones 2
James Ledbetter 2
Ilya Lessing 1
Betty Lipschitz 2
Betty Neubacher 2
John Neubacher 3
Katie Senya 1
Jim Smith 3
Ping Yi 1
as the outcome.
(d) Define another comparator cmp2 that orders Student objects by section in ascending order. In the main method call each of the six methods from Part (a), as well as Arrays.sort or Arrays.parallelSort, to sort the resulting array from Part (c), this time using cmp2 as the comparator. Compare the results of the seven methods. What do you observe? Which methods are stable?
8.10. Issue Tracker/Comments
9. Glossary
- Behavior
-
actions of an object; represented by the methods of an object.
- Class
-
a blueprint that defines an object.
- Heap memory
-
dynamically allocated memory used to store objects.
- Object
-
represents an entity in the real world and has state and behavior; an instance of a class.
- Object-oriented programming
-
a way of organizing code around objects, instead of actions.
- Reference
-
memory address of where the object is located.
- Reference type
-
a class; variable of this type can reference an object of a class.
- Reference variable
-
variable of a class type, which contains a reference to the object of that class.
- Stack memory
-
stores local variables of primitive type and reference variables; memory is accessed in First In Last Out order.
- State
-
represented by data fields or attributes of the object.
- Association
-
a general binary relation between two separate classes. For example, a student taking a course is an association between the Student class and the Course class.
- Aggregation
-
an association when one object uses another object.
- Composition
-
an association when one object owns other class and other class cannot meaningfully exist. Composition is stronger than aggregation.
- Overriding method
-
When a method in a subclass has the same name, same parameters or signature, and same return types(or sub-type) as a method in its superclass.
- Overloading method
-
a class is allowed to have more than one method having the same name as long as their parameter lists are different.
- Inheritance
-
a mechanism to define new classes from existing classes. In java, classes can inherit the properties and methods of superclass.
- Superclass
-
a general class which a method(s) to a subclass. Or the class being inherited from.
- Subclass
-
The derived class that is derived from superclass.
- Exception
-
An erroneous or anomalous condition that comes up when a program is running.
- Exception Handling
-
An approach that separates a program’s normal code from it’s error-handling code.
- Throw
-
To throw an exception is to create an exception object and pass it off to the run-time environment. This is done explicity in code using the throw keyword.
- Stack Trace
-
A stack trace is sometimes called a stack backtrace or even just a backtrace. The stack traceis a list of stack frames. A stack frame indicates a moment during an application’s execution when a method is called. A stack frame contains information about where the method was called from in the Java source code. So the Java stack trace generated when an exception is called is a list of frames that starts at line in the method the exception occurred and extends back to when the program started.
- File
-
A resource used to store a collection of data on a computer storage device.
- Text File
-
A computer file consisting of human readable Unicode characters. Typically read using a text editor like the one in most IDE’s. Considered human readable.
- Binary File
-
A computer file stored in the native binary code of the computer. Not considered human readable.
- Input
-
Information or data from an external source read into a Java program.
- Output
-
Information or data from a Java program written to an external source.
- Open a File
-
Create a stream of data to or from a computer file.
- File Stream
-
A one way queue of data either to or from a file. The order of data in the queue represents the order of the data in the file.
- Close a File
-
Flush and close a stream of data to or from a file. When writing a file, forces the program to wait until all data in the stream has been written to the file. When reading a file, terminates any further data coming from the file.
- Delimiter
-
Delimiters are whitespace characters used to separate various pieces of data in a text file. Examples are a blank space, tab, or end of line characters which do not show up as print in a text file.
- bounded type
-
A generic type being specified as a subtype of another type
- upper bounded wildcard (<? extends E>)
-
bounds with upper inheritance constraint by using etends keyword.
- lower bound wildcard (<? super E>)
-
bounds is using the wildcard character (?), following by the super keyword by its lower bound.
- unbounded wildcard(<?>)
-
bounds which is specified using <?>. this is called unknown type.
- raw type
-
a name of a generic class or interface without any type arguments.
- type erasure
-
the process of type checking only at compile time and discarding the element type information at runtime.
- recursion
-
computation that invovles a function (or method) calling itself
- base case
-
the simplest case in a recursive solution
- recursive case
-
mirrors the overall solution but with simplified input values
- direct recursion
-
when the same method calls itself
- indirect recursion
-
when more than one method is involved in a recursion
- recursive backtracking
-
when recursion is used to build a set of candidate solutions and a criteria is applied to select the right ones

This work is licensed under a Creative Commons Attribution-NonCommercial 4.0 International License